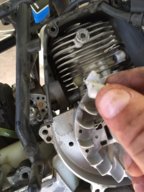
Broke cooling fin where coil bolts on to top of block of 30.5 REV engine

This site may earn a commission from merchant affiliate
links, including eBay, Amazon, and others.

tresnsom

Member
Messages
13
Hey guys, just wondering what best thing to do is on my 2 week old KRSC002 Rev 4bolt 30.5cc

This engine is rated at 4.25 from King motors and I have a pipe( Id like to think I have more than 4.25hp lol). it looks like I need to replace the entire top end unit to fix seeing the entire fin and surrounding support where the coil bolts on where it floats the flywheel( waiting on KM to see if they will replace for free or perhaps even swap out engine for new one seeing I only have 2 gallons and haven't bashed it or even jumped it yet- been real easy on it and is my way of playing, my last 1/5 scale KM lasted me 3 yrs with absolutely nothing that ever broke or had an issues- my 7 yr old loves to watch our dog chase it around baseball fields or golf course type areas)


Im not mechanically inclined when it comes to actually building engines, positioning stuff, timming or real indepth portions of building an engine and it seems like thats what I am looking at having to do,


SO,
do I wait a couple days to see what KM will do?
Do I get a 31.8 or 32cc big bore kit? Long block kit? I like OBM engines and what the feedback is, but I am on a budget here, a serious one where I need to tell my wife I got it for "free". So dropping $400 isnt an option.

OR am I a tard and overthinking how hard it is to replace top end of engine?
 

Attachments

  • bolt.JPG
    bolt.JPG
    60.2 KB · Views: 14
It's not too hard to replace just the head. The engine cover is only held on by a couple bolts, and then either two or four bolts holding the head on. Make sure the gap in the piston ring is opposite the arrow on the top of the piston and then slide the new head on. Swap the carb and you're done. Can I ask how in the world you broke it though??
 
I have no idea, I mean its literally 2 weeks old with just under 2 gallons run thru it. I cant figure it out because never any crashes or anything other than it rolling over when front tires dug in grass when turning.

thanks for the advice,
another question,
should I go ahead and get an upgraded head? Its a 4 bolt already, but didnt know if switching out the head since I need to do that, if I could go ahead and get a 32cc engine conversion kit and add a little power?

http://www.ebay.com/itm/32CC-Engine...207121?hash=item1a0ad9f9d1:g:7qQAAOSwo3pWcODI
 
another thought, would JB Weld 900psi strength putty be strong enough to hold up to the vibrations?
it says its for engines, exhaust and looked like it could work, but, I never have used anything like that on an engine
 
That's an entire engine! Lol the biggest you can go with a standard four bolt is 30.5, that "kit" is an entire G320 minus a few crossover parts like the carb and ignition. I would just track down a new 4-bolt 30.5 head and do a direct replacement. You can try jb weld but just be prepared for it to break again.
 
You can either get a new head and swap it out, or you can spend $10 on some jb weld. After the cure time you can drill and tap jb weld after it cures.
 
I am going to try the weld and goop it up to add strength. I could replace my engine for $150, Dan offered the King Motor 30.5cc 4-Bolt Cylinder Head, Piston Kit and 2mm Stuffed Crank for a discount.
I just get nervous thinking about ME doing any internal work knowing my history of screwing up some of the easiest installs lol. So I could do entire new engine for $150, replace just the head for like $20 or to be safe if replacing the head, to also do the piston/head/crank kit for $50.


All your replys are really appreciated guys, thanks. Are there any upgraded head/piston kits that are economical and would be direct bolt on and add some power/tourque?
 
Have you run this motor with the broken fin and is it over heating? I don't really see how one fin is going to make that much of a difference. If it for some reason does just go with the $20 head. Simple as removing carb and insulator manifold then the 4 head bolts swap plug ignitor and your done. Would take you less then an 30min, you'll gain confidence and stay way under budget. Save your money for a new motor like an ESP.
 
I think hes saying that it broke where the could bolts on.
Have you run this motor with the broken fin and is it over heating? I don't really see how one fin is going to make that much of a difference. If it for some reason does just go with the $20 head. Simple as removing carb and insulator manifold then the 4 head bolts swap plug ignitor and your done. Would take you less then an 30min, you'll gain confidence and stay way under budget. Save your money for a new motor like an ESP.
 
Yeah, it broke where it bolts into the head, so issue wasnt heat. I am going to try the weld I put on there, I have the head and stuffed crank kit coming tomorrow or wednesday.
 
The trick is not to kink the rings, which if I were you would reuse and save the new ones.

Or practice assembly again and again w the bad cylinder head. Nothing is forced when installing the CH to the block, there will be minor resistance but then it dlides easy.

The rings must be aligned w the stops on the piston, squeeze from the back, clamp the CH and slowly work your way w your fingers and the ring to the front. DO NOt jiggle the CH, or correct alignment. If you do the ring may get kinked and possibly scuff the liner.

The CH must go in one shot...
People say to use this oil that, I always use 90w shock oil during assembly around the ring, inside the cylinder head, a silly coat just enough the surfaces slide and don't drag.

Are you planning on swapping piston and ring?

Remember, gasket goes first, and don't destroy pinch it while pushing down the ch to the block. Attempt your swap on a day you are chill and expect to hit a wall and walk away. Its like learning to ride a bime, once you tackle itis cake, is partof the hobby.

On a side note; I am glad you post your experience of what happened from buying a clonr. Mine had 3 bad differentials, carb and PS. He ended sending a bunch of stuff at discount prices.
The trucks clone X2 and 305 are not bad, but it does happen. I was the same way as to why this and that and I took mine apart before running for the first time.
 
I got it on, re used old ring on the piston head. had to walk away a couple times after trying to get the head on. I feel like its lagging RPMs or speed. could be just me, but just doesn't seem as fast as it was you know. you could hear the piston rubbing the head unit when I was just having it go thru the motions using the flywheel to move it up and down. maybe thats normal for a first couple turns?
 
I got it on, re used old ring on the piston head. had to walk away a couple times after trying to get the head on. I feel like its lagging RPMs or speed. could be just me, but just doesn't seem as fast as it was you know. you could hear the piston rubbing the head unit when I was just having it go thru the motions using the flywheel to move it up and down. maybe thats normal for a first couple turns?


Let it cycle like a brand new engine, 25:1, a little rich, regular 2 stroke to make the rings settle quicker. Heat cycle, turn off, don't race it or wot, I guess its too late. Give it about 3 tanks and see. don't drive it for more than 15 min on the first tank or so. Be patient, it may or may not wake up.
My 30.5 took about 4 tanks and then it was pulling mad, shifted to 35:1 synthetic.

Check your spark plug, black-rich, brown - safe zone, gray or white, lean - not good.

You can tell if the ring is correct by looking into the intake port (remove carb and mani) and there will be a notch on the intake hole, the ring gap has to be in that spot. There will be some sound when turning over, should not be that bad to the point it binds or shows significant resistance.

Taking into consideration there is freeplay on drivetrain, no jammed rubbing brakes, clutch is good, and that the flywheel bolts for the ignition are tight w red threadlocker and a paper business thick gap.
Spark plug good gap, fuel mix correct, clean air filter.

Concentrate on a good idle, tune, for the first few tanks. On the meantime look through the intake hole for any scuffing, should be nice shinny w maybe some carbon on the top of the piston.

Good job on the assembly. Its not that difficult, its just one of those things, like installing piston rings, those are hit or miss. Somedays they go in easy, other times I have snapped them.
 
Last edited:
Back
Top
AdBlock Detected

We get it, advertisements are annoying!

Sure, ad-blocking software does a great job at blocking ads, but it also blocks useful features of our website. For the best site experience please disable your AdBlocker.

I've Disabled AdBlock    No Thanks