HPI Baja 5B "TARMAC"

This site may earn a commission from merchant affiliate
links, including eBay, Amazon, and others.
Messages
13
Location
Paris, France
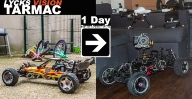
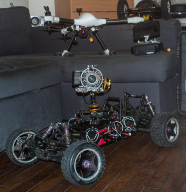
HPI Baja 5B "TARMAC" or DIY Freefly Tero

Hi all, I will present here my "little modified" baja 5B :)
I'm french so excuse my english...

I am director and cameraman, I have a big shoot in two months on open road and race track for a Japanese car customizer. I want to make stabilised close to the ground shots and the simplest solution is to rent or buy a wheel drone freefly tero wich cost 5000 bucks :lol:
Tero-3_1024x1024.jpg


But selling a plate and a vibration isolation system at 4000 bucks is a joke for me, the base is clearly a HPI Baja 5B flux, and it has not escaped to me!

So I decided to build it myself for less than 1000 bucks :)
I bought a used baja 5B with spare parts and some carbon options for 290 dollars. It seemed to be a very good opportunity on the spot:
1.jpg

I want to convert it to brushless, I'll take this 12s esc :
P-FS-HWK120-88da.jpg

he 120a 12s max

I hesitate between two 110 dollars motors :
moteur2.jpg

moteur.jpg


I need to be able to take a load (camera+gyro-stabilized camera gimbal) from 2 to 8 kilos, which one would you take?
Knowing that I want my investment stay "reasonable" what do you think of my combo? Do you have other suggestions?
I know the freefly tero lift 8 kilos with the castle creation combo for Hpi Baja 5B Flux, so normally it should go without problems with an engine less powerful (5,500 watts) but with 4 lipo cells more.

Let's start the work! I have done it all in a day work yesterday.

Apparently the previous owner wanted to "lighten the chassis to make it go faster" so I'll use the other one.
2.jpg

In the future I'll make cut cnc additional parts in carbon plates, but for now I use a cutting board ...
4.jpg

It's amazing what you can do with a cutting board right?
5.jpg

little test to make sure everything is aligned
6.jpg

Preparing the frame and vibration suppression system to be painted
7.jpg

The bottom right triangle of the front axle is a little bit fiddlesticked up...
8.jpg

Metallic paint is done !
9.jpg
10.jpg
11.jpg

I plan to keep the disc brake with using the esc because apparently I have to choose between brakes or reverse ...
[url]http://yannkibongui.com/tarmac/conception/12.jpeg[/url] [/ img]

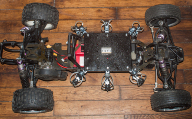
Put it all together!
[ATTACH=full]42176[/ATTACH]

little carbon options are nice
[ATTACH=full]42177[/ATTACH]

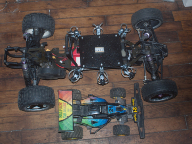
The HPI Baja 5B "Tarmac" next to my first car RC wich is over 20 years old
[ATTACH=full]42178[/ATTACH]

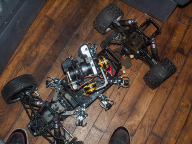
Well, it only remains to put the engine and electronic :
[ATTACH=full]42179[/ATTACH]

[ATTACH=full]42180[/ATTACH]

I want to add position lights, turn lights, and a stop light. I will be driving in FPV so there will be a camera on the front, and a rear view camera, I'll have the two images simultaneously on the video screen on my radio.
I'll put an OSD and a GPS module to have on my screen, the level of lipos, my current speed, distance etc, like on my drone.

Who says FPV says long range remote control, so I leave the original radio for a "Real" radio wich work up to 1.5 km, and it will allow me to make mixes for the throttle esc on the same pod as the mechanical brake and the second pod for reverse, my buttons to manage different lighting and control the camera+gimbal when I operate alone without camera operator.

Because of the camera mounting plate I won't be able to use the original body of 5B. I have to find a body when I'm not shooting but just want to have fun without dismantling the whole system. Which body would you use ?

That's it ! I welcome any feedback or advice!
 

Attachments

  • Tarmac.jpg
    Tarmac.jpg
    207 KB · Views: 6
  • 16.jpg
    16.jpg
    533.3 KB · Views: 6
  • 15.jpg
    15.jpg
    459.2 KB · Views: 6
  • 14.jpg
    14.jpg
    548.2 KB · Views: 6
  • 13.jpg
    13.jpg
    538.7 KB · Views: 6
Last edited:
I have the 730 leopard motor that you show there. I ran 18t pinion and 55 spur with 8s and the tires just spun. On 6s it was more controlable but still stupid power. It's one hell of a motor.
 
Soyez bienvenue monsieur!!
Votre projet est bien interessent, et bonne chance!
Votre anglais est excellent et bien lisible.

Keep the build thread going.
Al.

Merci beaucoup !

I have the 730 leopard motor that you show there. I ran 18t pinion and 55 spur with 8s and the tires just spun. On 6s it was more controlable but still stupid power. It's one hell of a motor.

That is good news :D so my choice is ok, thanks for the info !
 
Finally I'll choose the 540 kv motor wich can handle 20s...
So I'll take an esc capable of handle 20s too :D :D
170 dollars for the beast, made by the same manufacturer than alien esc, I've been looking for some infos, they are used on some boats and users seems to be satisfied.
http://www.aliexpress.com/store/pro...-brushless-motor-rc-Car/513485_767856130.html

There is a 400a version too !
http://www.aliexpress.com/store/pro...brushless-motor-rc-Car/513485_1183145093.html

moteur3.jpg

I will have some big torque so now I have to think about gearing and I plan to buy a wheelie bar.
 
Last edited:
My goal is to reach at least 100km/h or 62.1mph, it is part of my specifications.
After some calculations, this is my theoretical speeds (I do not count the ballooning effect of the tire increases the maximum speed):

17cm x 3.14 = 53.38 cm tread length
the differential ratio = 2.4

15t pinion
57t spur
Lipo 12s
15/57/2.4 = 0.11
540kv 12s = 25,920 rpm
25,920 x 0.11 = 2851
53.38 x 2851 = 152,197 cm/min
152 197 x 60/100 000 = 91.32 km/h or 56.73 mph
20% of friction and other = 73 km/h or 45.35 mph


15t pinion
57t spur
Lipo 20s
15/57/2.4 = 0.11
540kv in 20s = 43,200 rpm
43 200 x 0.11 = 4752
53.38 x 4752 = 253,661 cm/min
152 197 x 60/100 000 = 152.19 km/h or 94.55 mph
20% of friction and other = 121.75 km/h or 75.64 mph


19t pinion
52t spur
Lipo 12s
19/52/2.4 = 0.152
540kv 12s = 25,920 rpm
25,920 x 0.152 = 3939
53.38 x 3939 = 210,308 cm/min
210 308 x 60/100 000 = 126 km/h or 78.28 mph
20% of friction and other = 100.8 km/h or 62.6 mph


19t pinion
52t spur
Lipo 20s
19/52/2.4 = 0.152
540kv in 20s = 43,200 rpm
43 200 x 0.152 = 6566
53.38 x 6566 = 350,514 cm/min
350 514 x 60/100 000 = 210.3 km/h or 130.65 mph
20% of friction and other = 168 km/h 104.37 mph

But I just realize that I can not find a spur gear of less than 55 teeth and its impossible to find a pinion larger than 19t (I can find it for gas version but not for baja flux). So I can not reach my PERFECT transmission set.
My transmission will necessarily have to be manufactured or adapted to achieve the desired objective...

On this video, a baja flux reaches 90.1 mph or 145 km/h equipped withwith just 8s:

When we look at this screenshot, it is clear that the pinion is huge and and the spur gear verry little :
gear.jpg

I do not know how he did to have a custom transmission like that but suddenly, I had an idea to have a crazy top speed.

Adapting a 3-speed box like this one :
gear2.jpg
gear3.jpg

So I will have acceleration, and a high top speed. Normally it should be a real monster !
The bad thing is that I have to machine the shaft of the electric motor to make it exactly like the black bell clutch, to pass the 3 pinions and secure them in place.

What do you think about this solution?
 
Last edited by a moderator:
No no no I'm not obsessed by cutting boards ... But I bought a new one to change my vibration damper system :
conc.jpg


Here is the first one with only six shocks:
conc-1.jpg
conc-2.jpg
conc-3.jpg


And here is the new vibration absorber system with 8 wire rope vibration isolators and above all easily removable with butterflies screws. Because working on the car, I told myself that I will also use it just for fun :)
In any case it supports 8 kilos without problems ! With a ninth wire rope damper in the center I think I can put 10 kilos of payload.
conc-8.jpg
conc-6.jpg
conc-7.jpg
conc-9.jpg


I bought two gopro hd hero (first version) for 30 euros each. Put in 960p (1280x960 in 4/3 ratio) I'll use them to drive the car in FPV.
The first one on the front side will be the main image on the screen, the rear camera will be used as "rear view mirror" and will be displayed in PIP (picture in picture) in the corner of the screen.
This will allow me to evaluate the distance of the person / vehicle behind the car and adjust my speed accordingly. I have maked them up in black to be more discreet.
Here are my rear turn signals (I will take the same for the front) and my rear position/stop light :
conc-10.jpg
conc-11.jpg


And that it, just have to mount the second turn signal :
conc-12.jpg

conc-13.jpg
conc-16.jpg
conc-14.jpg
conc-15.jpg


Otherwise I ordered a conversion kit (without esc and motor) I'll order the motor and esc in the next week, with slick tires, zero deformation foams, width extenders, and an OBR long transmission.
I should be able to drive it soon!
 
Last edited:
Small more steps on the machine, I have tested all the lights and everything seems to be good, the main front light is from a torch with cree xr-e which is quite warm (it melted the hot glue I put to fix it) so, I installed a small fan and all is ok :) I just have tu put a small cover on it and it will be perfect.
light-4.jpg

I love the back of the car ^^ I may have to readjust the position of the turn signals depending on the position of the rear wing.
light-2.jpg

So there are the lights :
light.jpg
light-5.jpg

light-3.jpg
light-6.jpg

Next work is to wire it in a clean way. I have a flasher unit to connect to the circuit of turn signals so they will flash.

For these turn signals I'll have 2 modes:
- Automatic, everything will be wired to the same ground wire, the positive will be on the steering servo arm and will make contact to the left or right and close the circuit of the left and right turn signals.
- A manual on my radio, I put a swith to the left lor right to light the turn signals.

For that I'll use servo switches of this type:
46040(1).jpg

http://www.hobbyking.com/store/__46040__Turnigy_Receiver_Controlled_Switch.html


I also use them for a warning function and to be able to turn on and off the front light. For the "brake" position of my tail light, I'll use the first mechanical method to be used on the servo mechanical brake that I keep.

The brushless conversion kit was posted yesterday, I should get it tomorrow :)
 
Last edited:
So ! I bought for 50 euros a conversion kit :
moteur.jpg

I want to keep the mechanical brake for a little more runtime, to have the motor and esc more cool, and because I think it's cool: D
I plan to install hydraulic disc brakes on the front axle. But this is where things are getting complicated. Conversion kits are not at all intended to keep the original brake system ... But even more strange when I normally mount it, I have a weird space between the motor support plate and the crown.
moteur-2.jpg
moteur-3.jpg

Knowing that the shaft length of my engine is 2cm long, I don't see how it's supposed to be mounted ... But anyway I will not mount the kit as it should be because I want to keep brakes. Unfortunately brakes plate holes are not aligned with motor mount plate :
moteur-4.jpg

I used my drill to widden the hole and it's ok !
moteur-5.jpg

BUT I can not attach the plate to the chassis correctly since it is not in the right place. So I'll use this piece that I disassembled to put the battery box and use it as reinforcement.
moteur-6.jpg
moteur-7.jpg

Everything seems well secured, well if we will see on accelerations!
moteur-8.jpg

Since I will finally use the flux battery box to have more place for my lipos instead of cut the original receiver box, I have no place for the butterflies of the damping system.
So I inserted nut in the frame. The system will be fixed with btr screws
moteur-9.jpg

And voila !
moteur-11.jpg
moteur-10.jpg

Sio I have nothing to support my brake servo: / I have not thought about a solution for the moment, I must find a place to securely attach it to the current system and activates too the hydro piston front brake of the future system.
Finally, aluminum is nice, I think about to add some aluminum parts on the project ... Even if it has nothing to do with the video function of the machine ah ah ah !
Front and rear shocks support tower, for example this would be nice :)

I dream to have this red arrow usa cage, I really love the general line. Maaaaaaaagnifique!
nc251beadlocks.jpg
nc250beadlocks.jpg
superbee-baja-p4.jpg
project-ultra-beetle-baja-p2.jpg

Anyone know how to make a homemade rollcage? It could sell it rollcage: D

Let's go to the next episode!
 
Almost two weeks without posting!
I come back with some new stuff!

I ordered pieces to finish the tarmac and update my flying drone to reach a take off weight of 15 kg:
com-2.jpg
com-5.jpg
com-3.jpg
com-4.jpg

It's Christmas ! For the gearing I opted for the obr 30/44 :
com-6.jpg

The motor shaft is 6mm and sprocket hole is not round so small problem:
com-13.jpg

So I thought to contact a guy to do the missing piece :
piece.jpg

But the flat part was complicated to do in this size so that's the piece made:
entretoise.jpg
entretoise2.jpg

Then finally I asked to add a hole to screw it, so that it holds well on the motor shaft:
piece3.jpg
entretoise3.jpg

I also bought a 24t pinion , 8mm hole if the 30t was too big:
com-14.jpg
I have a 6-8mm spacer and I planned to drill the pinion, the spacer and the shaft to pass a pin to fix everything together.
But the gear diameter is smaller, if I slide the motor so that the pinion touches the spur gear, the motor is blocked by the brake disc ... So I have to remove the mechanical brake tu use this 24t pinion : / For now I keep the option of the pinion 30, I'll see.

Here is the 22s esc, and it is huge:
com-15.jpg
When I see pictures of the baja flux and its mamba xl2 it is impressive how mine is big in comparison. Besides, I have not found a solution to mount it, there is no hole to mount elsewhere.

I also got the HDMI converter to AV for my black magic pocket cinema camera camera to send the video signal to my screen and/or the cameraman one:
com-16.jpg


And finally I bought a quick release 5T hoop with frc windows for when I ride without the camera, just for fun:
com-19.jpg

Let's mount all of this !
 
Last edited:
So I found the right mix on my radio to keep the mechanical brake while being able to keep reverse, it's all good!

It works well , my adaptation of the 40x30 customized transmission is perfect but I got some tires issues :
 
Last edited by a moderator:
Awesome build! Would love to see some vidz produced by this car when you are set up!

tarmfin.jpg
I finally finished the drone. we did not used it on the set as it was planned so that's why I took my time to finish it :)
This is the first test, there is still wires everywhere and to external lipos that will disappear and replaced by a big BEC.
On this quick test the car is powered by 12s batteries, I stay smooth on the throttle ...
Or it makes some burnouts !
I have to increase the diameter of the wire rope on wire rope vibration dampers to use the tarmac with big cameras like sony s700 or red epic but I'm really happy of the result :

[ame]https://vimeo.com/136556787[/ame]

Tests with extreme sports performers and actors are coming soon !
 
Last edited:
Back
Top
AdBlock Detected

We get it, advertisements are annoying!

Sure, ad-blocking software does a great job at blocking ads, but it also blocks useful features of our website. For the best site experience please disable your AdBlocker.

I've Disabled AdBlock    No Thanks