- Messages
- 2,962
- Location
- Long Island, ny
Follow along with the video below to see how to install our site as a web app on your home screen.
Note: This feature may not be available in some browsers.
Reset the carb settings and tryYeah I followed obr’s Video and used a business card. Compression is good. I know I have good fuel pressure. Maybe my 990 carb is too far out of tune?
Thanks guys will try thisCould be. Any time you change something major on the motor, it's a good idea to reset to factory needle settings and start over with your tune.
But of course, bear in mind that you will never get one of those motors to fire on the first pull. It's just the nature of how their fueling system is designed. But you should be getting it to kick over after 3 pulls if you did 2 slow pulls to get the fuel into the engine before yanking.
Yes the bad???Do the bad over air filter trick someone mentioned to act as a choke
Sooooo treat it like an ugly date....I film holding my
Yes the bad???
Sean was saying the bag over the filter trick??
Make sure there are no leaks on your carb/manifold coz will give you a hard time starting ??


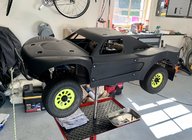
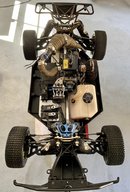
Looks badass manGot my wrap back from the printer today and wrapped the rig. I learned two things
1. I’m not good at wrapping
2. I need to take my time next time.
but I think it looks fiddlesticking radView attachment 53438View attachment 53439View attachment 53440View attachment 53441View attachment 53442View attachment 53443
It’s all about hiding the imperfections for the photos hahayeh its a fine art putting on decals perfectly?...not as easy it looks....
Yeah I used a window tint kit. It had a spray bottle and scraper. The biggest problem I had was that some of the sections were cut along the parts where the curves on the body began so there wasn’t even material to hold the curve. If that makes sense. I’ll post a closer look at my problem areasJust a little trick from a former sign guy here.
When you are applying large decals to a curved body you need 2 things. A spray bottle with soapy water, and a rubber bondo scraper or soft plastic putty knife. You spray the surface of the car with the soapy water and align your decal. Then when you have it where you want it, you press it down and use the scraper to push the soapy water out from under the decal from the center and smooth the surface. You might still get some tiny air bubbles. You can pop these with a razor and smooth them out with the scraper.
I used to install giant die cut decals on full sized cars back in the day. This it the only way to get them perfect that I've found.
@misterleon you're wrap looks great. A few flips and knocks, and she'll look like a proper off-road beasty!
Register and gain access to Discussions, Reviews, Tech Tips, How to Articles, and much more - on the largest Large Scale RC community for RC enthusiasts that covers all aspects of the Large Scale RC!
Register Today It's free! This box will disappear once registered!
We get it, advertisements are annoying!
Sure, ad-blocking software does a great job at blocking ads, but it also blocks useful features of our website. For the best site experience please disable your AdBlocker.