
Are you thinking about getting a Rampage?

This site may earn a commission from merchant affiliate
links, including eBay, Amazon, and others.

kenzx

Active Member
Messages
25
Reaction score
0
Location
Las Vegas
Hello,

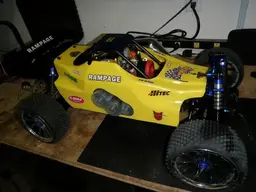
I'm posting this just to share my detail experience with the Redcat Rampage TT that I recently bought so that anyone thinking about getting one will know what to expect.

PART 1. ordering.

First, the RTR version for about $700-$800 was a good deal but it only comes with 23cc motor, I decided to buy the roller version from www.davesmotors.com for $475 using the "squirrel" discount code. DDM also included a Dominator pipe for FREE, saving of $150+. Luckily LargescaleRC was having a sale - GP290 engine for $160 so I got that too. I already have a spektrum DX3S radio so I ordered the Hitec HS805MG for steering for about $50. So far under $700 cool!

PART 2 Assembly

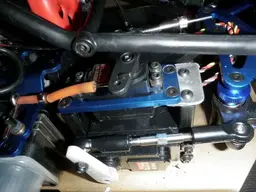
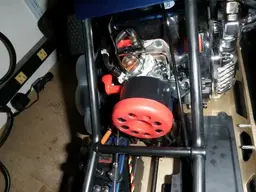
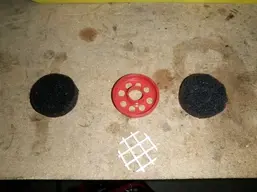
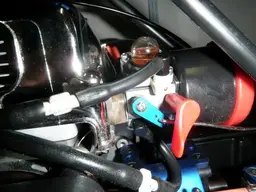
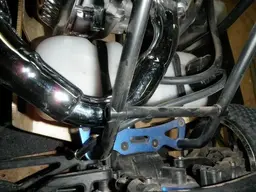
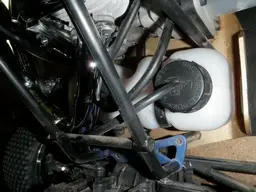
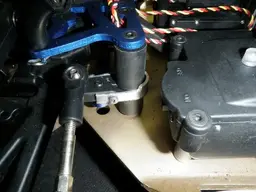
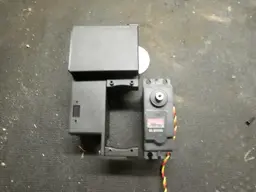
Got all the stuffs in. Most of the car was already assembled so just installing the engine and radio didn't take long. I went over the car to ensure all nuts, bolts, and shocks are tight. Issues 1 - the Hitec steering servo was bigger than stock so I had to move the mounting bracket further apart which made the top throttle servo plate too small. I had to custom make a mounting bracket out of a piece of aluminum (see pic). Also I had to cut the servo mounting post, drill new hole so the steering servo will fit properly. Issue 2 - the engine came with throttle linkage made for cable connection. While you can hook up the the wire rod to the other side of the carburetor or buy the correct linkage type, I decided to drummel an aluminum servo horn to fit instead. Issue 3 - I was a dum-dum and forgot to order an air filter, local stores were out too. Not wanting to wait, I made one out of small spray paint cap (black) and a water bottle cap (red). Using the carburetor gasket, I marked the black cap where the carburetor hole and the mounting bolt will go and drill them out, sanded the holes to ensure no loose craps will get suck into the engine. I got a sheet of filter foam, use the cap for tracing and cut out 2 round pieces, spray the foam with filter oil and insert them into the black cap. Drill several holes in the red cap to allow air in. The red cap fit over the black cap nicely. The white screen is optional but it goes in the black cap before the filter foams. End part 2 - Will post more tomorrow.
 

Attachments

  • P2264183.webp
    P2264183.webp
    28.1 KB · Views: 83
  • P2264184.webp
    P2264184.webp
    31.6 KB · Views: 67
  • P2264187.webp
    P2264187.webp
    33 KB · Views: 76
  • P2264189.webp
    P2264189.webp
    34.2 KB · Views: 57
  • P2264191.webp
    P2264191.webp
    32.1 KB · Views: 62
Hello again

Note: 1. When mounting the Dominator pipe to the chassis, don't tighten the brackets so much that it put stress on the engine block. You don't want to distort the piston chamber. Just add more rubber washers if needed and snug the pipe down just enough.

Note: 2. For Spektrum radio - don't forget to set the fail safe before running the car.

Note: 3. Make sure the fuel lines are hook up correctly. Main in-line at the bottom and return line back to the tank on top.

Part 3 Breaking in.

I went out and got a gallon of 91 Octane gas and mixed it with Lucas semi-synthetic 2 cycle oil 25:1. After priming the fuel and close the choke (vertical) , gave it a couple pulls. Turn the choke back to horizontal and started the engine. For the first 2 min or so I just let it idle. The factory needle setting was fine - low 1 1/4 and high needle at about 1 1/2. After warm up, I ran the car at low speed back and forth on the street about 7-10 min cycle then let it cool, done that 3-4 times. SO far all is well.

Part 4. First day at the track

Started the car with no problem and ran it easy around the track, no more than 1/2 to 3/4 throttle. Only about 3 mins in -engine die. Couldn't restart so I took the plug out and cleaned it up with a soft wire brush. It was still hard to restart but finally got it running again. Back on the track easy for about 10 more min. I took a few easy hops and soon found both rear shock shafts were bent. The 4mm shafts were just too small for 1/5 scale. The engine had a tough time idling and would die if I don't give it some gas. Tried to tune low needle and the idle screw but still no good. The engine die again and this time I just couldn't get it restart even after checking everything. My arm got quite a workout from using the pull start. Any way went home and ordered the replacement 5mm shock shafts. I had to order the shock bottom sleeves too since the new shafts are thicker than the stock one. Not sure if the 5mm shafts will last, I decided to order HPI Baja SS 6mm complete front shocks too for back up (HPI front fits Redcat Rampage rear). Spent another $75 for all the shock stuffs.


Part 5 Engine problem.

I checked everything and even vented the gas cap. After several more tries to start the engine and can't get it going - I took the engine apart. Somehow the connecting rod bearing connected to the crank is out. Way too loose up and down and side to side. Right away I thought it was my fuel mixture so I double check. The fuel was not the problem. Please keep in mind this is not Redcat issue since I am using an after market engine. I sent the engine back to the store. They couldn't see why that would happened so soon, perhaps the bearing was not press in right. Any way they sent me another new engine at no charge.

Note: After venting the fuel cap, I ran the line thru the rear roll cage pin clip (see pic). This way there's little to no leak even when you roll over the car.


Part 6 Break in the engine again.

Got the new replacement engine. This time I'm using all the precautions. I took the plug and carb out and squirted a lot of "3 in 1" oil into the engine. Rotate the engine several times to lube all the components and let the oil soak in over night. Next day - got new fresh fuel. This time decided to mix it with Motul 800 full synthetic 2 cycle oil. Engine started up fine, I didn't have to touch the needle setting. There was a lot of smoke at fist from all the oil in the engine but it quickly went away after few minutes. Followed the same break in process as last time. After the first full tank, I took the plug and exhaust off to check the engine. Piston and everything looks good. I noticed this engine was much easier to start than the last one.


Part 7 let's play at the park.

Things were looking good so took the buggy out to the park to open it up a bit. The engine is still running somewhat rich but since it idles and take off OK, I left the needle setting alone for now. Before the day ends I manage to stripped the transmission gears. The 29CC engine puts out good amount of torque which proof to be too much for the stock plastic gears. Redcat knows that stock gears are not greatest, that's why they include a second set with the kit. After installing the second set, I know this would not last neither. Got on the computer and ordered the steel gears set from DDM. While I'm at it, I also ordered the remote Killer Bee fail safe kit. Spent another $127.

Note: So far I think I spent about $1000. Below is just a list of of what I have spent or planning to.

Redcat Roller $470
engine GP290 $165
throttle lever linkage kit $8
Air filter $25
pre filter $15
Shocks - 5mm shafts (4) kits $60
HPI 6mm front shock $50
remote fail safe engine kill switch $65
fail safe optional light $13
throttle servo hitec 5645 $35
metal gears steering servo Hitec 805MG $60
metal gears transmission set $65
on/off switch with charging cord $10
on piece aluminum engine mount (go on bottom of engine) $10

Wish list:

battery 5000mah 50
pull start cover 25
dual steering kit 30
2nd steering servo 60
lighting kit 100

Will post more later.

Kenzx
 

Attachments

  • P2274194.webp
    P2274194.webp
    36.1 KB · Views: 45
  • P2274192.webp
    P2274192.webp
    30.6 KB · Views: 41
Last edited:
Part 8 gearing

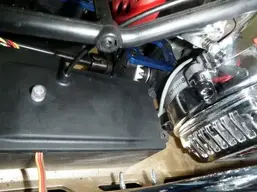
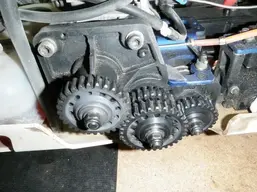
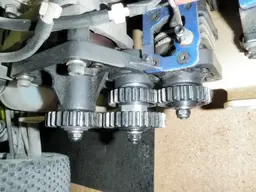
OK, got the metal gearing and fail-safe installed (see pics). I also installed the optional light kit on top of the radio box. I ran it fast and took some jumps around the track, no problem. I did notice that the center pinion gear has some plays - sliding in/out a little bit that can cause the gears not to mesh properly. I rolled the buggy forward and back and it was not as smooth as it should be. A washer was added to help eliminate that issue. Later that day, I went a bit too fast, gone over the track, and broke the steering linkage. I put a band aid on it, looks funny but it works, ok for the time being. Decided to order the dual steering kit ($30) instead of the aluminum part. Since the dual steering kit has spring load servo saver on it. I hope that will prevent another breakage in the future. I'll run it some more and will give it a final review next time.

Kenzx

P2274195.webp

P2274196.webp

P3064238.webp

P3064239.webp.
 
Last edited:
Part 9 hot gears.

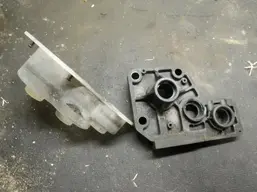
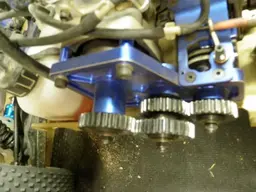
I put the buggy through its paces at a park for about 20 min until I heard a sound of a loose spinning gear. After taking the transmission gear cover off, I saw the lowest gear (one that connects to the break disc) came loose. I tightened it pretty good but I guess I should have use 'lock tight' next time. The metal gears were really HOTTT!!! and I can see that the plastic engine/gears plate has one area melted. I went back online and ordered (from DDM) the upgrade kit. I thought about ordering the aluminum plate but it seems many places are out of stock - many people with same problem may be? Any way I'll use the plate that will come with the upgrade kit for now. If it melts again, then definitely I would have to go with aluminum.
 
Last edited:
Part 9 hot gears.

I put the buggy through its paces at a park for about 20 min until I heard a sound of a loose spinning gear. After taking the transmission gear cover off, I saw the lowest gear (one that connects to the break disc) came loose. I tightened it pretty good but I guess I should have use 'lock tight' next time. The metal gears were really HOTTT!!! and I can see that the plastic engine/gears plate has one area melted. I went back online and ordered (from DDM) the upgrade kit. I thought about ordering the aluminum plate but it seems many places are out of stock - many people with same problem may be? Any way I'll use the plate that will come with the upgrade kit for now. If it melts again, then definitely I would have to go with aluminum.

I run without the gear cover. You can always cut some openings in the gear cover to help keep the gears cooler.

The aluminum plate I have on mine. The bearings are slightly loose, even after red loctiting them to hold them in place. The new plates and parts are supposed to have better bearing fit from what I've read over at RRF.
 
im from rrf and you should just get the aluminum plate use red locktie and they will not come loose anymore i use mine with the cover and metal gears they will get hot and the plastic plate will melt after a while you can also get the new steel pinion gear that holds the brake and the end gear the one that comes with it is aluminum and that will give up in notime you can you to redcat rampage hop ups you will fine it there
 
im from rrf and you should just get the aluminum plate use red locktie and they will not come loose anymore i use mine with the cover and metal gears they will get hot and the plastic plate will melt after a while you can also get the new steel pinion gear that holds the brake and the end gear the one that comes with it is aluminum and that will give up in notime you can you to redcat rampage hop ups you will fine it there

That is the longest run on sentence, I wasn't sure where to stop and catch my breathe! :clown:
 
Thanks guys,

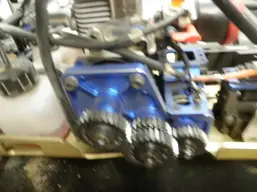
Well, since many places were out of the upgrade kit, I ordered the aluminum plate instead and so glad I did that. Just got them in today and yes the bearings are very tight fit. After hard tapping with a piece of wood 2X2 and carefully not to damage the bearings, I finally got them all in. I used blue locktite on all the screws this time. The gears alignment were off a bit so I added 1 small washer to the center gear shaft.

The dual steering kit (just as expected) is not made to fit Hi Tech 1/5 scale servos but I think I can make it work with some mod.
 
Thanks guys,

Well, since many places were out of the upgrade kit, I ordered the aluminum plate instead and so glad I did that. Just got them in today and yes the bearings are very tight fit. After hard tapping with a piece of wood 2X2 and carefully not to damage the bearings, I finally got them all in. I used blue locktite on all the screws this time. The gears alignment were off a bit so I added 1 small washer to the center gear shaft.

The dual steering kit (just as expected) is not made to fit Hi Tech 1/5 scale servos but I think I can make it work with some mod.

That's good news Kenzx, nothing more annoying than crappy tolerances for bearings. Wanna trade plates? :)

Once you get the dual steering kit done, can you post some pics of the steering?
 
Part 10 - check out my bling (just 1 bling)

I got the new aluminum plate installed and ran it with no problem. The metal gears are still kind of tight but will probably be okay with more run time. Enclosed are some pics, one is the old plate. During the melt down, the center shaft moved a bit causing a gear to touch the gear cover. Any way got some bling on now, no more melting. After a good run with NO the gear cover, I decided to check the temp - tranny gears 110, center gear connecting to drive shaft 130, engine measured just above exhaust port 180.

I didn't have time to try to put in the dual steering kit yet. You can see in the pics, 805MG servo is just a bit too big. But, of course, there's a will = there's a way.

Kenzx
 

Attachments

  • P3184286.webp
    P3184286.webp
    34.7 KB · Views: 36
  • P3184287.webp
    P3184287.webp
    23.5 KB · Views: 34
  • P3184288.webp
    P3184288.webp
    29.1 KB · Views: 37
  • P3184289.webp
    P3184289.webp
    31.5 KB · Views: 31
Back
Top