Jasongtr
Well-Known Member
- Messages
- 88
- Location
- Oxfordshire, UK
Hopefully some would find this useful or inspiring to have a bash at this yourself
Before I start I take no responsibility for anything I’ve written, please do your own research before embarking on this, I am not a professional anodiser and you are dealing with potentially harmful chemicals do take the necessary precautions and use a big dose of common sense.
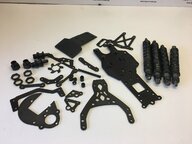
I started to think about doing this as I wanted a mostly black Baja 5b, I prefer to do things myself where possible too.
There are plenty of YouTube guides where they mostly use sulphuric battery acid for the main bath, it is hard to get hold of that now here in the UK, but you can get it off eBay from Germany, however you can anodise without it using a product that lowers PH levels in swimming pools, it’s called Sodium Bisulphate, the one I used was 92%
The other thing you need is Caustic Soda, this is nasty stuff so use carefully, a strong solution is used to strip the old anodising off and it works pretty fast, you will also need a 2% solution making up for a quick pre anodising dip (a few minutes)
The dye I used is a proper anodising dye, about £10 off eBay so I can’t see the point in using liquid clothes dye like some home setups use, I’m going black and that’s apparently the hardest colour to do.
The stages I do it are as follows, some guides I’ve seen use additional steps and whether that’s needed I couldn’t say but this is my way
All done
I bought large plastic storage bins to put the cold solutions in and a couple of metal pots for the dye and boiling/sealing, my car battery charger was too intelligent to work as it expected a battery to be connected before it worked so I bought a 30v 10amp power supply for £50 off eBay
Before I start I take no responsibility for anything I’ve written, please do your own research before embarking on this, I am not a professional anodiser and you are dealing with potentially harmful chemicals do take the necessary precautions and use a big dose of common sense.
I started to think about doing this as I wanted a mostly black Baja 5b, I prefer to do things myself where possible too.
There are plenty of YouTube guides where they mostly use sulphuric battery acid for the main bath, it is hard to get hold of that now here in the UK, but you can get it off eBay from Germany, however you can anodise without it using a product that lowers PH levels in swimming pools, it’s called Sodium Bisulphate, the one I used was 92%
The other thing you need is Caustic Soda, this is nasty stuff so use carefully, a strong solution is used to strip the old anodising off and it works pretty fast, you will also need a 2% solution making up for a quick pre anodising dip (a few minutes)
The dye I used is a proper anodising dye, about £10 off eBay so I can’t see the point in using liquid clothes dye like some home setups use, I’m going black and that’s apparently the hardest colour to do.
The stages I do it are as follows, some guides I’ve seen use additional steps and whether that’s needed I couldn’t say but this is my way
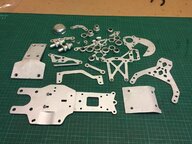
- Caustic soda mix to strip old anodising then rinse with deionised water
- Industrial green degreaser solution with a toothbrush to get the part very clean, I wear nitrile gloves as the oil in your skin will leave marks, again rinse with deionised water
- A few minutes in the 2% caustic soda solution then rinse again
- Into the anodising sodium bisulphate bath, negative wire to the cathodes, I use 3x aluminium plates wired together around the edge and the anode positive wire to the part you want to anodise, this is suspended in the solution with titanium wire, you can use aluminium wire but I prefer titanium, the voltage and current depend on the size of the part, the length of time in this stage depends on how thick an anodised layer you want, google the 720 guide to work that out, rinse when you remove from this stage
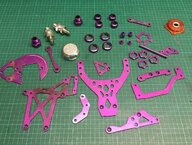
- Next step is into the dye bath, I heat it to just under 60 degrees Celsius and hotter and it will seal before the dye soaked in, leave it for about 20 minutes, rinse
- Boil in deionised water for about 20 minutes to seal it
All done
I bought large plastic storage bins to put the cold solutions in and a couple of metal pots for the dye and boiling/sealing, my car battery charger was too intelligent to work as it expected a battery to be connected before it worked so I bought a 30v 10amp power supply for £50 off eBay


