Rebuilding the King Motor after slamming a wall

This site may earn a commission from merchant affiliate
links, including eBay, Amazon, and others.

Bandit2013

Well-Known Member
Messages
254
Location
North Carolina
After getting the King Motor 305 Deluxe wild orange, I had plans on rebuilding the vehicle from the start. Since I was used to the 2 speed transmissions on my 1/10 scale nitro cars I wanted similar with this one. When I ordered the KM002-305wo, AKA KSRC-002 30.5cc, I had also ordered all of the hop up parts to rebuild it. Had some difficulty getting the 30.5cc engine started so I bought a Rovan 36CC engine to replace it. Figured I would dig into the issue with the 30.5cc engine sooner or later (turn out the ignition coil was too far away from the flywheel so no spart or very weak spark when using the pull start. I did get it started with a cordless drill and socket but that was not ideal.

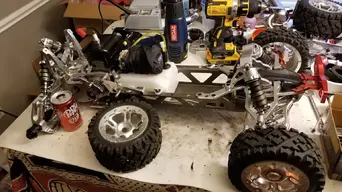
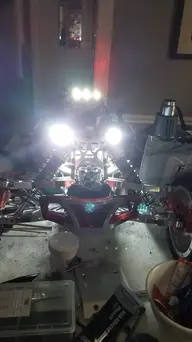
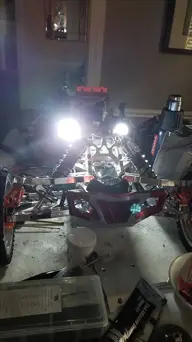
Below is the final assembly with all the aftermarket parts installed. Had this thing dialed in and ready for some yard bashing. Went over to a friend's home for Thanksgiving, he was interested in this hobby, so I took the KM and the Ex Barca with me to run in his back yard. I got a good feel for the yard with the Barca first. Was time to get the KM warmed up and ripping. A few laps to warm everything up and was a bit heavy on the throttle coming out of a wide turn, honestly thought I was going to clear the neighbor's solid wooden fence, nope. First thing I saw was the left front wheel flying up in the air, followed by the KM. Sure, the initial impact was severe enough to rip the front section of the frame off, the entire vehicle when airborne and took a hard hit as it tumbled on the ground several feet away. This is what the vehicle looked like before I left my home.

20211125_111025.jpg

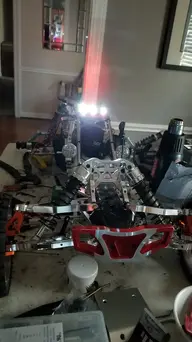
Here is the aftermath of the incident. Sort of glad I brought up two vehicles as the Barca served up the entertainment before dinner.

20211126_232845.jpg

The damage is not as bad as it looks. It is obvious the front chassis needs replacement. At first, the damage looked as if it included more components than anticipated. All I could locate were some extended control arms. Why not? New shocks, sure, get some bigger ones. I had planned on reusing the bulk of parts on the rebuild but after separating the rear from the front end, I noticed the rear wheels were not moving as they should. Turns out that the brake mount dug into the back side of the main gear plate. Removed that and noted the bearing on the inside of the bell housing was toast. It still rotated well but the rubber seal was no more. Using an unvented bell housing assembly has its faults. The clutch was in good shape.

20211213_121721.jpg
20211213_121653.jpg

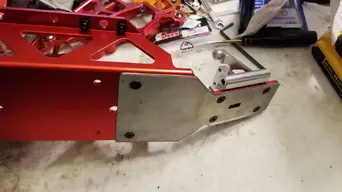
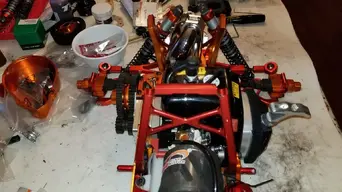
Got the parts in for the front end. I could not find the front upper bulkhead part by itself and bought a new set. The front half of the vehicle is mainly Rovan parts. Opted for the Taylor HD hinge pin brace set to complete the front end. This build will also include the stainless-steel reinforcement plate on the front end in hopes to prevent chassis separation. Perhaps this will keep the kick up area from weakening over time, doubt it will prevent damage on impact at full speed into a tree, wall, post or other immovable object.

20211206_211939.jpg20211206_062116.jpg

I got the hardened frame. I hope this will not make the material more brittle. To my surprise, I did not have to drill out the holes to mount the SS plate. At this time, I did not mount the aluminum skid plate as I need to make a mod to the tab thickness so it will fit. I would not be able to install the plastic skid plate as there would be no tab left to hook in the square hole after modifications.

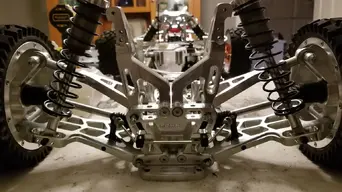
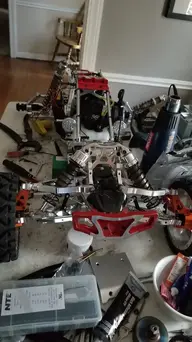
A few more images of rebuild. The parts from the wreck that are still good and parts that cannot be reused. Since I sort of when overboard on the rebuild, when I am done with it, the only parts I will reuse from the wreck is the engine, fuel tank, and servo/receiver assembly. I will build up another vehicle with the leftover parts, just need another frame, fuel tank and a few more minor components. Tearing down the separated portion of the front end was a bit difficult due to some bent parts, damaged screws and such. Shocks were still good, shock tower and shock brace still straight. Control arms and front turn knuckles were good, bearings in good shape too. I may be able to get the threaded bolt of the sheared off ball end out of the steering control arm. The servo saver did its job well. I would assume that the weaker turn buckles also helped to protect the steering servo from damage.

20211205_121501.jpg
20211205_125446.jpg
20211205_145516.jpg
20211205_150546.jpg
20211205_145925.jpg20211206_124403.jpg

Up next will be the new rear end assembly.
 
Now for the back end. Sorry I did not take pictures during the process as that would have provided a better story. Here is the bulk of text and the pictures will follow.

Since I was changing the length of the control arms, I felt compelled to go even further. I could have just reused the parts from the original build but wanted to try some other brand of components. To start off with, I had replaced the gear plate and bell cover assembly on the limited-edition Rovan 360B with a Turtle Racing HD V2 complete clutch system from DDM. Also decided on the Black Magic 18/56 gear set. I was impressed with the response of the gear set more so than the 2 speed King motor assembly. The plan was to get the same for the rebuild. It will be a heavy vehicle, may need a larger engine but for now the 36cc will do fine.

I got the mod bug while shopping for parts. Detroit Performance RC had most of the parts of interest. I still wanted to use the novelty exhaust and roll cage but was unsure if the better alternates would work out. For something different I decided on the RCMAX rear bulkhead components along with the rear bumper brace, shock tower supports, transmission brace and a Diablo shock tower/brace. Taylor left and right engine braces, fuel tank brace, V2 gear box, and already had the rear hinge pin braces. I also got the RCMAX rear hubs but could not use them. Axles fit fine but the hole for the axle pin did not work with the Baja wheel hubs. If I had the larger axle pin, I could have used the 5ive-t wheel hub (Rovan equivalent) as there was no issue with hole alignment. If and when I do an outlaw build, I will make use of that. I also got the Red Arrow front steering knuckles that would not fit with the Rovan extended arm ball end. Bummer. I would assume they are compatible with the Red Arrow extended control arm kit. One other part that did not work out was the aluminum Modified RC spur gear cover. The Turtle Racing gear plate was too thick. I can modify that easy enough but for now the stock plastic spur gear cover fit without any issues.

I was hoping to avoid the issues I had encountered when I rebuild the King motor from the start. There was some difficulty with mating parts to some extent which was corrected with the proper assembly procedure (keep the screws loose during assembly and tighten ones that would be difficult to get to first. Since I am using a novelty exhaust system, fitment with the Rovan rear bumper brace was an issue. Had to grind that down for clearance. The good news about the RCMAX and Taylor parts, no mods needed with one exception, gear box.

The gear box front section when assembled fit the differential perfectly. I first tried the Rovan differential with the cast aluminum housing. The rear half of the gear box did not fit. Had to remove some material from the inside surface of the flange that provided the interference fit with the bearings. Yep, already tried to press the bearings further on the differential. I did have a rebuild set I got from Detroit Performance RC when I ordered the parts but the bearings for the diff were thicker than the one's on the new differential assembly. I doubt I would have any better luck with a different differential brand, when comparing the mating surfaces of the front half of the gear box to the rear half, the inner surface of the flanges did not match. I was able to correct this issue but ran into another problem, I got the diff assembly with the oversized cups, way too big for the extended drive shafts. Found an alternate differential housing but that also had issues but easy to correct. It fit the case but would not rotate due to extruded area where the set screws were located. Sanded the boss down at an angle for clearance and was able to retain the set screws. Now came the next challenge, fitting the Taylor gear box loaded with stuff into the Modified RC rear plate. I got it to fit once but after I took it out to swap out the differential it would not go back in again. Easy fix, slight material removal with a file did the trick. Still tight to get in but got it into place where in needs to be.

The other part that required modification was the Turtle racing bell housing enclosure. I could have opted for the racing version that does not enclose the bell completely. The diameter of the disc brakes interfered with the housing, no clearance. If I had a machine shop at my disposal, this would be an easy task. I had to grind the part down by hand using a cutting wheel on a Dremel tool. I did this before when I installed the same assembly on the other vehicle. I knew what and where to cut. Now the bell housing is vented at the disc brake area.

The rest was just assembly without any mods. The exhaust and roll cage fit without any issue. Rear bumper assembly from the wreck was used. The RCMAX rear bumper brace did not require any changes, plenty of clearance for the exhaust pipe. The Diablo shock tower brace fit like a charm around the roll cage. I was going to use the Rovan brace, but it did not line up with the mounting holes properly. The King Motor shock tower brace required some material removement to fit around the roll cage and the rear bumper brace needed to be ground down where the interference fit to the exhaust pipe occurred. Not so with the RCMAX parts. All went together without a hitch other than what was mentioned earlier.

Now for the pictures:
Partial assembly without engine. Testing for fitment of parts. I did not have the RCMAX Diablo shock tower brace at this point, so the rear shocks were not installed. In case you were wondering what that white matt is, it is from a roll of gasket material used to make ventilation dampers. I have two layers placed on the table separated between a throw blanket. This white stuff is great as it is chemical resistance and difficult to damage. I also used it to line the aluminum battery box to protect the battery from damage. Used for assembly only and not where I would do any grinding, drilling or anything that would result in damage to the table.

20211218_175315.jpg

While waiting for the last few parts to arrive, I installed the outerwears cover on the bottom of the engine. Bummer that the velcro adhesives were poor. Could not get it to stick to the aluminum. Even tried cleaning with acetone, tried heat on the adhesive. nothing. Time to innovate and make use of some high temp RTV sealant to stick the velcro strips to the aluminum. If that did not work, was going to move to plan B and use some aluminum screen material that I have samples of I got from work. the mesh was too fine for use in HVAC applications but will work with this.

20211220_165255.jpg

Another view of the front end. Completed with bumper installed. This was on the original car as an upgrade but did some damage to it after jumping a speed bump in the parking lot at work, car took some major air then landed on the front bumper getting embedded into the pavement. Before taking vacation, I took the bumper to the machine shop and milled off the damage. It probably will not stay that way for long.

20211220_165345.jpg

Bottom rear view of the Modified RC rear chassis plate. The Rovan rear bumper assembly with bashing scars intact.

20211220_165325.jpg

Trying to figure out how to get the outerwears cover to fit the bottom section of the engine. Some of the old parts in view that will be reused in another build. Not shown in the picture was the Taylor cooling clutch plate. I took this picture before installing it. That was much easier to do than expected.

20211213_121646.jpg

I did have an aluminum easy start installed when I wrecked the vehicle. I was surprised how well that kept the grass out of the engine. That kit was meant for a smaller engine that has the extended tabs on the flywheel. The adapter bolt is extended so there is an additional spacer used to offset the starter. Since my plan to reuse the King Motor 30.5cc engine with the salvaged parts, the easy start kit was a perfect unit for that. The Taylor pull start unit was attractive and the small vent holes in the housing was of interest. Also, it did not stick out as far as the Rovan easy pull starter assembly.

20211221_083736.jpg

After the RCMAX rear bumper brace and Taylor Diablo Rear shock tower arrived, I was able to complete the assembly. No mods needed. The red hex spacers are used to compress the roll cage inward for ease of fitment. The Diablo brace clears the roll cage. I did have to look at the Diablo exhaust systems available. Eventually may get something in that line up. For now, the novelty exhaust is fine.

20211220_165310.jpg

I also wanted a different look than the wild orange body. That one was modified to fit the 2 speed transmission. Thought black, red and orange in a different design would be cool. I was never any good at painting bodies, have done many in the past but never worked out as intended. To be honest, I ran the car more without the body installed. The other car I ran with the body on it. It will still collect the grass clippings and other debris regardless of body or not.

20211221_083649.jpg

Bottom of chassis. I hope I do not see this side too many times when bashing unless it is due to taking some air off a hill and not due to a roll over. 20211221_083905.jpg

Time to clean up the mess. I will leave the table cover in place so I can start rebuilding the salvage King motor. I got carried away with something different. Can I make it better? not sure. However, one thing is for certain, it did not lose any weight in the process.

Here is where it all began, right out of the box, all original. Looks like I need to add the weight of the body as it was not on the car when I weighed it. 20lbs 12.6 oz, 30.5cc engine.
20211016_061255.jpg

Converting from plastic to aluminum parts, with body this time. 30.5cc engine. 2 speed trans. Battery box/servo unit was plastic. The weight penalty for modifications was 7 lbs.

20211017_220345.jpg

Different chassis material, stainless-steel front brace, 36cc engine and everything added has made this one a porker. Different exhaust as well. 30lbs 14oz. Add 5 lbs for the wheels and wonder why the car is so slow off the line. I am only doing this for fun, and not serious about racing. Time for a bigger engine?

20211221_125422.jpg
Just for smiles and grins, I got the full weights of both vehicles with wheels. The Blue Rovan limited edition 360B weighs in at 38lbs, 1.6 oz. The rebuilt one on the right with mixed parts was not as heavy but damn close to call it a draw at 38lbs, 1.4 oz. Both have the Rovan aluminum wheels. The rebuilt one would weigh more if I added the rear wing. Tires are different but wheel foams are the same. The new build does sit a little taller than the one with stock arms. If you push down on both, the one with the extended arms is one inch wider. The only actual components that remain from the King Motor 305 would be the gear cover, tires (excluding rims and foams), fuel tank and the King motor prefilter. I do have one more task, adding functional lights. Waiting on the control module (simple type for on/off control only). I do have a Killer RC module but could not invert the rear taillights. Brake light would get bright with throttle applied and dim with brakes applied. I guess I could reprogram the servo since I am using the AFGRC. Not sure if I can set the reversal that way. Much easier just to invert with the transmitter. Have to wait for the rain to stop so I can get a first run on the rebuilt. It is more of a new construction than a rebuilt as things went in a different direction. When the parts arrive for the salvaged parts (chassis and a few minor parts) I will post that here. Having a third Baja adds to the fun. Still plan on getting a Losi or Vekta. Still undecided on that choice. May end up with both eventually.

20211221_142536.jpg
 
Last edited:
First run of the rebuild was good but not awesome. Should have replaced the clutch during the rebuild. When the car starts to run slower and slower and then barely moving is a good sign the clutch surfaces or clutch spring is out. Yep, pads were worn, and spring was elongated. It is the original clutch that came on the engine. Figured it was due.

20211229_000225.jpg

20211229_000235.jpg

Ordered a few more parts to improve performance. New brakes so I do not have to worry about brake failure. Turns out that it was not the aluminum fan that sits between the two rotors was the reason for issue I had with the Rovan. It was the aluminum brake nut. Could be there is some interference with the turtle racing clutch housing as it was a tight fit even after grinding down on the housing to improve clearances. Brake nut basically rounded off closer to the spur gear which allowed the brake rotor to slip off the nut along with the aluminum fan part, that ended up with a bent assembly. Easy fix with new parts.

20211231_124811.jpg
20211231_124932.jpg

This set has not made it onto the project vehicle yet. I did install the other brake set on the aluminum Rovan baja. Had to make some adjust the linkage to get them to work. So far they are doing the job. Now I need to replace the clutch on that car as well.


20211231_125152.jpg

I had an extra clutch, 7000 RPM to try out. That actually worked out great with the 18/56 gear set. Also got my order for Maxima Castor927. It looks like mango pee but does seem to work out well. At least I can see the smoke now. The synthetic 2 stroke oils that I could find locally were formulated for no smoke and probably full of additives. Not much to find locally except for Lucas semisynthetic 2 stroke. Never thought distilled castor bean oil would be something of value. I was able to run a tank of the castor oil. Reminds me of the Nitro fuel smell.

After correcting the spark issue on the King Motor 30.5 engine, I will use it in the restoration of the vehicle. The sticky on the velco did not seem to stick to the aluminum engine case. Some of it was dried out when I installed the outerwears underside cover on the 36cc engine. Found the black RTV sealant works really well and should hold up with the heat. Here is an image of the 30.5 getting its velcro glued on.

20211231_125225.jpg

Most of the salvaged parts are in great shape from the wreck. A few parts for the front end were needed but most of the parts were still good for reuse. I tore down the rear completely and rebuilt it. KM Differential was in great shape, No issues with any of the gears or bearings. Once the RTV sealant cures I can get the outerwears cover installed and engine mounted onto the rear chassis. No rush on this as I am still waiting for some parts. Had to order most of the components from TIT racing which has wearhouses in US/Canada and other parts from China. Instead of the pad printed KM or RFC logos, it has the TIT logo. The front chassis plate was ordered from Rovan. Fuel tank is coming from China from TIT racing. I have no desires to use the aluminum fuel tank. I would consider the welded one found on Detroit Performance RC or DDM but that is expensive. The others that are CNC alloy use rubber gaskets or rubber paste seals which may be ok first off but will probably leak after a while.

20211231_125316.jpg

I did buy the hubs for Rovan LT/ Losi 5iveT as I intended to use them on my Exceed Barca but did not have the 5mm pins. Was not aware there was a difference. As it turns out, the RCMAX rear hubs will not fit with the Baja 5B hub types. Had to order a few drills to open up the pin hole on the axle. Nitride 5mm drill bits should do the trick. May need to do this at work as I do not have a vice at my disposal. Will see how that works out with hand tools first. Baja nuts will not fit the LT/5IVE-t hubs but I have that covered. Baja wheels will fit if you have the correct wheel nuts. Already checked for clearance fit. As it turns out, while running the new build and during the tuning process I slammed the rear of the car into the brick steps. Had a mental block and instead of hitting the brakes I hit the throttle by mistake and when I realized what I did, tried to correct for the mistake and slammed the rear. That busted the upper tie rod end and twisted the control arm. Now I will have an extra one for stupid mistakes as they can only be purchased as a set. Thus, the reason of bringing up the RCMAX rear hubs. I did not use them due to fitment issue with the axle and baja hub assembly. Now that I know the trick, I can make use of them. The parts from the rear will be extras for the other two vehicles that have the multi-part carrier assembly. This hobby is a money pit. Still having fun but want to run more than rebuild. Soon to have three Baja vehicles.
 
While I was posting the last update on the salvage, some of my parts came in. I am surprised they did not ring the doorbell and run like they normally do. Uhm, that is not orange. Perhaps those doing the anodizing for Rovan are color blind. I guess it is sort of on the orange hue but more red than orange. No big deal really as most of the other parts are not orange like the King Motor original aluminum parts. Hint: that automotive "Purple Power" degreaser will remove anodizing from aluminum. I had used it to clean up the parts before reassembly, including the aluminum hear box. Guess it depends on how the part was anodized or if it has a clear coat over it. Another thing about this replacement chassis is it also had the holes pre-drilled for the reinforcement stainless steel plate. Don't mind the mess, I was looking for the engine spacer and pulled all of the parts out to find it. Dumb ass me decided to place it with parts for the other vehicles. As for the unassembled front bulkhead, I have it there to keep the alignment of the steel plate before using loctite on the bolts closer to where the radio and servos mount. Added some lock washers and the red stuff.

20211231_161507.jpg

20211231_161600.jpg


Here is one place to use the loctite red 271, on the screws that secure the front chassis to the rear. Since it a bit thinner with less solids than the blue stuff, I was a bit liberal using it but not by choice. It will keep the two plates together even if the screws come out. Before adding the loctite to any of the bolts, I had pre-assembled it first. Tightened up and verified chassis was straight. Removed one screw at a time, applied loctite and re-inserted the screw. Repeated for the remaining screws except for the 4 in the front bulkhead. Need a few more parts to complete the front end so when they arrive, I will only use the blue 272 stuff.

20211231_161545.jpg

I learned my lesson, for now every Baja build I do will get the reinforcement plate. However, it is a female dog to grind down the square hook on the skid plate. The plastic skid plate cannot be modified unless you cut off the hook. You still have the two front screws securing the front of the bulkhead and the two that secure it to the bumper part. Some may not like the added weight of the stainless-steel plate, it is heavy, but prevents the kick up area from breaking off on impact or due to flex during extended use. The weak point is where the two bulkhead screws mount towards the bend. I am new to the 1/5 scale scene so perhaps others may have similar or different experiences. I am not expecting this to be a light-weight build. I will find out soon enough how well the 30.5cc King motor engine will hold up. The lower casting of the engine has King Motor embossed on it. Not a cut but more of an extruded lettering. Not sure who makes this engine. Zenoah clone of sorts as it has similar clutch parts.

Would I have rebuilt this if it was still stock? Absolutely!
 

Attachments

  • 20211231_161614.jpg
    20211231_161614.jpg
    104.6 KB · Views: 2
The Zenoah G320RC with 34cc stroker mod arrived the other day. This will be the engine I plan to use on the so-called rebuild project. Was considering the Taylor 35 but can wait and see how things progress with that first. I was able to transfer the RCMAX pull start onto the Zenoah. At least I did not need to add spacers as this was required to be used with the Rovan 36cc engine due to difference in flywheel. I was not aware the RCMAX parts would work but they did without any issues. Also got the outerwears on the pull start to keep the dirt out.

20220111_190415.jpg

20220112_064935.jpg

The acetone was used to prep the surfaces after cleaning with other chemicals (throttle body cleaner). It was in the house. Bought from Walmart for cleaning printed circuit boards in my guitar amps (aluminum tube/valve holders on the preamp tubes tend to shed aluminum dust that falls onto the PCB, a Q-tip swab dipped in acetone works. Isopropyl alcohol is mostly watered down and does not dry easily).

Since the rebuild project turned into build two from one deal, my focus has been on the new build more so than the rebuild.
I am considering removing the Rovan parts on the front assembly (bulkhead components) and swap them with the Taylor RC components. Nothing wrong with the Rovan parts as they seem durable enough and will make use of them as spares for the other Rovan vehicle, including the half inch extended arms. I already twisted one in the rear due to my negligence. Have replacement parts for that already.

Any body have experience with Red Arrow? I found the control arms on the Detroit Performance RC shop. They are extended but no mention of how long they are relative to stock length. I did make an inquiry with DPRC but have not gotten a response (it was late so I may have some response later today). Already have the Red Arrow HD steering knuckles and want to make use of them. They did not fit with the Rovan style of control arms as the ball joint assembly was too wide. Red Arrow use the chrome molly ball ends so those would be much stronger and do not have the weak points as you get with the Rovan / King Motor control arm ball joint assembly.

https://www.detroitperformancerc.com/product-page/red-arrow-usa-hd-v2-baja-extended-arm-kit

The control arms I had on the KM when I wrecked it did hold up to the abuse prior to impact with wall. They are still good to reuse with some minor blemishes. The Rovan ball ends can break easily vs the KM one's as they are different designs (reference to the aluminum alloy components, never ran with the plastic parts). One would think the white plastic bearings used in the control arms and with the ball ends would be ok. Not always, they can loosen up the assembly too much.

To complete the rear end assembly, I will be using the Taylor RC rear hub carriers. I did not use them at first after I discovered the Baja axles and hubs did not fit the Taylor hub carriers due to width. I did have a set of Losi hubs that would work but not with the wheels I intend to use. Did find some adapters that will do the job. All I have to do is drill out the 4mm hole for the 5mm pin. Nitride drills already in the house for that task.

Have not made much progress with the King Motor rebuild, still waiting on some parts to arrive. It seems the USPS tracking indicated package arrived in NC but now is in FL. WTF? I live in NC not FL. so why route it there first? That would explain why the tracking stated delays in estimated arrival. Bummer. Oh well, no rush.
 
I did have some fun with the new build project for a short while. While tuning the hi needle screw I slammed the rear end into the brick steps. Did an oops by pulling the throttle back instead of hitting the brakes. Not sure why I had a brain fart for that one moment. I am used to running gas/nitro cars as I have done so since 1986. I guess I wanted to keep going but did manage to turn the wheel to prevent another front end disaster. This time, car slid sideways into the brick steps causing impact on the left rear wheel. That resulted in breakage of the long set screw used for the tie rod end and ball joint. The control arm also twisted, and the rear hub assembly went out of whack. Had to get another set but was able to buy the rear end parts vs the total kit. At least the rear hub part with the bearings and perhaps the shim could be used on the wreck rebuild. The hub carrier is bent to hell. If I end up destroying this one, I will go for the FLM extended control arm kit.

Since I was replacing the one rear lower control arm, I took the liberty to change the rear hub assembly. The parts I was waiting for that are adapters for a Losi to HPI conversion with a 1/2 inch extension came in: DarkSoul axle extenders for Losi 5IVE, purchased from DDM. Also got some 5mm pins and the proper drills to drill out the axles. I needed the parts in order to use the RCMAX rear hub carriers since the offset on the Rovan hex hubs (I would assume HPI would be similar) would not permit the 4mm pin to be inserted. RCMAX hub rear hub carriers are thicker, could be due to the larger bearings. Drilled, installed with pin pressed in (tight fit, probably do not heed the screw in the axle to keep them in but installed it anyways as well as the rubber o-rings.
20220115_204033.jpgHad to use nitride drill to open up the pin hole since it is hardened steel. That drill cut into the steel like butter. The 5mm pin did require pressing into place with a vice used as the press. I did not buy any reems to open up the hole for improved pin clearance. Since the Baja is rear wheel drive, I have a spare hub set if I had to repeat this process again. The threaded shaft is a bit longer than the HPI (including the clones) hub so I will not be able to use closed end wheel nuts.
20220115_222738.jpg
I do have reservations on the alloy ball joint assembly that uses tiny screws and thin materials. They can break on you without notice. Perhaps it is just the Rovan part as I have not been able to break the King motor part. They are different designs. Below is the Rovan front upper ball joint that could not take the abuse. Could have just been a defect from the start or poor design in general. I have not broken any rear ball joints yet even the ones I had on the new build project when I twisted the rear end. The steel screw broke first, and the ball end is just fine. Just wanted to make a point.

20220115_204119.jpg

Now that the rear end is complete/repaired, I can get to the task of Rovan 36cc engine removal and prep for the Zenoah-ESP G340RC stroker.

20220115_222804.jpg

I also decided to replace the fuel tank with a vented version. I can use the take-off for the wreck rebuild project. At least the new tank uses a felt clunk-filter like the one supplied with the Zenoah engine.
20220115_222841.jpg

I will say this now. It was a PITA (pain in the arse) to get the velcro strips on to the Zenoah. Even when using the RTV sealant trick did not make for an easy task. Had to cut the strips into short pieces to attach to the clutch case. Got it done.

20220115_223457.jpg

I did order the correct engine for the Baja. I double checked it to confirm: BB128C. It was not an easy fit. Some may want to say it is a Rovan chassis, no wonder you have issues. Not for this project. Complete rear chassis is made of RCMAX/Taylor and Modified RC parts. The Rovan 36cc engine was an easy fit. The King Motor engine spacer could not be used as it was too tall. Had to improvise and use a steel spacer I grabbed at work thinking it may be useful. It was. The King motor engine spacer measured 9.6mm (0.378"). The alternate spacer I used measured 7.62mm (0.300"). That change in height allowed for proper alignment of the engine to the clutch bell assembly with gear plate attached. I could have ground down the engine spacer, I would have done so if I did not have an alternate. It did take a few love taps with a rod and hammer to get the top rear support seated properly. Did this with the screws loose. Checked for issues with the gears and such, all good. Ready to roll once I break it in.

20220115_234733.jpg

Also decided to take this opportunity to install working lights. I did get a higher capacity battery (Venom 5000mAhr) but it would not fit into the aluminum battery box. If you look at the spec it is actually a 4300mAhr battery. At least it did fit into the Rovan plastic battery box, so it was not a waste of money. Need that for the wreck rebuild.

I hope to have the electrical completed so I can at least get in a few heat cycles on the engine. No point in running today as it is raining.
 

Attachments

  • 20220116_090359.jpg
    20220116_090359.jpg
    201.9 KB · Views: 4
  • 20220115_222819.jpg
    20220115_222819.jpg
    157.1 KB · Views: 4
I got around to installing working lights on the new build. Pictures attached show the sequence. All off, top plate + tail lights, buggy pods, all lights. There is a flashing mode and a seizure mode before you get to all off. I should have no issue seeing this thing when it starts to get dark out at sunset. Will not need to use them in the summer but in late fall, winter, and early spring they will be helpful. Still have one thing to do before I fire up the Zenoah is to address the one tie rod on the rear end. It is too long and needs to be cut to length for better camber adjustments. One of these days I will get the dining room to acceptable order. At the moment I have two projects going so it is a bit of a clutter. Nobody here to complain except for me. Also, when I have company over for our jam sessions, no place to eat dinner. I play guitar, bass and drums but not at the same time. I usually man the drum set and let the other two musicians decide if they want to play guitar or bass. My friends used to call my house the music store, now they refer to it as the garage. It is all good.
 

Attachments

  • 20220117_122349.jpg
    20220117_122349.jpg
    105.7 KB · Views: 4
  • 20220117_122335.jpg
    20220117_122335.jpg
    78.3 KB · Views: 3
  • 20220117_122329.jpg
    20220117_122329.jpg
    85.7 KB · Views: 3
  • 20220117_122324.jpg
    20220117_122324.jpg
    91.9 KB · Views: 2
  • 20220117_122315.jpg
    20220117_122315.jpg
    109.9 KB · Views: 3
  • 20201011_080945.jpg
    20201011_080945.jpg
    201.8 KB · Views: 4
I still have that one.... also getting rebuilt but with same or similar parts. Waiting on the components. I opted for the single parts vs the full kit so it will take longer to get.

The wall was a 2 for one deal.
 

Attachments

  • 20211231_161507.jpg
    20211231_161507.jpg
    178.1 KB · Views: 4
I got to that point of installing the King Motor 30.5cc engine on the wreck rebuild. All was fine at first then noticed I forgot to install the kill switch. Actually, there was no switch on the engine at all, planned on a take-off from the 36cc engine that was on this vehicle. Oops. Also noticed the long layshaft had a bend in it. The rear mounting plate also has a lot of flex to it. Something did not seem right. Need to tear it down and replace the back plate and address the other issues. It was apparent that more damage had occurred to the transfer of energy on impact of the wall. There was some other damage I did not expect, the fan housing was cracked at one of the mounting ears to secure fan plate to engine. This was not apparent until I removed the fan cover to gain access to the kill switch assembly. Since I am waiting on imported parts to arrive, may as well make the wreck a bit stronger than it was before I slammed the wall.

At least I have an extra 2speed set. Wanted to use that on the Rovan but decided to keep it single speed.

As for the rear chassis plate: Checked Rovan website, $52 for the thicker plate, 6mm with some pockets milled out. Nothing special, made from Rovan mystery metal. Detroit Performance RC has the Modified RC upgraded rear chassis plate for $59, 0.25" or 6.35mm with stated aluminum alloy used. Guess which one I decided on. Hint, it was not the Rovan part. Not trying to say one product is better than the other, just one is unclear as to its materials. I do have the Modified RC plate but a different version on the "build my own Baja" that was spawned from this disaster. Not sure I want to pick up the pieces after the rear assembly sh!ts the bed. That may be part of the fun but also takes the fun out of it if it fails in less run time vs build time.
 
Made a decision to pull it apart to replace the layshaft. There was enough wobble on the shaft end to cause gear mesh issues. At least I did not loctite any of the screws holding the rear assembly together since I left everything loose for engine install. This also keeps the parts free to get good alignment of the gear plate and clutch housing.
20220124_063733.jpg20220124_063736.jpg20220124_063750.jpg

As for the gear box, yeah, I did loctite all of the screws. I used blue stuff so it should not be that difficult to take apart. However, the rear chassis plate was secured with the red stuff. That will require heat. Never noticed how flimsy the rear chassis plate was until I proceeded to install the engine. At first, I thought the movement was just the loose rear assembly. It was to some extent but the bow I was seeing was in the plate. Once all of the engine supports are attached the rear chassis does get some reinforcement. I would prefer something a little stronger than the thin metal sheet. Thickness of original rear chassis plate is 3.91mm (0.154 in). New part will be 6.39mm (0.250 in) thick. I plan to use the sacrificial plastic skid plate with this rebuild.

Since the engine fan cover was cracked on the 36cc engine, I can imagine there was some displacement that occurred on impact. I am surprised there was almost a 1/16 in displacement at the end of the shaft. (1.6mm if you only understand metric). Not sure what the displacement tolerance on the gear mesh would be. No need to go that deep. Hopefully the other shaft in the extra 2-speed kit is straight. The bend could have been there from the start but doubt it. That would have been noticed from the start. When I installed the 2 speed, the gear mesh was near perfection. I did not notice any wobble or gear mesh issues.

Sometimes parts will not be as they seem when reusing them from a hard hit. Nothing else appeared to be bent. Shocks on the front end and rear are in good shape. It is what it is.
 
Swapping out the layshaft was not difficult but it was messy. Already cleaned out the gear box some time ago but did not realize the layshaft was bent. The old shaft is easy to tell apart from the new one. I did check the new part for straightness before I took the transmission apart.

20220124_180624.jpg

Since the inner case was flooded with grease, I used a Q-tip cut in half and shoved it into the threaded hole to keep the grease out of it so I can secure the screw onto the pin with loctite. Also replace the C clip with a new one. The old one was the original clip that I bent when removing it the first time. That sucker went flying across the room and almost took out the glass door in the China cabinet. Probably a bad idea using the dining room as a work area.


20220124_181308.jpg

Easy if you have done this before. All buttoned up and ready to install on the new rear chassis plate when it comes in. Now have to heat up the chassis bolts to get them out. Much easier to do when there is nothing in the way.

20220124_182216.jpg

Interesting to note, the differential and drive cups are the originals. I am surprised there is no wear on the edges. The drive axles were worn to the point of replacement. Soon to get this thing completed. Still waiting on parts to arrive. Passed customs and they are in the states.
 
It took about 40 minutes to remove the rear chassis plate. I was liberal with the red loctite during assembly as I did not expect to be removing it anytime soon. After seeing how flexible the rear chassis plate was, did not want to have to replace that after it breaks. Uncertain of its integrity considering how much abuse the vehicle endured prior to the wall incident. Due to the size of the parts and amount of heat sinking the aluminum will provide to the screws, it required considerable amount of heat exposure to soften up the loctite. Had to do this job out in the garage on a small workbench. Also had to wear gloves to prevent getting burned.

After I removed the rear chassis plate, it seems strong enough when trying to bend it by hand. The screws were tight and there was no movement in the rear and front chassis joint, I looked at that before disassembly.

When the new part comes in, I will get some weights to compare stock to the Modified RC. I am just curious to see what the weight difference is.

20220126_070159.jpg
 
Detroit Performance RC parts came in. I have all the parts to complete the rebuild of the wreck except for one component. I bought it from TIT-racing since they sell the individual parts whereas Rovan or KM you need to buy the full set. I did get some other components, but most were in-bound from China and not from the US warehouse. If there were other resources to use, I would use them. I could just remove the Rovan parts I have on the new build and get the RCMAX stuff as I felt that was better quality. I may do that some time down the road. Waiting to break or bend something first.

front brace.JPG

Here is the Modified RC rear chassis plate compared to the thinner King Motor stock part. The Modified RC part is slightly heavier but not much, 1.8 oz difference.

20220128_182049.jpg
20220128_182132.jpg
20220128_182151.jpg

Installed the Modified RC plate. Everything seems to check out. Installed the gearbox and rear bulkhead assembly and was going to get the engine in place but realized there was no kill switch on it. I did pull off the Killer bee switch assembly from the Rovan 36cc engine, just did not install it on the 30.5cc engine yet.

20220129_021448.jpg

Before I even got started with the Modified RC rear chassis plate, I did confirm that the plastic skid plate will fit. The MRC plate may be thicker than the stock part but is milled out in areas that make sense. No mods required to make use of this new part.

20220129_021504.jpg

After a few minutes of searching for the Killer bee switch assembly, I was able to install it onto the engine. I also had a change of mind on the paper filter assembly. It is a female dog to take apart and if I had to replace a filter, I would need to remove the engine to get access to the lower bolts as they fuel lines and rubber plug into the fuel tank gets in the way. The alloy Rovan air filter assembly has an angle so it will not rest on the fuel tank like the paper filter unit does. I removed that from the Rovan 36cc engine as well and thought it will work well with the KM30.5cc engine. The 30.5cc engine does have the King Motor name embossed out on the lower casting. Not sure if this is a CY engine or something else. If it does not work, at least the Rovan 36cc engine does so that will be the fall back in the event I get into a cursing fit trying to get it started. I still question if the carburetor is any good. Will find out soon enough.

20220129_043401.jpg

It does not take very long to build one of these vehicles. A complete build could be done in one day or perhaps a bit longer depending on how much free time you have available. If you have not done this before, it will take some time to figure out how the puzzle pieces go together. It is not very difficult. I am dragging my feet on this since I am still waiting for the final puzzle piece.
 
Made some progress on the wreck.
All of the outerwears installed. I am surprised the standard outerwears for the typical pull start fit the Rovan Easy Start assembly. Good to know as this will keep the sand and dust on the weighted paws from sticking. I could have changed the handle to plastic for lighter weight, the alloy one is on the heavy side. Could potentially become a yard anchor. I had issues with it before, such that the cord was not pulling back in all the way. I did shorten the cord just a bit which sometimes helps.


20220130_094005.jpg
20220130_094135.jpg

Also note: I could not use the aluminum spacer between the bearing and the 2nd gear latch. I decided to omit it this time. Not sure how I managed with that before. Never mind, it is the 7075RC Upgraded brake hex that is resting on the bearing. At least there is clearance from the thick gear plate. The King motor brake hex dug into the other assembly, probably because I pulled the shaft outward using the aluminum gear spacer. Not required since the 2nd gear latch is secured by a set screw and glue (loctite). I did a half assed attempt at milling using a drill press and crapy vice in the Engineering fabrication area at work. If the end mill machines were not tied up in the machine shop, could have done a better job and the cut would have been straight not angled. I decided to open up the clutch housing with some means of venting. The open clutch bell carrier will not work with the thicker gear plate as it was made for the solid one that has all of the bearings. If the brake rotors sh!t the bed on my like they did on the Rovan limited edition I will upgrade to the RCR set up. For now this will have to do. The fan is not the thin aluminum one, it is the one made of carbon fiber (it could be black stained fiberglass for all I know, never can tell what it is you are getting sometimes.)

20220130_094035.jpg

Got the pigtail exhaust installed. Not very fond of it. If it works, that is ok. That is the original exhaust that came on the King Motor to start with but removed it in place of the dual exhaust pipe. Not sure how loud or effective the Thore exhaust pipe will be. The alloy clamp was tricky to get on but is 100% better than the thin sheet metal and cotter pin type. Not sure how long this will last, probably will get broken on the first roll over since it will stick out from the roll cage. 20220130_094108.jpg
20220130_094118.jpg

I was going to replace the fuel tank. Looks like the old one will get reused. While I was waiting for almost a month for the TIT-racing parts to arrive (finally came in yesterday) the so called "HPI, Rovan, ? Fuel tank" would not fit between the front chassis rails. It will drop in but no way will the tank ears mate to the holes on the chassis. Damn thing is too narrow. I had no issue with the Rovan tank fitting the new front chassis. I bought the fuel tank from TIT-racing since no other places had any. Sure enough, Rovan got their shipment in, so I bought a new vented tank for the other project that was shown earlier.

Do not buy the TIT-racing fuel tank, it will not fit. It looks the same but side by side, it does not have the same dimensions. Guess I will take out the fuel lines and remove the gromets and toss the tank in the garbage. I guess I could hold onto it and use it to test engines. At least that would be a purpose other than tossing in the trash. Sure, I can hear the suggestions stirring. Just waiting on someone to say just save yourself the grief and toss the entire car into the trash. I have no experience with Losi, HPI, Vekta, or Primal RC. Eventually a Primal Raminator will find its way to me. I have considered a Losi 5IVE-T or the Kraken Vekta, I am sure they are great RC vehicles. Raminator is just something different in its own way.

20220130_094251_LI.jpg
 

Attachments

  • 20220130_094313.jpg
    20220130_094313.jpg
    164.8 KB · Views: 3
Finished the frontend assembly. Getting closer to look like a Baja.
20220130_142258.jpg
20220130_142305.jpg

Need to add a receiver to the battery box and install it. Throttle linkage and adjust the steering tie rods. I will probably run with the bent wheel (you can almost make it out in on the right side of the front image.) The front control arms came from TIT-Racing. The upper control arm has the screwed in ring for the ball joint, but the lower control arms have a brass pressed in collar. At least the parts are close in color to the King Motor Orange. Most of the other parts are a blend of King Motor and Rovan with the top support brace being an RCMAX part. Was going to use it on the new build project but I did not feel like tearing it down to swap.

Still have to cut the alloy front skid plate prong to compensate for the stainless steel support plate. I have done this a few times already shortly after the wall incident. Not sure that will do much but at least there is some reinforcement. I placed the alloy skid plate in the rectangular opening in the front chassis and scored the prong with a blade so I can see where to cut too.
20220130_142409.jpg

After the battery box and linkages are connected. Force fit the roll cage and finish off the rear with the shock tower brace. Done. Not sure if I want to run a body on it. It is much easier to clean it without one in place. I have found the body and lower parts are a means to collect grass, and whatever else is getting sprayed up in the air from the rear end and some of it from the front tires.
It is all fun. Even when you wreck it but not intentional.
 
Finally got it completed. The KM 30.5 took a few pulls but not many to get it fired up. Was able to get a short run in across the yard. Still needs a little work on the steering. Tie rod decided to separate. Could not get it back together again. Will have to get a stock plastic one as that will hold up better and are much easier to pop together if an end separates from the ball.

From just a short run, the KM 30.5cc is way better than the Rovan 36cc engine. Good throttle response. It was still on the cold side and have not tuned it yet. Also surprised how quiet the KM Thor exhaust is. I will run that for a while and see how it performs. I can now say this is done. End of story.

20220205_172202.jpg20220205_172209.jpg
 
I was able to fix the tie rod. Had to remove the battery/servo box anyway since I needed to index the steering servo arm since I maxed out the trim to get it to run straight. Tie rod has a small screw that secures the plastic ring to the aluminum component. Removed the plastic ring from the ball end and installed it in the alloy part. Found a suitable screw to replace the one that I lost. So far it held up for an hour of fun. Also, second run on the engine. I only did a few minute warm up before hitting the yard with it for its initial operation. There is no point in doing the 5 to 6 heat cycles, as long as the engine is not running lean, should have no issue.

As for the end of the story, slamming into a wall was probably a good thing, not for my bank account, but in terms of the end result. I now have three Bajas instead of the two I started with.


20220206_135707.jpg

I also had the opportunity today to run the Zenoah-ESP G340RC engine for its first time (black baja). Did some tuning to make sure it is not leaning out. Will wait until it gets warmer before I lean out the High needle setting. The Excavator tires on the King Motor dig in much better than the one's on the other two cars. Will have to see how they do with the Zen.

The heaviest of the three is the fastest one yet with a rich break in tune (black one with the Zen). The KM is not far behind but that has a 2 speed trans. The Rovan (blue) is the slowest 1/5 scale I have now. If and when I decide to get a TaylorRC 35cc engine, that will take over for the Zenoah, and the Zenoah will replace the Rovan 36.

As for the engine I had on the wreck, Rovan 36CC High Performance engine (not really) I pulled off the parts to be used as spares for the other one. However, I looked at the spec on the Rovan LE, it is the same engine but with chrome plated covers. If it was the dual Ring it would have the 360DR label. I probably would not buy another Rovan engine. There is a flaw in this engine design, bottom dead center exposes the intake port. I did not see this with the Zenoah Engine or the King Motor 30.5 engine. Perhaps that is one reason for lack of performance. I assume it is not supposed to be like that.

20220206_140029.jpg
 
It is just a personal preference on materials. Alloy or plastic will have their own set of pros and cons.
I was not dissatisfied with the plastic parts I pulled off of the KM. The control arms are decent so I could have used them instead of the alloy parts.
 
Back
Top
AdBlock Detected

We get it, advertisements are annoying!

Sure, ad-blocking software does a great job at blocking ads, but it also blocks useful features of our website. For the best site experience please disable your AdBlocker.

I've Disabled AdBlock    No Thanks