RPM arms & IRP shocks

This site may earn a commission from merchant affiliate
links, including eBay, Amazon, and others.

Speedloader

Well-Known Member
Messages
51
Hello,

Is anyone in here running the RPM arms and Innovative RC big bore shocks?

I cant figure out why there isnt space for the big bore shocks in the front upper arm.
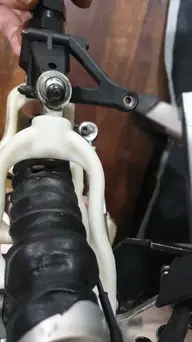
I have attached a picture of the arms with the standard shock and as you can see it isnt in the centre of the front upper arm.
But with the RPM arms, no caster adjustment is possible.received_2230447517213867.jpeg
 
I've had the same issue for years and mine rub.
 

Attachments

  • 1561972011937362582662248961851.jpg
    1561972011937362582662248961851.jpg
    72.1 KB · Views: 30
  • 15619720880073146699237812618328.jpg
    15619720880073146699237812618328.jpg
    111.3 KB · Views: 29
first off you can ditch those socks! The rovan rubber gators for 8mm shock shafts fit with just one thing done to them, the rubber near the lower spring perch needs to be folded outside in to sit on top of perch. top fits perfect on ring grove . Take off lower eyelet spacers and that stupid skid plate. put shock back on arm with the long bolt and center up shock in lower arm and remake spacers for proper offset, Make the spacers OD large enough to act as new skid pucks, as in make them so when installed they are just a bit larger than the end of plastic rod end. the two spacer pucks will act as a skid plate and this setup lets the crap fall through unlike the skid plate they give you in RPM kit..
again I can't stress enough , Get those socks off those. IRCs will oxidize big time under those socks. keep them out in open to air!!!!!!!!! The OD of spacer pucks should be around .675
 
Last edited:
I took a dremel to the head of those screws where the spring on the IRC hits it . I don't have the RPM arms though.
this fix is not for everyone but I blew throught the back wall of those upper arms and machined up tee bushings with the 1/4-28 thread that the steel heim upgrade uses. I locktite studs into joint and then screw them in arms. I leave the hex socket in stud facing out . machine the bushing fit tite with a couple glue rings in it, put a drop or two of glue on and press in tee sleeve . make tee head a thin as you can. If you make the sleeve to long don't worry as you can kiss the back of pivot joint to bring it back around. Ton of room now for those big springs as there is no more screw head but a almost flush tee sleeve. By adjusting the stud from back and snugging up joint from front you can get them to clock in right with different shim stacks for camber adjustment . P.S use purple locktite on stud so you can tweek it down the road and only use it on stud in joint and not on your new sleeve as it could spin in arm when adjusting.
 
Last edited:
Back
Top
AdBlock Detected

We get it, advertisements are annoying!

Sure, ad-blocking software does a great job at blocking ads, but it also blocks useful features of our website. For the best site experience please disable your AdBlocker.

I've Disabled AdBlock    No Thanks