5T/LT franken-build Help me out please...

This site may earn a commission from merchant affiliate
links, including eBay, Amazon, and others.
For cold start I've been getting a small burp with choke on and 1-2 pulls. Then choke off and its no more than 3 to fire. After that even after cool down no choke needed with 1 to 4 pulls No flooding issues yet. I do not ever trim up throttle for start to avoid any flooding issues. I keep it set at idle and hade no problems so far.
Thanks. And did it take more pulls with the choke on the very first time you started it? (Because the crankcase has no fuel in it?) Really want to avoid flooding this thing but at the same time don't want to be pulling on the start cord 100 times. 🤣
 
So, It may have on the very first start up last week cant recall. If you don't have success after no more than 4 pulls with choke on to get a burp. I would pull the plug and check for excess fuel. Considering I'm at altitude (which at times can be an issue on new motors), I've had zero issues with start up so far.
Have you actually tried starting it yet? Or???
No, I haven't even tried starting it yet. The weather here isn't cooperating. I'm just gathering data for when the time comes. Thanks for your insights.
 
No, I haven't even tried starting it yet. The weather here isn't cooperating. I'm just gathering data for when the time comes. Thanks for your insights.
I think you will be fine. As mentioned no issues....
 
I would think you just have to pay attention to what version clone is it. I have a rovan slt360. Its the buggy version. It is a v1 clone of the 5t/5b. The clutch carrier and fan shroud are for a v1 5t. I'm running a 34esp. I use the Vertigo vented clutch bell, vertigo pinion gears and fs clutch.
I cleaned out the grease in the diffs and switched to oil. It seemed to make the diffs a little smoother.

Flh003,​

Couple questions, what brand Tie Rods do you have installed? can you send a link to where you ordered them? Thanks!48.webp
 
2 stroke tuning (plug tuning) Let me explain...
So, I just want to share a few thoughts I've learned over the last 40yrs of racing full size 2 stroke shifter karts, dirt bikes, 125cc Honda road race GP bikes, and on road 1/5 scale gas rc while tuning 2 stoke gas for my sons and I. Not saying that I am an expert by any means however, we were very successful in most of the mentioned classes. I learned very quickly, especially in 2 stroke Kart racing that "plug tuning" really gives you a sense of engine limits and more importantly the "sweet spot" based on plug burn and color.
Plug tuning: Obviously we like to run our initial brake in with these small bore 2 strokes a bit on the rich side. However once you decide to really dive into getting the most out of your engine you really need to check the plug immediately after every hot lap or full out run. What we have always looked for is a very uniform "golden brown" burn on the ceramic insulator of the plug. With larger bore 2 strokes we have much more control of jetting options to achieve the perfect burn based on fuel, and air temps. Colder days are what we call "Fat Air". This means we need to add more fuel to the additional oxygen levels to achieve the perfect mixture/burn which is done through jetting options. With these smaller bore engines/carbs we typically have to achieve the perfect burn with the two needle jet tuning screws. Hi end and low end screws. Plug tuning is based around the hi end needle when running flat out at top RPM.
So, after a long top end run, kill the engine and pull the plug. Check the burn color. If dark and oily, you are on the rich side and loosing top end (however not a threat of damage) . If on the white side with some dark spots you are on the limit of detonation (not good). The sweet spot should be a uniform golden brown burn on the ceramic. This is optimal burn and will yield the best results for performance and longevity of your engine with regular maintenance. Always toss in a new plug to confirm your settings at top end run.
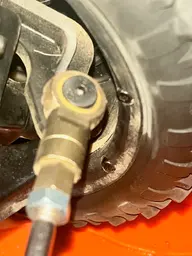
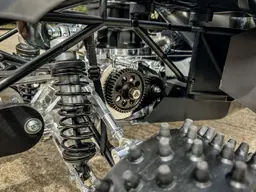
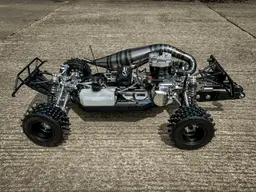
-The below pic of my Taylor 35cc reed engine shows some golden brown however also some darker areas meaning still a bit rich on the top end. My break in fuel started with Klotz 32:1 with 91 octane pump gas for 1 full tank then once the 2nd tank was half full I added 40:1 Amsoil Dom with 91 oct. I will eventually switch to at least a 93 or higher at some point with a 50:1 ratio of Ams Dom. Once fully broken in, I will be looking for a more uniform golden brown burn all around the ceramic insulator. That's the sweet and spot. Changing to new plugs to establish a clean slate is advised while working out your tune/plug burn.

47.webp
 
Last edited:
They are Fonzie HD Godzilla links from Detroit Performance. They fit fine on the Rovan buggy because im using 1/2 in hub extenders.
On the 5t I had to take a dremil with a sanding wheel and shave off a bit of the front inner beadlock ring to clear the heim joint on the steering ling. I didnt want to run the hub extensions on the 5t body, the Rovan being a buggy body doest really make a difference.
 

Attachments

  • 20250726_122620.webp
    20250726_122620.webp
    164.3 KB · Views: 4
They are Fonzie HD Godzilla links from Detroit Performance. They fit fine on the Rovan buggy because im using 1/2 in hub extenders.
On the 5t I had to take a dremil with a sanding wheel and shave off a bit of the front inner beadlock ring to clear the heim joint on the steering ling. I didnt want to run the hub extensions on the 5t body, the Rovan being a buggy body doest really make a difference.

1773200456001.webp
Ok Thanks, I was just looking at the clearance between my Heim joints to the inner rim edge and there seems to be about 5-6mm of clearance. Those must be huge! I have larger than stock and still have room between the rim. So you were able to sand that little bit of the bead lock ring without getting into the screws?
Just checked them out. Pricey lil bastards....:LOL:

Also, is the Rovan buggy you have still available? Is yours a DBXL clone? I was considering getting one but the one I looked at is a completely different setup.
I think I found it. OUT OF STOCK...
 

Attachments

  • 49.webp
    49.webp
    77.9 KB · Views: 2
Last edited:
I took off the molded edge on the beadlock ring and there is just enough clearance it doesn't rub.
The buggy is the SLT360 Rovan on fearless website. Its more of a 5b clone. With a really ugly body .lol
 

Attachments

  • 20260225_175520.webp
    20260225_175520.webp
    138.9 KB · Views: 2
  • IMG_0986.webp
    IMG_0986.webp
    112.6 KB · Views: 2
I took off the molded edge on the beadlock ring and there is just enough clearance it doesn't rub.
The buggy is the SLT360 Rovan on fearless website. Its more of a 5b clone. With a really ugly body .lol

Haha yea the body is a bit ug.. but the chassis looks great! It needs a scaled up Tekno, Kyosho, or Losi body to give it the look we are all used to.
Part of the prob it trying to hide the motor head I'm sure.
 
Haha yea the body is a bit ug.. but the chassis looks great! It needs a scaled up Tekno, Kyosho, or Losi body to give it the look we are all used to.
Part of the prob it trying to hide the motor head I'm sure.
I skuffed the body and gave it a quick coat of paint, changed the tires to 5t size and added aluminum beadlocks to make it look a little different.
 

Attachments

  • 20250719_172446.webp
    20250719_172446.webp
    137.1 KB · Views: 6
Is it just me or???? Just when you thought you were the cool guy...I mean this pup is Nasty. Who else would want this to bash around in the the dirt and dunes?
88cc Diablo Outlaw from Taylor. Just a small ask of $7,699.00 pony up boys...
52.webp
 

Attachments

  • 53.webp
    53.webp
    220.8 KB · Views: 6
  • 54.webp
    54.webp
    168.7 KB · Views: 6
  • 55.webp
    55.webp
    391.4 KB · Views: 6
  • 55.webp
    55.webp
    331.3 KB · Views: 6
Last edited:
Vinyl wraps for the 3DN body's...

Does anyone have a very positive experience with a custom vinyl wrap company?
To be clear, I want a wrap/decal kit that will actually bond well to the 3DM flex body. I have watched all of Jerad from DS's videos on prep and I'm aware of the surface issues with wraps and decals on a micro pores surface . I have a vinyl cutter and have been doing single color cut logos and graphics for quite some time however I want to source out a custom decal/wrap kit with a solid company that uses the correct adhesive backed material to actually bond to the correctly prepped surface of the 3DN body.

Dark Side has some great looking kits that can be customized to some extent. They seem to be busy currently however I'm waiting on a reply.

I ordered a nice looking 3DN cut Red Bull Kit on ebay and the adhesive quality is horrible to say the least for this surface. Even with multiple surface prep attempts with the correct industry products.
Just looking for a supplier that has it figured out. Any help would be much appreciated!!!

The below pics are from the supplier I purchased my kit from on ebay. Not mentioning the seller publicly...
 

Attachments

  • 58.webp
    58.webp
    113.1 KB · Views: 4
  • 59.webp
    59.webp
    180.2 KB · Views: 4
Vinyl wraps for the 3DN body's...

Does anyone have a very positive experience with a custom vinyl wrap company?
To be clear, I want a wrap/decal kit that will actually bond well to the 3DM flex body. I have watched all of Jerad from DS's videos on prep and I'm aware of the surface issues with wraps and decals on a micro pores surface . I have a vinyl cutter and have been doing single color cut logos and graphics for quite some time however I want to source out a custom decal/wrap kit with a solid company that uses the correct adhesive backed material to actually bond to the correctly prepped surface of the 3DN body.

Dark Side has some great looking kits that can be customized to some extent. They seem to be busy currently however I'm waiting on a reply.

I ordered a nice looking 3DN cut Red Bull Kit on ebay and the adhesive quality is horrible to say the least for this surface. Even with multiple surface prep attempts with the correct industry products.
Just looking for a supplier that has it figured out. Any help would be much appreciated!!!

The below pics are from the supplier I purchased my kit from on ebay. Not mentioning the seller publicly...
I have 2 wraps from Darksidestudioarts.com and personally know another that has one as well. Fit and finish is great so is the adhesive for a 30dn body, the only problem i had is with the installer, that be me..lol. i did mostly dry application, only couple pieces i did wet apply. I even had a can of 3m primer 94 on standby but i didn't use it. I emailed him a few times and he always replied back relatively quick. I did ask him about a Redbull or Monster theme but he doesn't print anything like that.
 
I have 2 wraps from Darksidestudioarts.com and personally know another that has one as well. Fit and finish is great so is the adhesive for a 30dn body, the only problem i had is with the installer, that be me..lol. i did mostly dry application, only couple pieces i did wet apply. I even had a can of 3m primer 94 on standby but i didn't use it. I emailed him a few times and he always replied back relatively quick. I did ask him about a Redbull or Monster theme but he doesn't print anything like that.
Thanks for that info. I did reach out to Jared at DS and he got back to me right away. I plan on placing an order with him in the next few days. He definitely has the best cut templates for the 3dn bodies, making the install much more straight forward imo.
 
man truck absolutely rips!!!! currently in the process with my Rovan LT360 as well...bringing it up to snuff of the 5t 2.0!
 
man truck absolutely rips!!!! currently in the process with my Rovan LT360 as well...bringing it up to snuff of the 5t 2.0!
So I’ve learned a lot on here and it’s been a great resource. If you are truly wanting to bring it up to a 2.0, the one thing you will not be able to do with the stock v1 chassis (which you and I have) is you cannot use a 2.0 center diff housing. Just make sure you use v1 parts for the center diff housing. The motor placement is the same location but the 2.0 center diff shifts closer to the engine (meaning different hole locations in the chassis) and the Spur gear is towards the front of the diff mount.
Also, Flh003 previously mentioned: "Just a heads up if you don't know already".when you switch your center diff mount look at your brake cams. Rovan uses a diffrent style that will not work with 5t center diff mounts. When i put the MOD center diff in my Rovan i had to get the Losi 5t brake cam hardware kit.
He was 100% correct. The Rovan brake cams will not work on any of the aftermarket 5T or Losi 5T Center diff mounts. You will need to order Losi brake cams. The Rovan cams are a two piece system and will definitely not work with any other center diff mount.
 
Last edited:
Does anyone have a good bench top work stand for the 1/5th scale trucks. I'm not looking for the floor mount tripod with tray type. just a good work stand that can swivel and be locked at any location. I've been looking quite a bit and not really seeing anything that fits what I want. I guess I would want a traditional stand like most 10th and 8th scale stands only a bit beefier...Suggestions welcome.
 
Back
Top