It’s a bummer when you need to order something just to see if it even fits.Looking at the Taylor Diff specs, it says it works with the rovan LT so I guess I'll hope for the best. 'll find out soon. Thanks for bringing that up!


Follow along with the video below to see how to install our site as a web app on your home screen.
Note: This feature may not be available in some browsers.
It’s a bummer when you need to order something just to see if it even fits.Looking at the Taylor Diff specs, it says it works with the rovan LT so I guess I'll hope for the best. 'll find out soon. Thanks for bringing that up!
I have a 5t v1.0 and a Rovan and a 30dn. I usually strip and test fit the part off of the 5t and see if it fits then i can order what i need. LolIt’s a bummer when you need to order something just to see if it even fits.
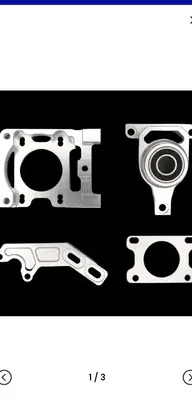
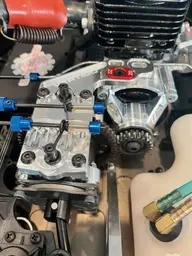
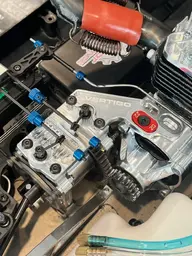
Hey looking back at your pics, which diff mesh brace brace do you have installed to your bell housing? Is it a Modified rc or another brand? Thx!I would think you just have to pay attention to what version clone is it. I have a rovan slt360. Its the buggy version. It is a v1 clone of the 5t/5b. The clutch carrier and fan shroud are for a v1 5t. I'm running a 34esp. I use the Vertigo vented clutch bell, vertigo pinion gears and fs clutch.
I cleaned out the grease in the diffs and switched to oil. It seemed to make the diffs a little smoother.
Its part of the vertigo open clutch carrier

Thanks for that. I'll find out soon. I may have to make a custom brace considering I'm using a modified rc V1 diff mount and a Taylor bell housing. might reach out to Taylor and see if they have something that will work.It looks slightly different then the one that comes in the kit. I went with the kits on mine. The brace bolts flat on clutch carrier.
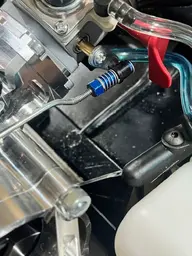
I installed one of those too and it definitely makes it just a little bit easier when you remove the engine. I have not yet run mine though, I hope that little tiny ball and clevis can handle the vibration.I just installed a du-bro quick disconnect throttle push rod in 4/40. love it! Had to drill out the throttle arm a bit as well as my servo arm
pivot/slide connector for the 4/40 rod. much more sturdy.
Here is what Taylor responded with in regards to the mesh brace:It looks slightly different then the one that comes in the kit. I went with the kits on mine. The brace bolts flat on clutch carrier.


Great news !
Get out and give it a thrashing !.

For cold start I've been getting a small burp with choke on and 1-2 pulls. Then choke off and its no more than 3 to fire. After that even after cool down no choke needed with 1 to 4 pulls No flooding issues yet. I do not ever trim up throttle for start to avoid any flooding issues. I keep it set at idle with no problems so far.Looks great. What's your startup procedure for the Taylor 35? Taylor recommends you do only one pull on the choke to avoid flooding. Wondering how you've done it.
Register and gain access to Discussions, Reviews, Tech Tips, How to Articles, and much more - on the largest Large Scale RC community for RC enthusiasts that covers all aspects of the Large Scale RC!
Register Today It's free! This box will disappear once registered!