

Polar_Bus
Well-Known Member
- Messages
- 754
- Reaction score
- 1,549
This thread will be helpful to the guys that maybe are looking to dive a little deeper into engine teardown and simple part fit assessment and reassembly and gain some real world knowledge about how to keep your weed wacker engine in top running condition. . I was not sure I needed to do this until I removed my engine and gave it a close inspection and immediately spotted some concerns. The primary concern was why the factory added Threebond type gasket sealer goop to brand new fresh gaskets. Never seen this done in any engines i've delt with. This immediately tells me that CY has NO trust in their assembly quality. There are 2 primary reasons 2 stroke engines fail : #1 is Too lean of a air/fuel mixture causing a seizure , and #2 is dirt ingestion past your air filter and usually trashing the crank bearings. To add to engine failure #1 is air leaks. Air leaks are common at the crank rubber seals and the cylinder base gasket. Engines can also suck air through the case halves but this is less common. To absolutely ensure reliable engine life and experience consistent carb tuning you need to have a AIR TIGHT engine. All the engine hop-up's in the world won't do you squat if you have an air leak(s). Obviously CY has issues with air leaks on new engines and don't want the engine blowing up the first outing for warranty consideration. Don't be afraid to tear them down and learn ! In this thread i'll cover the issues I found and simple fixes.
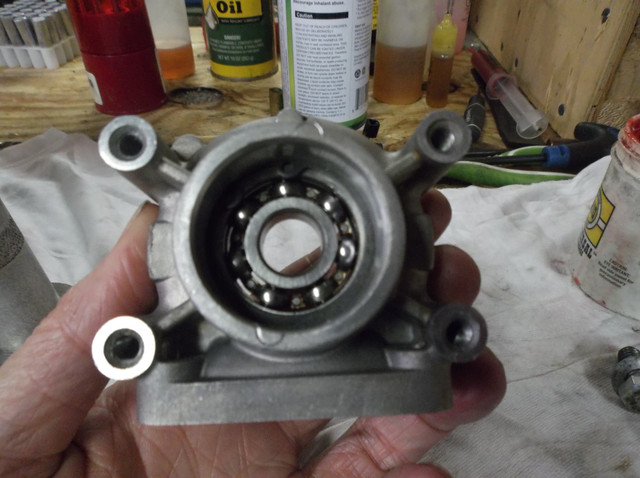
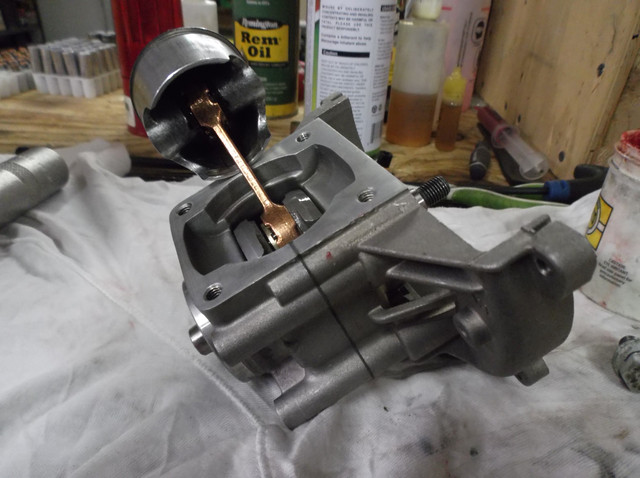
Issue #1) Upon a full engine disassembly I observed the flywheel inboard rubber seal was distorted. Looks like some type of bushing seal driver was used and too much force was applied and mashed one half of the seal. It was actually cocked in the bore slightly. This without a doubt could cause an air leak. You can see in the pic (sorry for slightly blurry) where half the seal is distorted. The seal is a "double lip" so chances are it would be ok but the seal probably would have worn out quickly from misalignment. Why risk all the headaches over a $3 seal ?? New crank seals on the way, and an installation tip I practice is to smear some synthetic grease inside the seal lips to help keep the seal lips from tearing upon installation , and the grease adds some sealing protection and lubrication of the rubber.

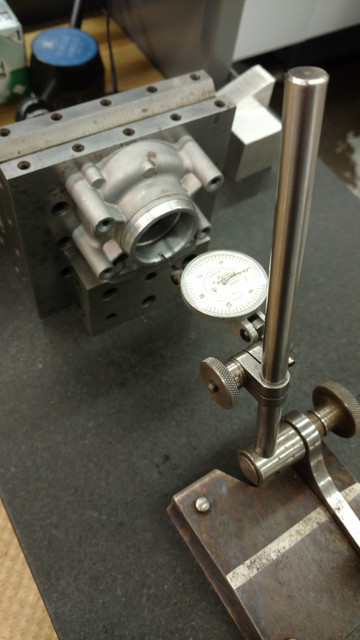
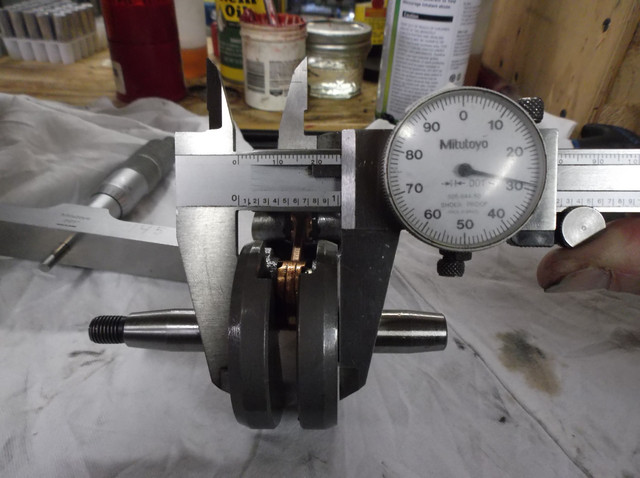
Issue #2) The crank case surfaces out of flatness. This is an area where a little elbow grease lapping surfaces pays off and helps seal surfaces. The center mating surfaces where the crank halves mate was a good fit. I gave a quick lapping on my granite surface plate using 600 emery paper and all is good. However the case surfaces where the cylinder bolts was NOT flat. If you look at the pic the dark shades in the red circles are "low spots" as much as -.0015" . This is not a lot but remember when aluminum heats up it moves around. I'll bet some of these fan cooled engines run pretty hot especially in the deep south and when crud plugs up the recoil housing intake air vents. Took me about 20 min of gentile lapping and got the surfaces flat to within .0004". Good enough. The second pic you can see a more uniformed shiny surface indication good flatness. You can do this at home if you have a granite counter top or a ceramic stove top. These surfaces are usually very flat. Use some 400 or 600 emery paper and work lightly, slowly and in "figure 8" directional motion.
.
That's all for now, i'm waiting on my engine gasket /seal kit. I'll update this thread as I finish assembly.
Issue #1) Upon a full engine disassembly I observed the flywheel inboard rubber seal was distorted. Looks like some type of bushing seal driver was used and too much force was applied and mashed one half of the seal. It was actually cocked in the bore slightly. This without a doubt could cause an air leak. You can see in the pic (sorry for slightly blurry) where half the seal is distorted. The seal is a "double lip" so chances are it would be ok but the seal probably would have worn out quickly from misalignment. Why risk all the headaches over a $3 seal ?? New crank seals on the way, and an installation tip I practice is to smear some synthetic grease inside the seal lips to help keep the seal lips from tearing upon installation , and the grease adds some sealing protection and lubrication of the rubber.
Issue #2) The crank case surfaces out of flatness. This is an area where a little elbow grease lapping surfaces pays off and helps seal surfaces. The center mating surfaces where the crank halves mate was a good fit. I gave a quick lapping on my granite surface plate using 600 emery paper and all is good. However the case surfaces where the cylinder bolts was NOT flat. If you look at the pic the dark shades in the red circles are "low spots" as much as -.0015" . This is not a lot but remember when aluminum heats up it moves around. I'll bet some of these fan cooled engines run pretty hot especially in the deep south and when crud plugs up the recoil housing intake air vents. Took me about 20 min of gentile lapping and got the surfaces flat to within .0004". Good enough. The second pic you can see a more uniformed shiny surface indication good flatness. You can do this at home if you have a granite counter top or a ceramic stove top. These surfaces are usually very flat. Use some 400 or 600 emery paper and work lightly, slowly and in "figure 8" directional motion.
.
That's all for now, i'm waiting on my engine gasket /seal kit. I'll update this thread as I finish assembly.


") . Trust me there won't be nothing left but shards of aluminum... But for now it's a good learning experience and only cost me $12 in gaskets and seals.
. Trust me there won't be nothing left but shards of aluminum... But for now it's a good learning experience and only cost me $12 in gaskets and seals.