Successful Pocket Bike Conversion build.

This site may earn a commission from merchant affiliate
links, including eBay, Amazon, and others.

porscheaddiction

Active Member
Messages
31
Location
Cornwall, Ont
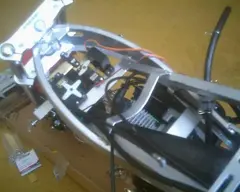
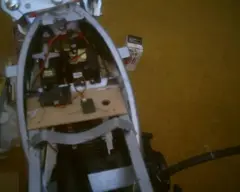
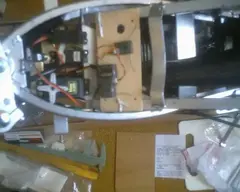
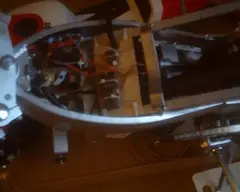
Ok everyone you asked for it...I will add the pictures as I locate them all again.

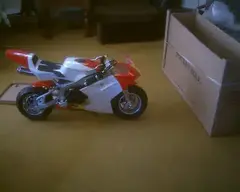
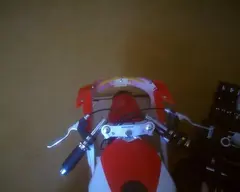
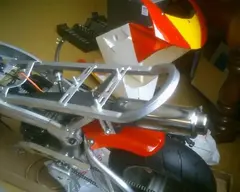
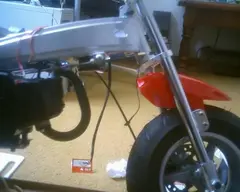
For the first pic its just the bike when it was new out of the crate.
Before anybody asks I did not ride it ever before tearing into it. My belief at that time was to be successful at the conversion was not to get hooked on liking to ride it.
More pictures to come.
Chris
 

Attachments

  • firstlook.jpg
    firstlook.jpg
    43.2 KB · Views: 148
SO? are you saying you turned that little pockit bike into a functioning RC? i wana see pics and vid please. this should be great! ive been tossing around the idea of a minny quad conversion, but never thought of a pockit bike. does it have fall down braces and how did you get it to stear? COOME-OON!!
 
SO? are you saying you turned that little pockit bike into a functioning RC? i wana see pics and vid please. this should be great! ive been tossing around the idea of a minny quad conversion, but never thought of a pockit bike. does it have fall down braces and how did you get it to stear? COOME-OON!!

Some of you may know who I am already, I'm known on other forums as "finallyaheli", "porscheaddiction", "seawayhobby", and of course Chris. I didn't know this forum existed for large scale enthusiasts. I don't own any large scale cars but I do have a fair sized gas powered boat as well as this thing.........hope its ok to repost the link here.
http://ca.youtube.com/watch?v=JlweKStu_Zc

Yes I am one of the few crazy people in the world that has successfully converted a pocket bike into R/C. Some of you may have seen this vid already and those that haven't I hope you enjoy it.

In the future I'm hoping to pick up a 1/5th scale baja or MT.
Its just nice to have found a large scale group

Chris

It was in his introduction.
 
This is what I had to work with, Removal of parts begins. Here we have the body completely removed from the frame.
 

Attachments

  • casingremoved1.jpg
    casingremoved1.jpg
    24.2 KB · Views: 98
  • casingremoved2.jpg
    casingremoved2.jpg
    28.5 KB · Views: 82
"does it have fall down braces and how did you get it to stear?"
Yes it has fall down braces..........and for steering you will see as I continue to upload the conversion pics.
Chris
 
Continuing along.... here we have another view of the naked bike along with an up close shot under the tank where I have chosen to mount the electronics for this conversion. Stepping back a bit I best show there really isn't much steering travel on these bikes but it works fine.
 

Attachments

  • casingremoved3.jpg
    casingremoved3.jpg
    31 KB · Views: 49
  • undertank.jpg
    undertank.jpg
    24.5 KB · Views: 51
  • forkscentered.jpg
    forkscentered.jpg
    23.7 KB · Views: 44
  • forksleft.jpg
    forksleft.jpg
    23.9 KB · Views: 44
  • forksright.jpg
    forksright.jpg
    24.2 KB · Views: 42
Ok so now we know what we have to work with, The bike is stripped down, throttle disconnected as well as the brakes. Handle bars have been removed from the forks. (not needed in the conversion just extra weight if you leave them on) Tank is removed too. Don't throw out any cables you will need them later on. The Front brake you can remove completely but for appearance sake and laziness I left the front disc on but did remove the front caliper.

If anyone has any questions and or comments, Feel free to jump in here any time.
Chris
 

Attachments

  • bike_stripped.jpg
    bike_stripped.jpg
    35.9 KB · Views: 55
Last edited:
Here is a couple more pics, Here is one where the AR7000 dual Spektrum set up mounted simply to its mounting shelf with tie wraps. This is not the final position of the rxs as you will see a bit later. You will also notice the beginning of the servo mounting in the next pic, Steering,throttle, and remote kill servos mounted. they are mounted using thick brass plate that is drilled and attached to the sides of the frame by nuts and bolts. Also used the bike cross supports as well as mounting points.

Still more to come.
Chris.
 

Attachments

  • rxonrxmount.jpg
    rxonrxmount.jpg
    18.5 KB · Views: 48
  • servomount1.jpg
    servomount1.jpg
    31.9 KB · Views: 62
Found a few more pics.....here is a few shots of all the servos mounted, And in the last photo you can see how the throttle and rear brake cable is attached to the frame just drilled holes where I wanted to mount them and used plastic tie wraps. Neat and does the job.
Chris
 

Attachments

  • servomount2.jpg
    servomount2.jpg
    35.3 KB · Views: 50
  • servomount3.jpg
    servomount3.jpg
    35.6 KB · Views: 50
  • servomount4.jpg
    servomount4.jpg
    25.4 KB · Views: 60
SO? are you saying you turned that little pockit bike into a functioning RC? i wana see pics and vid please. this should be great! ive been tossing around the idea of a minny quad conversion, but never thought of a pockit bike. does it have fall down braces and how did you get it to stear? COOME-OON!!

Kryptonite... Here you go, tons of vids... Personally I think my FG would smoke 'em all... lol...http://www.youtube.com/results?search_type=&search_query=pocket+quad+rc&aq=f

Trip..
 
"Personally I think my FG would smoke 'em all... lol"


I think your right Trip. However be a great thing just to bash around, No gear box gears to strip out.

You could probably get some really good speed out of an ATV conversion just need to change the sprocket sizes. Several different ones are available for these machines. Just a bit of testing is all that would be needed.

I will post a couple of more pics on my bike conversion after I get back home from work.
Chris.
 
Last edited:
Ya this thread has rekindled my desire to build one. I am going to do a quad though. Only $250 cdn new a few blocks away from me at a shop so good parts support as well...

Just have to get around to starting now... my bank account thanks you LOL
 
Glad I could help rekindle the spirit! You wont regret it. I'm limited where I can use my bike where as the ATV you will have a lot more options where you can run it.
Make sure you do a build thread like this too . Would very much like to see it.

All right here we go......Here is couple more pics of the servos mounted.
Hmm before we get to far we better figure out how we can get easy access to the radio gear when need be. The answer is longer bolts and a few nuts.. mount the screws upside down so they stick up as in the pic. Ok now you have to take off the whole fork tree from the bike to get at the lower fork support. Once removed drill a hole so a 4-40 size rod will pass through it.( As for the length of the rod we will get to that later on). This is part of the steering system. You can see the rod was bent 90 deg with enough length in the bent section to allow attachment to the fork support. Which was simply to thread the rod with 4-40 threads and mount it securely using washers, and nuts through top and bottom of the fork support.
Will add more later on.
Chris
 

Attachments

  • servomount5.jpg
    servomount5.jpg
    35 KB · Views: 37
  • servosmount6.jpg
    servosmount6.jpg
    27 KB · Views: 38
  • bodymounting.jpg
    bodymounting.jpg
    36.4 KB · Views: 35
  • rodmounting.jpg
    rodmounting.jpg
    39.3 KB · Views: 34
Last edited:
Time for some more pics... 1st pic is a trial fit of the rxs. This took a bit of time due to using a dual rx system the antennas had to be far enough from each other and the metal framing of the bike itself. The other pics show the final placement of each of the rxs. Plus how the rxs are mounted to the board and the rxmount board to the frame. All done with nylon tie-wraps. The large hole on the rx mount is to allow the fuel line to pass through up to the tank. To protect the radio gear in case of accidental gasoline spillage the Gas tank itself is put inside a plastic bag, cheap and does the trick. Yes I know a a mess of wires, they get cleaned up and routed later after all the controls are functioning properly.

More to come soon.
Chris
 

Attachments

  • rxstrialfit.jpg
    rxstrialfit.jpg
    26.3 KB · Views: 22
  • rxsmounted1.jpg
    rxsmounted1.jpg
    33.2 KB · Views: 26
  • rxsmountedfinalpos1.jpg
    rxsmountedfinalpos1.jpg
    25.9 KB · Views: 23
Last edited:
Ok everyone here is what you been waiting for the steering set up....
BUT first I have to do this..

If any one should attempt this conversion or a conversion similar to this, I can not be held responsible for any mishaps, damages to persons property etc. that could be caused by building and operating a project such as this. This bike could easily kill some one if it gets out of control including the operator. You must be completely observant for your safety and the safety of others.

Thank You.
Chris
 
All right.. For the steering you need your 4-40 rod I sure hope you didn't cut it and one end should be firmly attached by now to the lower fork tree.
You also need 2 compression springs(trial and error to locate the right ones) and some way of limiting there travel in each direction along the length of the rod. Those stoppers will also increase or decrease your sensitivity of the bikes steering. Set it to what your comfortable at through trial and error. The second pic shows one of the adjustable stoppers I used. The next pic shows plainly that the steering rod is not attached to the servo arm rigidly but rather is able to pass through it via a brass fitting. This is how the bike can track in a straight line be leaned and turned and then when throttle is reapplied to bring the bike back upright. The total length of the steering rod was cut to just be shy of hitting the engine. I wanted the rod long enough so I can experiment with different springs compression ratios etc.

Still more to come
Chris.
 

Attachments

  • steeringsetup1.jpg
    steeringsetup1.jpg
    34.1 KB · Views: 42
  • steeringsetup2.jpg
    steeringsetup2.jpg
    17.1 KB · Views: 40
  • steeringsetup3.jpg
    steeringsetup3.jpg
    26.4 KB · Views: 43
  • steeringsetup4.jpg
    steeringsetup4.jpg
    26.9 KB · Views: 33
Last edited:
Back
Top
AdBlock Detected

We get it, advertisements are annoying!

Sure, ad-blocking software does a great job at blocking ads, but it also blocks useful features of our website. For the best site experience please disable your AdBlocker.

I've Disabled AdBlock    No Thanks