

Navigation
Install the app
How to install the app on iOS
Follow along with the video below to see how to install our site as a web app on your home screen.
Note: This feature may not be available in some browsers.
More options
Style variation
You are using an out of date browser. It may not display this or other websites correctly.
You should upgrade or use an alternative browser.
You should upgrade or use an alternative browser.
top or bottom of steering arms ??
- Thread starter buzzkill
- Start date
This site may earn a commission from merchant affiliate
links, including eBay, Amazon, and others.
links, including eBay, Amazon, and others.
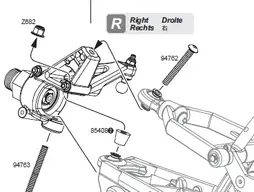
Sure you'll not notice ? iv always set mine up like the diagram ??
- Messages
- 19,475
- Reaction score
- 27,691
If I'm honest ,I don't understand a damn thing you said And the picture didn't help one bit ? but here's how mine is setup, I don't think you can do it any other way


if you mean the steering arms buzz, then there supposed to go to the bottom as in z zee zeds pics ") ,
,
just realised my own mistake on the spovan 45 build, i put em on top,
will flip em now i realised ,
,
i think it alter steering if there on top instead of bottom as well, much more toe in and toe out as suspension compresses etc,
this pic is wrong way

,just realised my own mistake on the spovan 45 build, i put em on top,
will flip em now i realised
,i think it alter steering if there on top instead of bottom as well, much more toe in and toe out as suspension compresses etc,
this pic is wrong way
buzzkill
Mad?scientist
- Thread starter
- #6
If you pulled the ball and put it on the TOP thats what I'm talking about reverse ! I HAVE TO Reset everything anyhow so WTHIf I'm honest ,I don't understand a damn thing you said And the picture didn't help one bit ? but here's how mine is setup, I don't think you can do it any other way
View attachment 67764
View attachment 67765
- Messages
- 19,475
- Reaction score
- 27,691
Why would you do that? That's stupid, you are throwing away a bunch of suspension travel ?
buzzkill
Mad?scientist
- Thread starter
- #8
Ya it might effect the bump steer also ?? Ill check it out and see what I come up withif you mean the steering arms buzz, then there supposed to go to the bottom as in z zee zeds pics
just realised my own mistake on the spovan 45 build, i put em on top,
will flip em now i realised
i think it alter steering if there on top instead of bottom as well, much more toe in and toe out as suspension compresses etc,
this pic is wrong way
they hit the frame rails ! I would have to cut slots in the frame for clearanceWhy would you do that? That's stupid, you are throwing away a bunch of suspension travel ?
check out my post above buzz, defo need to go to the bottomYa it might effect the bump steer also ?? Ill check it out and see what I come up with
,not sure why i made the on the top mistake myself, all my other baja based builds are on the bottom as they should be,
- Messages
- 19,475
- Reaction score
- 27,691
They still need to be in the bottom. I had to grind the chasiss for my tr ,but it was so worth it for the added steeringYa it might effect the bump steer also ?? Ill check it out and see what I come up with
they hit the frame rails ! I would have to cut slots in the frame for clearance
- Messages
- 19,475
- Reaction score
- 27,691
Why have you cut your chassis??
- Messages
- 19,475
- Reaction score
- 27,691
I

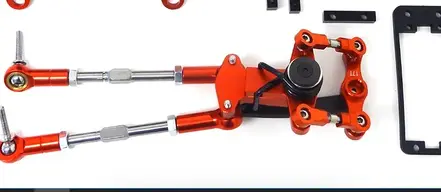
There's 3 settings on the tr wiper arm I bought (the non HD version). First hole it the stock configuration (don't have to cut anything) and the third hole gives you much better steering but you will have to grind the chassis a slight bit . I never tried hole 2 , it's probably somewhere in the middle. So I chose option 3 and it gave me like 10x better steering. I don't really give a feck about grinding a lil bit out of the chasiss tbh. Here's the TR rackWhy have you cut your chassis??
Right I only have the HD version ?
Cutting the chassis sux though ?
Cutting the chassis sux though ?
- Messages
- 19,475
- Reaction score
- 27,691
Naw not really. Had to grind like 2mm just for it to clear. don't Matter to me
buzzkill
Mad?scientist
- Thread starter
- #17
I had to remove about 1/2" of matereial just to get good clearance , I also had the whole damn thing upside down so a ball end was hitting the servo !! came like that LOL ! , flipped it all after breaking a ball end now all good so far.Naw not really. Had to grind like 2mm just for it to clear. don't Matter to me
How do you tighten up a servo saver setup ? its a little loose at rest ??, this is the type of setup it is
Attachments
- Messages
- 19,475
- Reaction score
- 27,691
There's a screw on top. And my system is a stock configuration (bellcrank) just aluminum with a better saver design., that's some wierd ass thing you havw, no idea about that and what mods it needs to fitI had to remove about 1/2" of matereial just to get good clearance , I also had the whole damn thing upside down so a ball end was hitting the servo !! came like that LOL ! , flipped it all after breaking a ball end now all good so far.
How do you tighten up a servo saver setup ? its a little loose at rest ??, this is the type of setup it is
MonsterAir
Lone Racer 🤠
That's the Rovan symmetrical steering rack. It's what FG uses. Much better design in my opinion. You can't adjust those that I know of. They are spring loaded so only adjustment is changing the spring which I don't think they offer.
If you want the ability to adjust tension maybe this could fit? I run this is my Marder and F1, they sell different springs for it.
https://www.davesmotors.com/fg-04493-aluminium-servo-saver-04
If you want the ability to adjust tension maybe this could fit? I run this is my Marder and F1, they sell different springs for it.
https://www.davesmotors.com/fg-04493-aluminium-servo-saver-04