Small butane torch is my most valueable tool working on truck. Lasr time the rear axle broke the iner piion bearing exploded for me.Had not installed the bushing yet.Current setup is bushing,steel locknut with nylon insert,longer shcs and punched head to gear in 3 spots on each bolt.Very good research and development ther Shad.Thank you for sharing!!!!


Navigation
Install the app
How to install the app on iOS
Follow along with the video below to see how to install our site as a web app on your home screen.
Note: This feature may not be available in some browsers.
More options
You are using an out of date browser. It may not display this or other websites correctly.
You should upgrade or use an alternative browser.
You should upgrade or use an alternative browser.
Another Taylor 50GT “Grave Digger” Engine ….
- Thread starter Shad0man
- Start date
This site may earn a commission from merchant affiliate
links, including eBay, Amazon, and others.
links, including eBay, Amazon, and others.
- Thread starter
- #42
Another 1 of 3 progress updates
When installing a Taylor 50GT engine one of the steps is to raise the fuel tank to clear the air filter based on the new layout. Instead of machining spacers I opted to use readily available M4 x 15mm diameter x 20mm tall rubber stand-offs that screw directly into the supporting cross bars. Then I shortened the original M4 cap bolts used to secure the fuel tank to the rubber stand-offs.
During the fitting I saw that the exhaust bracket Mike furnishes with the engines was very close to the fuel tank, close as in business card air space close so I simply notched it. Now everything looks and fits with ample clearance as if the way it was originally designed. I discussed the close proximity with John Parks and he shared that with the Taylor engines he rotates the fuel tank 180 degrees. I tried this but in the end feel that I can keep it in the original position however, after running some thermal tests I may put a band of Mylar around the exhaust where it is 5/8” from the fuel tank.
With everything in place the fuel cap is easy to remove and the tank vent is able to free air away from the exhaust.


Progress update 2 of 3
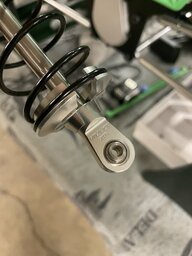
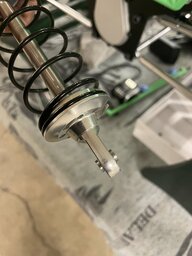
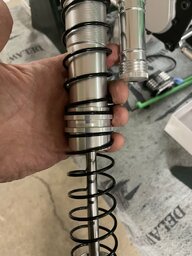
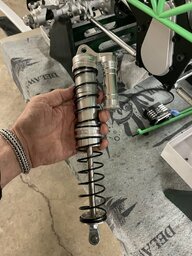
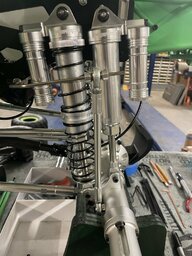
I share this update because when the rig arrived I assembled and moderately exercised it for a very short period time, less than 1/2 tank of fuel after which I inspecting it and 3 of the lower plastic shock retainers had either fallen out or cracked into pieces. I ordered spares seeing this as a service item and then I reached out to Mike Taylor to see if he had considered creating an upgrade. He said that he would look into it however, soon after that I read a thread where a company, VitaVon was about to release some. I contacted them and purchased a full set of them as will as their newly created machined aluminum spring separators. The separators were purchased simply because I think they look cool.
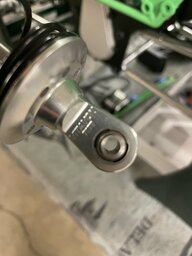
So, regarding VitaVon’s shock ends, they are BADA**!! They look wonderful, are all metal, and assembled as if a conventional spherical rod using a e-clip style retaining clip.
In any case.
When they arrived I removed the original 8 lower shock ends and simply screwed the 8 VitaVon lower shock ends on with no issues. I installed the VitaVon machined aluminum shock spring separators and installed them. All the time I was prepared for some hiccup to appear however, there were none. They fit perfectly including the width of the lower rod-end ball.
Now I have a significant supply of nylon retainers for the original rod-ends; LOL, that thankfully, I will never need.
So I’ll share that if there is 1 item that I’d encourage other to consider, the lower shock ends from VitaVon would be number 1 on my list.
I have no affiliation with VitaVon as they graciously took my money in exchange for their great products. What I am is a very happy customer that received a fairly priced, very high quality product, and exceptional service. Order to delivery was 4-5 days.
When installing a Taylor 50GT engine one of the steps is to raise the fuel tank to clear the air filter based on the new layout. Instead of machining spacers I opted to use readily available M4 x 15mm diameter x 20mm tall rubber stand-offs that screw directly into the supporting cross bars. Then I shortened the original M4 cap bolts used to secure the fuel tank to the rubber stand-offs.
During the fitting I saw that the exhaust bracket Mike furnishes with the engines was very close to the fuel tank, close as in business card air space close so I simply notched it. Now everything looks and fits with ample clearance as if the way it was originally designed. I discussed the close proximity with John Parks and he shared that with the Taylor engines he rotates the fuel tank 180 degrees. I tried this but in the end feel that I can keep it in the original position however, after running some thermal tests I may put a band of Mylar around the exhaust where it is 5/8” from the fuel tank.
With everything in place the fuel cap is easy to remove and the tank vent is able to free air away from the exhaust.
Progress update 2 of 3
I share this update because when the rig arrived I assembled and moderately exercised it for a very short period time, less than 1/2 tank of fuel after which I inspecting it and 3 of the lower plastic shock retainers had either fallen out or cracked into pieces. I ordered spares seeing this as a service item and then I reached out to Mike Taylor to see if he had considered creating an upgrade. He said that he would look into it however, soon after that I read a thread where a company, VitaVon was about to release some. I contacted them and purchased a full set of them as will as their newly created machined aluminum spring separators. The separators were purchased simply because I think they look cool.
So, regarding VitaVon’s shock ends, they are BADA**!! They look wonderful, are all metal, and assembled as if a conventional spherical rod using a e-clip style retaining clip.
In any case.
When they arrived I removed the original 8 lower shock ends and simply screwed the 8 VitaVon lower shock ends on with no issues. I installed the VitaVon machined aluminum shock spring separators and installed them. All the time I was prepared for some hiccup to appear however, there were none. They fit perfectly including the width of the lower rod-end ball.
Now I have a significant supply of nylon retainers for the original rod-ends; LOL, that thankfully, I will never need.
So I’ll share that if there is 1 item that I’d encourage other to consider, the lower shock ends from VitaVon would be number 1 on my list.
I have no affiliation with VitaVon as they graciously took my money in exchange for their great products. What I am is a very happy customer that received a fairly priced, very high quality product, and exceptional service. Order to delivery was 4-5 days.
Attachments
Last edited:
- Thread starter
- #43
Progress Update 3 of 3
Now I’ll begin by sharing that my expectations are high however, I have no real time experience with these yet.
I am speaking of, carbon fiber rotors.
We all know these rigs are heavy and that Dan’s braking system does a great job of stopping them however, the act of stopping them is hard on brake pads. Even in the short time I exercised my rig I quickly recognized that brake pads were going to be a regular maintenance/ consumable item so I purchased several sets of spares.
I began considering viable long term options because in my HPI 5T and Baja brake pad wear is not an issue. I was thinking that an asbestos/composite pad would be a great idea. Ultimately I read a thread where a set of “one off” carbon fiber rotors had been made with what sounded like good results. Ultimately I contacted a fellow, David, aka High Voltage RC that was selling them. He has a thread on one of the forums and I purchased a couple sets of them. Great guy. They were fairly priced, arrived quickly, look nice, and are roughly the same thickness as the original stainless steel rotors. So close in fact that I did not have to adjust my brakes after installing them.
Next will be my thoughts, hoping to validate the “proof of concept” once I exercise the rig.
While installing the drivelines I used the heat shrink idea on them at the transmission end to keep the pins from coming out as was shared by another forum member. This is a great idea, inexpensive, and easy to do.
Last edited:


- Thread starter
- #45
Thank you Mick
Is your rig back online?
I see the exhaust difference. Looks like a different exhaust as the center of my can is much further back and the stinger/tip exits ostensibly at the rear of the body rather than inside of it.
I considered cutting spacers to raise the fuel tank however, I use rubber standoffs for a variety of my projects so I opted to go this direction. Both serve the same purpose and look nice.
Next I will be finishing the test fitting of the cage. I have a spare cage and body so doing the fit is much easier. Sadly no driver will fit as you know so the Grave Digger will have a ghost driver.
- Messages
- 446
- Location
- Montreal
Ya, the v2 Taylor engines have a different pipe that gives a bit more low end and the power comes on smoother, instead of hitting hard and practically out of control.
Man I have a mega truck to look at but just seeing those shocks in your hands is impressive to say the least...unless you had a 10 year old holding them for the pic. Lol
Good info for the shock and brake parts, anxious to see how the discs hold up to the torment of stopping one of these monsters that is propulsed by a Taylor engine!
Last edited:
Did you order the "in cab exhaust" or standerd "torpedo" ?Mine is the in cab,they may have changed design.The torpedo sits more towards the center,gas cap from photos Ive seen.Your gonna be pushing 10 grand like me with upgrades and spares.Saw the new vitavon sway bars but I don't know if they fit extended wheelbase.Tried to post a vid of body flipping but wont work on thread.Hopefully when my lady is home can get a running vid.New firm tire inserts working good,less roll in corners.Truck has been on its roof twice on last 2 runs,new flip mount holding up well.
- Messages
- 13,120
Videos need posted to you tube then linked here.
- Thread starter
- #49
I did not order a specific exhaust but rather this is what I received with the Taylor GT Grave Digger engine.
Because I have a spare cage and body the following was much easier to do because I could clearly see from all angles. This is my display body so I’ll transfer the tweaks to the one that will be used when exercising the rig.
I just finished fitting the cage and I am very pleased. I read that cutting the cage was necessary to fit but I never saw or understood the clear path so frankly, I was a bit anxious about what would be needed.
Other than loosing my driver which remains unavoidable, with what sounds like a new version exhaust the fit was very “easy”. In fact the body pops on and off as it did before.
There is one midsection cage cross brace that is simply unscrewed and removed, this is the token rear support bar for the driver. Technically it can be left in place however, to do so the exhaust would have to be slipped into place “after” the body is on. IMO, this would be far too inconvenient and impractical. And only one piece of the cage was removed. The piece removed was the token front cross bar that the driver is secured to. After removing it I put a couple green caps on the ends for a finished look. Once I set the cage in place there is ample clearance “everywhere. Then I set he body in place and amble clearance remains.
Unless told, one would never realize that anything was modified and I see no heat or structural concerns. Add to this, the new style exhaust will blow outside of the body and not all over everything within it.
Last edited:
John Parks
Print my own
- Messages
- 4,021
Looks awesome so far, I just may do what you did with the fuel tank mounts. Mine back out fairly quick and I think the rubber damper would help alot
John Parks
Print my own
- Messages
- 4,021
Ha
Have a link to the stand offs you used?
Thank you John
I appreciate both you assistance and kind words.
The rubber stand-offs are IMO an inexpensive great way to raise the tank. I think you’d like it too.
Have a link to the stand offs you used?
- Thread starter
- #53
Yes sir….Ha
Have a link to the stand offs you used?
https://www.amazon.com/gp/aw/d/B0BPLVMHJZ?psc=1&ref=ppx_pop_mob_b_asin_title
Lookin great!!!!! One last tip and Im goona shut my trap,I soak down all my platics with wd40.My entire xmaxx,grave digger cage etc. for a couple days ,everything gets a bit more flexable after doing this.Use common sense if you do this,do not use on rpm parts.Best of luck ShadOman!!!!
ShadOman,been awhile,just checking up on your truck.Hope all is well,and yes I am jealous of your workspace......I am still working out of a cave.I cant get my you tube app to work for weeks to post video but still trying.Going to watch F1 qualifying then give truck a run,enjoy ur day...
- Thread starter
- #57
Hi Mick
Nice to hear from you too. I hope your projects are unfolding nicely.
I have been tinkering with the Grave Digger in-between other projects. All is good.
Since we last chatted I trimmed the exhaust bracket a bit more moving the exhaust a little further away from the fuel tank cap.
I also replaced the 4 securing Allen cap bolts with studs. This way I was able to use Nylock flange nuts to secure the fuel tank. This allowed me to secure the fuel tank without compressing the fuel tank grommets so they don’t get damaged.
I also secured the pull start with a p-clamp at the passenger side window.
Lastly, I also used a different approach to secure the steering servo arms. First, I loosened the servo saver about a turn and then I used Loctite 222, it’s a little less aggressive than Loctite blue this time and external star washers on all 5 Allen cap screws. They bite into the arms and the underside of the Allen cap screws so I am hoping the linkage will remain more stable.
Enjoy the F1 race and exercising your rig.


I apologize for the duplicate pictures… don’t know what happened. I tried to edit the post but it keeps throwing an error.
Nice to hear from you too. I hope your projects are unfolding nicely.
I have been tinkering with the Grave Digger in-between other projects. All is good.
Since we last chatted I trimmed the exhaust bracket a bit more moving the exhaust a little further away from the fuel tank cap.
I also replaced the 4 securing Allen cap bolts with studs. This way I was able to use Nylock flange nuts to secure the fuel tank. This allowed me to secure the fuel tank without compressing the fuel tank grommets so they don’t get damaged.
I also secured the pull start with a p-clamp at the passenger side window.
Lastly, I also used a different approach to secure the steering servo arms. First, I loosened the servo saver about a turn and then I used Loctite 222, it’s a little less aggressive than Loctite blue this time and external star washers on all 5 Allen cap screws. They bite into the arms and the underside of the Allen cap screws so I am hoping the linkage will remain more stable.
Enjoy the F1 race and exercising your rig.
I apologize for the duplicate pictures… don’t know what happened. I tried to edit the post but it keeps throwing an error.
Last edited:
Looking good my friend!!!Going to use the clamp idea,just have my pullstart wire tied to frame.Been busy with Losi 5t 2.0 ,broke a shock,going to try some from detroit rc.I believe IRC is brand.Taylor carrys them also.The Digger ran like a bear today,likes the cooler temperature.It was pulling front wheels,never did that in summer heat.No breakage either.......Enjoy your projects and keep up good work,take care.
- Thread starter
- #60
Another little tweak.
Now, even through the exhaust clearances are good in all areas I still wanted a simple clean looking way to control the header pipe heat. If for no other reason so I don’t fricken burn myself on it.
Initially I tried typical 1” exhaust wrap that regularly use for other projects but on such a small diameter pipe I felt that it looked bulky so I removed it and began my quest for sock style thermal sleeve. Similar to what I use to protect spark plug wires that rest on or very near header tubes.
I asked Mike Taylor the temps at the header and he said about 300 C/562 F on the outside so that became my baseline thermal requirement. It also had to be expandable because I had to be able to get it over the header spring hooks and the header because it’s a stepped header design comprised of several diameters of tubing.
The sleeve I ultimately purchased a couple days ago checked the proverbial boxes. It has a constant operating temperature rating of 982 C/1800 degrees Fahrenheit with a burst temperature rating of 1371 C/2500 degrees Fahrenheit. It is also expandable, 1” to 1 1/2” ID.
Initially I installed it with stainless steel zip ties however, no matter how I tried I was not able to get the clamp tight enough that it would not rotate with modest pressure so I opted to use stainless steel safety wire. To help with this process I folded the thermal sleeve material back over itself so I had a better area to compress, cinch, and be able to control the end fraying.