Having difficulties with the differential, One side is sticking

This site may earn a commission from merchant affiliate
links, including eBay, Amazon, and others.

RCSteve

Well-Known Member
Messages
86
Location
Sacramento, CA
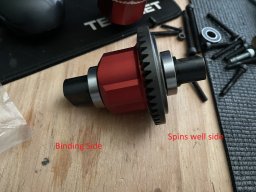
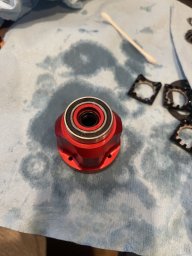
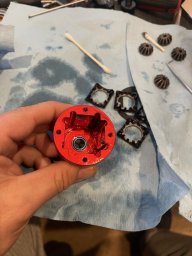
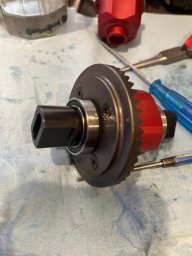
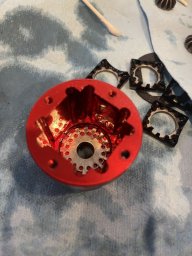
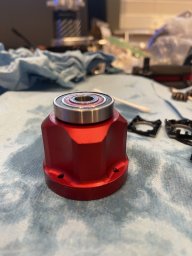
After my meltdown of my Max4, I have been doing the major maintenance my Raminator with some upgrades. I have been having a hell of a time with the rear diff. After the rebuild, it spins well when you grab both sides and twist. Spinning the gear side diff output shaft allows it to move with a little resistance. When you just try to spin the diff housing side of the output shaft it binds badly.

I have been following the HPI Baja diff videos from Fast Eddy to try to find help, since it is pretty much the same diff.

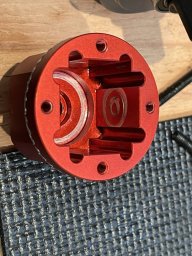
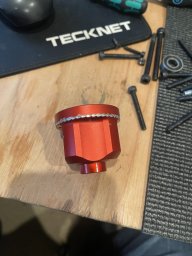
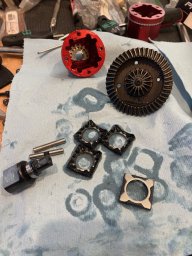
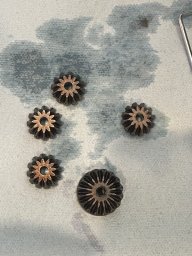
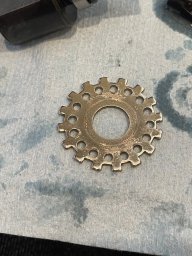
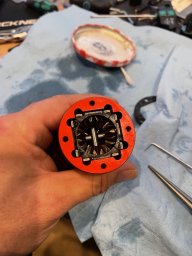
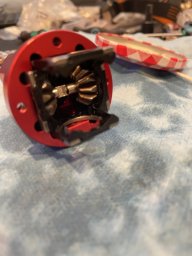
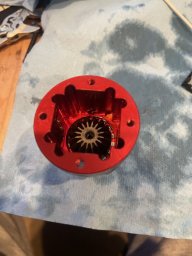
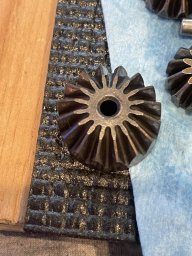
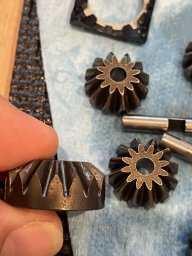
I did construct the diffs with the flat side of the (new) inner differential washers facing towards the center of the diff on all six sides (rounded sides facing the exterior). I also replaced the differential housing and upgraded the differential output cups to the supposedly stronger V3 version. Using 20k diff weight by team associated, I filled the diff to level with the top bar of the differential spider gear and I let it rest for 30 minutes to ensure I filled it with what I thought was the right amount. Gears look mint. I also gradually tightened the diff case in a star pattern to avoid any warping.

Any ideas? Yes I know this sounds like a rookie mistake and it probably is. My experience rebuilding diffs is with Arrma.

I appreciate all the help.
 
Hmmm...interesting for sure. Not being a smart guy with ya...but something seems too tight. I am very familiar with the V2 diffs and never had that issue. Even after rebuilds. I am wondering if something is a different size/spec with that V3 stuff causing it. There isnt an extra shim in that side by chance is there? Maybe @owen_primalrc can shed some light. Sorry not much help..but will be looking to see what others say as well!
 
Dude, awesome, thank you for a quick repose. I don't think it is because of the v2 vs v3 differential output cups, but I can be lacking intelligence at times. Should I put a shim in? As far as shims go, I didn't take one out while rebuilding but I do have new diff shims that I ordered from primal.
 
Here is what I am dealing with. I took a picture of the diff cup I replaced to show the damage and maybe it will help with a solution.
 

Attachments

  • IMG_3981.jpg
    IMG_3981.jpg
    186.2 KB · Views: 9
  • IMG_3982.jpg
    IMG_3982.jpg
    176.7 KB · Views: 9
  • IMG_39752.jpg
    IMG_39752.jpg
    122.8 KB · Views: 9
I was referring to the scars on the cup pictured separately, the one that is being used is brand new.

By washer, are you talking about the star washer pictured?

Also I have included pictures of the internals, if that helps at all.
 

Attachments

  • IMG_3986.jpg
    IMG_3986.jpg
    172.5 KB · Views: 15
  • IMG_3985.jpg
    IMG_3985.jpg
    181.7 KB · Views: 15
  • IMG_3987.jpg
    IMG_3987.jpg
    175.7 KB · Views: 15
I decided to document how I am rebuilding the diff. I have pictures of the steps I have taken. Yes the gasket was used and I added the screw to the cup side output shaft, these are the pictures I forgot to take. Still binding. I also flushed up the four spider gear plastic holders after taken the photo of step 7, in the photo it is uneven.

How am I messing this up? Should the bearing in step 3 be flush?
 

Attachments

  • Step two.jpg
    Step two.jpg
    116.2 KB · Views: 8
  • Step one.jpg
    Step one.jpg
    115.8 KB · Views: 7
  • Step 8.jpg
    Step 8.jpg
    117.8 KB · Views: 9
  • Step 7.jpg
    Step 7.jpg
    107.2 KB · Views: 9
  • Step 6.jpg
    Step 6.jpg
    91.7 KB · Views: 9
  • step 5.jpg
    step 5.jpg
    112 KB · Views: 9
  • Step 4.jpg
    Step 4.jpg
    144.8 KB · Views: 8
  • Step 3.jpg
    Step 3.jpg
    101.7 KB · Views: 8
You 100% are assembling it correctly. Bearing placement looks good too. What were you referring too in regards to adding a screw at output shaft..the stock one or something extra?
At this point, I would email Primal and ask..link them to thia thread. I am at a loss. I don't see an issue from pics.
At what point of assembly are you feeling the binding?..that might be a key to this.
 
The screw is the standard 10mm button head that goes into step five.

I start to experience the binding with the spider gears in, pushed down. The binding is experienced more in one direction than the other, I am thinking that it could be related to the spider gears but they look good.
Yes I am going to fire off an email to Primal.
 
How bad is it? Some small binding can be normal with alot of gears, they will wear in. But if it's physically hard to turn or stopping then it's an issue. When assembling did you visually check for any hang ups as you were installing each piece?

For shits and giggles take one of the thrust washers out and put it together dry and see if it's any better. Also make sure your cross pins aren't to long by chance
 
The cross pins are tight and it can be a difficult to remove the spider gears, I have to use significant muscle to remove them. I swear im not weak but I get scared I'm going to bend my 90 degree pick when pulling.

The binding is bad enough that I can't turn it when it is locked up but can spin it in the other direction some. Hopefully that makes since.

The one gear has a little scaring on it but it doesn't look that bad, picture attached. This is the same gear from step 5. I have looked at all the spider gears and I can't see any damage other than the attached pictures and I don't see this causing a problem but I have been wrong before.

I haven't tried without a thrust washer but will do that next.

When assembling, I was checking for binding and the binding starts when the second set of spider gears is installed to complete the cross hairs. Yes I have been looking at the parts and I checked to see if the shafts where straight by rolling them on the granite and looking for light leaking.
 

Attachments

  • Gear by itself.jpg
    Gear by itself.jpg
    176.6 KB · Views: 7
  • Gear zoomed in.jpg
    Gear zoomed in.jpg
    128.4 KB · Views: 7
Last edited:
The cross pins are tight and it can be a difficult to remove the spider gears, I have to use significant muscle to remove them. I swear im not weak but I get scared I'm going to bend my 90 degree pick when pulling.

The binding is bad enough that I can't turn it when it is locked up but can spin it in the other direction some. Hopefully that makes since.

The one gear has a little scaring on it but it doesn't look that bad, picture attached. This is the same gear from step 5. I have looked at all the spider gears and I can't see any damage other than the attached pictures and I don't see this causing a problem but I have been wrong before.

I haven't tried without a thrust washer but will do that next.

When assembling, I was checking for binding and the binding starts when the second set of spider gears is installed to complete the cross hairs. Yes I have been looking at the parts and I checked to see if the shafts where straight by rolling them on the granite and looking for light leaking.
Have you done the other diff yet? If not check it and move some parts around to see if it changes. Its alot of time and a pain but might give you some answers
 
Here is a picture of the shaft lengths for the spider gears. One might be one hundredth off a mm longer.
I have not done the other diff yet but that sounds like the easiest way to figure out what the problem is by swapping other parts in.
 

Attachments

  • Shaft length.jpg
    Shaft length.jpg
    150.9 KB · Views: 4
The diff gears on both my Ram and mega truck feel a bit notchy when you work the diff action
The mega truck is worse then the Ram for some reason
The crown and pinion gears all spin smooth and the truck rolls with ease
I think a lot of the issue is with inconsistent QC with the parts
I've taken my diffs apart and can find no issues with the assembly I think the notchiness is just what it is
The first set of pictures you took, the third pic is what my ram diff looked like and the chew marks around the cup were caused by the 4 diff bolts being loose which caused the diff to be loose and wobble inside the axle housing, the gears is what is causing the chew marks
If you put your diff together but leave the bolts a bit loose the diff will prob spin smoother so the notchiness is being caused by tight tolerances
There is a mod that you can do that allows you to use longer bolts and use lock nuts to Keep the diff bolts from backing out
The diffs in the ram are very strong but Primal should have used larger bolts to hold the diff together
 
Back
Top
AdBlock Detected

We get it, advertisements are annoying!

Sure, ad-blocking software does a great job at blocking ads, but it also blocks useful features of our website. For the best site experience please disable your AdBlocker.

I've Disabled AdBlock    No Thanks