New to1/5 Scale..Slawhammer's Project

This site may earn a commission from merchant affiliate
links, including eBay, Amazon, and others.
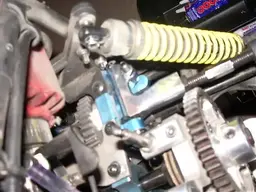
Rear Alloy Upper Arm

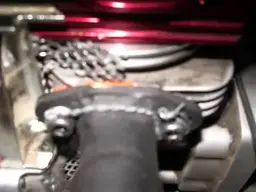
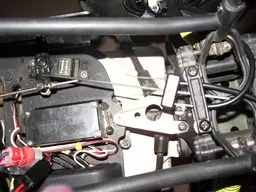
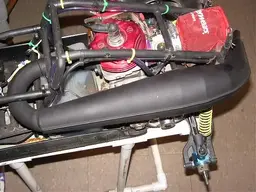
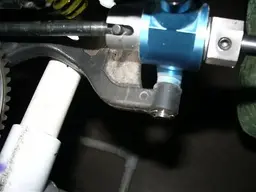
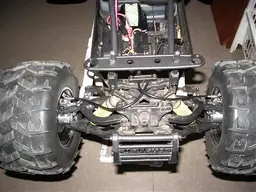
Ok ..I installed the rear alloy upper arms...The DDM pipe is not the correct fit I have too
work on that to get to fit..some minor filing..Mainly the mount bracket..it's off good 1/2
inch...Should have done in the morning..All replies welcome..AKASlawhammer
Enclosed picture,,:)
 

Attachments

  • Installed upper arm.webp
    Installed upper arm.webp
    26.6 KB · Views: 29
RotoTool

Oh yeah..Look what the miss's got for me...I could have used this for the wheel collars
It is no dremel but should do the same thing..from sears..If goes bad I can take it back..
all replies welcome ..AKASlawhammer..:):):)
Enclosed Picture..
 

Attachments

  • roto tool.webp
    roto tool.webp
    15.7 KB · Views: 12
Black DDM PIPE

Well the Black DDM Pipe is mounted..That roto tool made short work for me..I had to
grind the mount flange a little and the mount tab...Thanks to all those who have been helping me on this firehammer project..I still have the front brakes to install yet...
I was told they have been shipped...Ready to run..Maybe in the morning..If not Sat
morning...All replies welcome..AKASlawhammer
Enclosed Picture of Black DDM Pipe:):)
 

Attachments

  • Black DDM PIPE.webp
    Black DDM PIPE.webp
    40.7 KB · Views: 28
Well the Black DDM Pipe is mounted..That roto tool made short work for me..I had to
grind the mount flange a little and the mount tab...Thanks to all those who have been helping me on this firehammer project..I still have the front brakes to install yet...
I was told they have been shipped...Ready to run..Maybe in the morning..If not Sat
morning...All replies welcome..AKASlawhammer
Enclosed Picture of Black DDM Pipe:):)

Looks awesome! Just got mine tonight from [AK]Zip, the pipe appears to mount a bit different than the high speed one of mine. The torque one snakes around the rollcage while the high speed doesn't. I can't wait to get it mounted up this weekend.

Oh yeah, I had to modify the mount tab on my high speed pipe when I mounted it originally (drilled out the mounting hole a LOT bigger).
 
Last edited:
CSP1971: You should get 25% more power with that TQ Pipe..You will have to readjust your carb for it..When that pipe snakes around the roll cage on the rear left it wants to hit the cornor post..You might have to make the tab hole bigger..it bolts to the gear plate
bolt by the lay shaft brake...Let me know what you think on the pipe after you run your
truck...Thanks for your reply...All repiles welcome..AKASlawhammer
 
Frt Disk Brakes

Oh Yeah..USP Truck showed up this morning..The front brakes have arrived..
Not sure if will get done today..Miss's has other plans slated for the day..
But for now a item picture..I will post picture when installed...All replies welcome..
AKASlawhammer
 

Attachments

  • Frt Brakes.webp
    Frt Brakes.webp
    20.1 KB · Views: 14
Safety Wired cap screws

Ok..I don't remember If I mentioned about drilling holes in the exhaust cap screws or not.
Well there drilled and I safety wired the cap screws..If a screw tries to loosen up it will pull against the wire..and still be tight..I was tired of tighting up the cap screws..
I will let ya know after the next run...Maybe in the morning...
Oh Yeah ..I noticed on full extention in the rear the dog bones want to come out..Too
much slop in there..Any recomendations for this...All relpies welcome..AKASlawhammer
Enclosed picture..
 

Attachments

  • Safety Wire.webp
    Safety Wire.webp
    14.6 KB · Views: 28
Ok..I don't remember If I mentioned about drilling holes in the exhaust cap screws or not.
Well there drilled and I safety wired the cap screws..If a screw tries to loosen up it will pull against the wire..and still be tight..I was tired of tighting up the cap screws..
I will let ya know after the next run...Maybe in the morning...
Oh Yeah ..I noticed on full extention in the rear the dog bones want to come out..Too
much slop in there..Any recomendations for this...All relpies welcome..AKASlawhammer
Enclosed picture..

Does your upper arm on the rear have a set screw that can reduce travel? See the thread below, this might help a little, otherwise some shims?

https://www.largescaleforums.com/forum/showthread.php?t=2707

I was using safety wire on mine too, but putting it on was a pain so now I just use body clips.

Should just put some safety wire through the cap bolt on the transmission brace, wrap the wire around the car about 12 times. That should keep that thing from ever moving! :lol: :lol:

Actually.....that might not be a bad idea, incorporating a cap head screw where the transmission brace goes into the large motor mount, then that one spot a couple posts above on the flywheel case (short 5mm cap screw red thread locked in place), then safety wire the two together somehow. Rigged, but it might do the trick if it's driving people nuts.
 
Last edited:
CSP1971: yes there are limit screws there..on the upper arms..Yeah Some times you can't
see the tree before the forest..I did not give any thought,,I will look in to that later..
Your right real pain in the butt to safety wire..I like your Idea of body clips there better..
You be the man...Great tip...Thanks for your reply...All replies welcome..AKASlawhammer
 
CSP1971: as too the limit screws..I have limited the travel to almost flush lower control
arms with the flat ground surface..But there is like 1/2 inch slop movement with the
dog bones..Yes I agree some movement is needed..But not a 1/2 inch..Maybe the dog bones are not the correct length..I have not found any specs on Duratrax for this..
Does any one out the know this measurement??Mine are 108MM long..Thanks
All replies welcome..AKASlawhammer
PS.. As for now I used fuel tubing in the drive cups ..I have slight movement now..Rain here..So I will
try too run this in the morning....
 
Last edited:
CSP1971: as too the limit screws..I have limited the travel to almost flush lower control
arms with the flat ground surface..But there is like 1/2 inch slop movement with the
dog bones..Yes I agree some movement is needed..But not a 1/2 inch..Maybe the dog bones are not the correct length..I have not found any specs on Duratrax for this..
Does any one out the know this measurement??Mine are 108MM long..Thanks
All replies welcome..AKASlawhammer
PS.. As for now I used fuel tubing in the drive cups ..I have slight movement now..Rain here..So I will
try too run this in the morning....

Your size is correct according to Tower:

http://www3.towerhobbies.com/cgi-bin/wti0001p?&I=LXPMN2&P=7

SPECS: Length: 4.25" (108mm)
Diameter: .258" (7mm)


I'll have to think about this one....maybe put a couple shims in between the wheel drive block and the rear hub carrier (outside) if there is enough thread room on the current axles to still get a good tight hold on the wheels. Make sense?
 
CSP1971: I got 2 washers there now..behind the drive block..Maybe the drive cups at the wheels are to short..Only thing left I can think of..Thanks for you reply..All replies welcome
AKASlawhammer
 
CSP1971: I got 2 washers there now..behind the drive block..Maybe the drive cups at the wheels are to short..Only thing left I can think of..Thanks for you reply..All replies welcome
AKASlawhammer

Can you post a couple pics of one of the sides without the wheel? I'm curious.
 
Washer for Spacer Behind drive block

CSP1971:As your request for a picture..This is now with fuel tubing added..
Thanks for your reply..All replies welcome.AKASlawhammer
Enclosed Picture
 

Attachments

  • Washer for Spacer.webp
    Washer for Spacer.webp
    15.5 KB · Views: 36
CSP1971: as too the limit screws..I have limited the travel to almost flush lower control
arms with the flat ground surface..But there is like 1/2 inch slop movement with the
dog bones..Yes I agree some movement is needed..But not a 1/2 inch..Maybe the dog bones are not the correct length..I have not found any specs on Duratrax for this..
Does any one out the know this measurement??Mine are 108MM long..Thanks
All replies welcome..AKASlawhammer
PS.. As for now I used fuel tubing in the drive cups ..I have slight movement now..Rain here..So I will
try too run this in the morning....

I just noticed something Slaw....are you certain you purchased Firehammer MT dogbones?

The reason I ask is this:

Firehammer: 95mm

Firehammer MT: 108mm

108-95 = 13mm

13mm = 1/2 inch
 
CSP1971: I can measure them..But just to be sure I have new firehammer MT dog bones coming..Should be here Tue or Wed..I also have a 8.2 volt /5400mahBattery coming..The 6 Volt regulator will step it down..So now as too the dog bones I thought order another set
making sure were MT Bones..Thanks for your reply..All replies welcome..AKASlawhammer
PS: I just rechecked the dog bones..CSP1971 you be the man..there 95 mm..Beer is on me my friend..Thanks
I was mistaken on the battery..It is 8.4 Volt 4600Mah..My bad on this..
 
Last edited:
Well not much today going on with the firehammer...I am working on another up grade..
Hope to have all the parts this coming week end..Long range forcast as to weather here RAIN
the rest of the week..like next 4 days..So looks like I will be starting the front brakes..
I was hoping to run the firehammer a little before that..Been about 6 to 8 weeks since
I had a full tank of fuel ran in the firehammer...Thank You for all your replies..All replies
welcome..AKASlawhammer
 
New Fuel system for firehammer

Ok..Here's the lastest Up grade I am going to make for the firehammer..New Fuel System
This will be all custom built...Waiting on a couple items yet to do this...
All replies welcome...AKASlawhammer..Enclosed picture...:)
 

Attachments

  • New Fuel System.webp
    New Fuel System.webp
    21.9 KB · Views: 24
Front Brakes for Froehammer

Ok..All I have to say about that epoxy putty Is it is super strong...If I were not going to
install front brakes I would leave it there for protection...Ok so I don't remember if I mentioned it or not but I got a flex cable for the roto tool..That thing is great..made short
work of taking the epoxy putty off the steering knuckles....I have the front brakes installed:)
I have to make some minor adjustments for tighter braking to stop better...
I am still waiting on a couple items yet for the new fuel system to be installed...
All replies welcome..AKASlawhammer
Enclosed Picture
 

Attachments

  • Front Brake Installed.webp
    Front Brake Installed.webp
    12.7 KB · Views: 33
Front Brakes for firehammer

Ok..couple more pictures of the front brake set up..I am going to do the new fuel tank
system late today or in the morning..still waiting on parts yet..Yeah another rain day here
Hope to get out now for a good run with the firehammer..
All replies welcome..AKA Slawhammer:2guns::2guns:
 

Attachments

  • Frt Brk Hook Up.webp
    Frt Brk Hook Up.webp
    34 KB · Views: 29
  • Short Brake Cables.webp
    Short Brake Cables.webp
    43.5 KB · Views: 32
  • Lt Frt Brk.webp
    Lt Frt Brk.webp
    21.4 KB · Views: 28
Back
Top