Joined the Raminator Owner's CLub as of Yesterday.

This site may earn a commission from merchant affiliate
links, including eBay, Amazon, and others.
Make sure the vent hole in the gas cap is open and not clogged ( you can even drill it out a bit bigger)
Also make sure the rubber valve in the cap is working properly
Some trucks had an issue with the cap not letting air into the tank as the fuel was being used up thus causing the engine to die out
I have the same issue with the Kraken Vekta KV5TT fuel tank. I bought two quick fill caps that have the metal filter breather. I can take out the rubber nipple gasket from the stock cap and use that to seal the cap to the tank. I did think about removing the small rubber flap on the plastic insert. That set up only lets pressure out due to vapor expansion assuming it is more positive pressure compared to outside of the tank. As it seems, the tank has negative pressure that pulls the rubber flap on the plastic insert inward and seals the tank. Vent hole will do nothing. I can experiment by pulling the small rubber flap off of the plastic insert. The cap will breathe better. Either that, just remove the plastic insert, no need to modifiy it. Will see if that works. I could always change the tank gromet and add a breather line and filter. Just trying to keep the mods to a minimum for now. Spent enough money.
 
I removed the rubber flap that is mounted to the plastic insert that sets inside the rubber nipple in the cap. That worked great. No issues with pressurized tank. Easy mod for a Ramiator or Vekta. Not suitable for a Baja due to angle of fill neck on the tank.

Ran the truck for about 25 minutes using the stock NiMH battery. Had no issues to speak of. The AFGRC servos all worked without any overload or overheating.

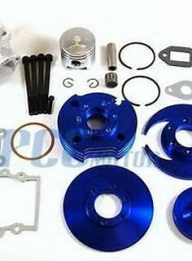
Just for S&G, I purchased a second Raminator engine. I want to experiment with some mods and see if a Stage 3 top end will do anything or nothing. Parts were not expensive. Based on a single video on the Raminator engine teardown, it already has the 44mm piston so that would make it more like a 52cc-54cc. I will find out once I get the motor. Also found a different carburetor and velocity stack with built in choke that is different than the stock unit. This may just be a blown endeavor and waste of time. Oh well. It will give me something to do when I go on vacation. Yeah, will have to take off the anodizing on the insert to improve electrical connection to the engine case. I may even shave off some of it for better performance. If it blows up or fails to run, I will have the original engine to go back too.

1660491303114.png
Have some carbon fiber reed valves on the way along with replacement gaskets. Will see how things work out. Was also looking into the pocket bike stuff. Break-in at 25:1 ratio, and then lean out the oil mixture. 30:1 up to 40:1. I may see how the 30:1 works out after I get a few tanks run through the stock engine as is.
 
I think your going to be dissapointed in that stage three top end
I bought a complete stage three engine 2 years ago to try in my raminator and found it had LESS power then the stock engine, (it did rev a bit more though)
I've done other mods to the stock engine like install a 4 petal reed block and a WT style intake so I could use a walbro 1107 carb with a proper choke
The engine runs better and starts nice but it doesn't have any more power unfortunately
Those top end kits have the same poor QC and they also have the compression reducing notch above the exhaust port, (at least mine did anyway)
The overall design of the engine was just not made for the performance/power output that we are used to in the 5th scale hobby
They were originally made to be used in tools like leaf blowers and trash pumps that run at a set RPM
If you want performance your going to have to pony up for a Taylor engine, the 50 has way more then enough power you don't need the 71 or 80 cc
when you put that top end in and use the supplied cooling head you will have to trim the two "wings" on the one head piece otherwise it hits the pipe
who knows maybe you will have better luck then i did with it :)
You may be correct on that. I am not expecting to turn the engine into a beast. May not even use the stage three cylinder. The carbon fiber reed valves would probably improve the throttle response the most. Since this engine has low RPM compared to other 2 stroke engines, it will suffer without a multi speed transmission. Even that will not get it to the performance I would like to see. Just wanted to experiment with some different parts.

Thinking in the 40GT or the 46GT. Probably will not fit as the options did not have the clutch size. Sure, the 50GT may be the way to go. I am just not interested in popping wheelies all the time. Perhaps I want more power but not necessarily more speed (well a little faster would be good). I will have to see some video's on the 50GT in the Raminator. The website claims it now has an in-cab exhaust. I assume that is different than the torpedo sticking out of the back? I will have to inquire with Taylor RC for pictures as the one's on their website are not what I would say is in-cab.
 
Yup the new Taylor engines now come with a shorty in frame pipe
This pipe is way better then the other pipe and dies not need the roll bar in the back for protection
If you want more power but not wheely popping power Primal has a gp 46 cc engine on their site
It will be a decent engine as it is a zenoah
It’s half the cost of the Taylor 50 gt but you have to reuse the stock raminator pipe
I might get one to try on the mega truck I have the Taylor 50 in the ram already
 
I would say now, I am pleased with the Raminator after I corrected the issue. This is one cool machine regardless of it being slow. I can get some good air just pulling up to the sidewalk step and hit the throttle. Same with a 4x4 piece of lumber. I do not think my neighbors would want to see any dirt ramps in my front yard (only large area I can run my vehicles). However, the Raminator does not need as much area to have fun with it. Have to see how a gear swap will work out. Still have the 25/25 ratio. Thinking on the using the 27/23 with the pinion at 27.

I will consider a better engine sometime down the road. For now, the stock engine is good enough to get used to the vehicle.
As for the second engine I bought from Primal RC, I got it for experimenting. I did consider buying one that was already set up (did not matter if stock, state 2 or stage 3) they claim only 1.8kW power. That would be 2.4HP, that is a bit lame. No mention on torque though. The Raminator replacement engine has a claim of 6HP. Not sure I believe that either unless one can provide the dyno test data or report.

When I get all of the parts, I will share that. Not expecting much if anything at all since the max unloaded RPM of this type of engine is 11k. Wonder what the RPM engagement of the clutch is.

If money was no object, I would figure out how to get one of those high dollar 1/4 to 1/3 scale supercharged V-8 engines in the truck. If they make an automatic transmission and torque converter like the real thing it would add to the realism of the monster truck. Would probably need a 2 gallon cooling tank. Since I have limited funds, that will never happen. So much for the dream of illusion.
 
Last edited:
Now that is what I would say is realistic. Awesome what money can buy along with some skills how to build such a thing. :D
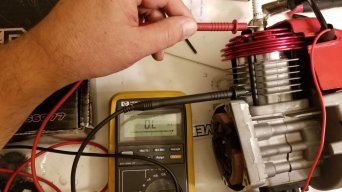
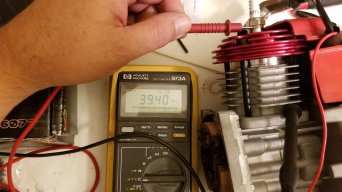
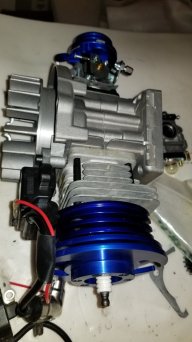
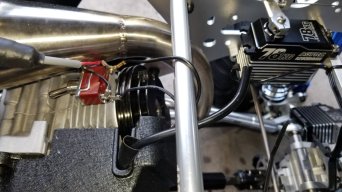
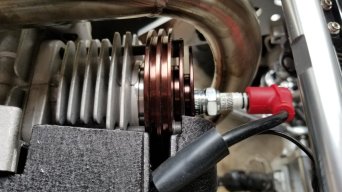
I got the second engine the other day. Figured I would take a picture how I measured the contact resistance of the cylinder head to the cylinder. It does not matter if there is any continuity to the bottom end of the engine case since the coil is only attached to the side of the cylinder. The coil is also grounded to the steel magnetic pickup plates. There may be some electrical coupling to the case with the head bolds. I took several measurements that ranged from 39 Mega ohms to OL (open circuit). It did not make much of a difference if I used both hands to force the probes vs jamming the probe between the bolt and cylinder. I could have used a clip but could not find any at the time. This engine was not run so I expected to see some high resistance.
20220817_201549.jpg20220817_201639.jpg

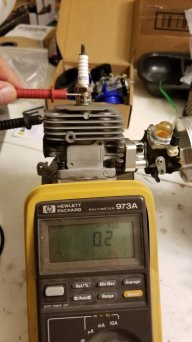
Just for S&Gs, I removed the spark plug and installed it on an old Rovan 36cc engine. Since the top end is a single casting and not three piece with anodized components, the return path for the spark measured 0.2 ohms. Less likely to miss-fire or have ignition issues. Funny to see how small that Rovan engine is compared to the 49cc Ram engine.

20220817_201849.jpg

Next step would be to take some measurements of the bore and cylinder. I want to model this in SolidWorks so I can determine where the compression is at. I would assume once the piston has blocked off all of the ports would be the position where compression begins. Then to measure where it is at TDC. I may fudge the radius of the piston in the model as well as the cylinder cap. Since SolidWorks can do volumetric calculations based on the geometry of the parts. I should be able to figure out the compression ratio easily. Perhaps this is just a waste of time. I am just looking at things out of curiosity. Once I get the top end kit, will measure that as well. Since it is a stage 3, may or may not use the cylinder. Not sure yet, depends on where the piston sits in the exhaust port window with the stock crank shaft. I doubt there is much of a difference with the one provided in the kit. If there is, may try that as well. Not sure what the compression ratio should be for a 2-stroke. 8:1, 10:1 or 15:1 and what the actual compression is to start with. I did try using a pressure gauge. I was missing a part in the kit so I could not pressurize the gauge, the peak pressure appeared to reach 10psi-15psi. I was getting above 20psi with the Rovan 36cc engine. May just get another pressure test kit as the one I have is rather old and was used to measure fuel line pressure in my 2004 Mustang Cobra.
 
Last edited:
Completed the CAD model of the cylinder, piston and cylinder cap. I doubt the figures are correct. I got 5.06:1 compression ratio based on volumetric analysis when the piston has just closed off all ports and to top dead center. If this is correct, it would explain the low PSI pressures I got with the engine before I took it apart.

Unfortunate that the cast bottom end broke when I removed the cylinder screws. Found some threaded metal casting bits that fell off on the desk. Had issue removing one of the bolts. It was stripped during assembly as was the casting. Bummer. It does appear I can still get a bolt in the hole and seems to hold ok. Casting flaws with voids tend to question the quality of the parts. As for the cut window in the piston, it servs no purpose for moving air/fuel into the compression chamber. I assume it aids it lubricating the wrist pin and bearing on the piston but could not figure out where it is not against the cylinder wall all the time. Perhaps it is only used with a non-reed style engine as that would make sense.

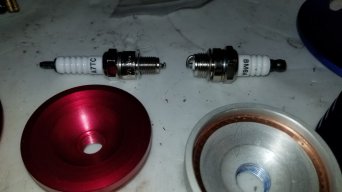
As for the stage-3 top end kit, it is the same damn thing as what is on the stock engine. there is one subtle difference in the shape of the piston cap squish area. It has less volume than the other. However, it will be more difficult to remove the anodizing to get better grounding for the ignition coil. I did install it just for kicks to see if there was a difference in feel when pulling on the starter. Nope. Also, the plug type is completely different and is not a 10mm thread. Much larger. I may not use that but why not try it at least once. I did not expect any major improvements to start with.

Oh-well. I still have the original engine operating OK. Will have to try out some iridium plugs just to see how that works or does not work.

I did consider a Taylor GT50 or the ChunYang GP460. I will settle with what I got for now, it works well and is not overkill or require cutting the side plate to get the engine to fit.
 
Need to correct something I stated earlier. The coil does not mount onto the cylinder like it does with smaller engines. It is mounted to the engine case. I did not realize this until I disassembled the one spare engine. My bad.
 
The stage three top end should have 2 additional boost ports cut into the cylinder, the stock engine should have none
They make a stage 5 with three boost ports as well but there isn’t much support in the cylinder for the piston so apparently the engines wear out pretty quick
I think if someone designed a proper top end and cylinder kit for the stock engine it could be a decent performer
I removed the stock cylinder, compared it to the so-called stage 3 version. They are identical in all respects. I thought there was a boost port cut in the side of the cylinder that is located where the piston windows are arranged. I have looked at several Stage three versions, one looks like the stock Raminator and the other has the oversized cylinder cap that is 4 pieces, center with a smaller squish dome, main cap with the 4 bolt holes and two additional heat sinks. Some of these stage 3 versions have the 3 boost ports cut on the side of the cylinder and others have none.

Regardless of what ever is out there, buyer beware. Not fond of the larger spark plug either. I can get the CMR7A plug in an iridium type but cannot find iridium versions of the BM6A or BMR6A plugs. The plug that came with the kit is a non-resistor type. At least I can get that in a resistor type if I get radio issues.

20220820_130934.jpg
 
Not sure this is going to do much or if anything at all. I doubt there would be any improvement with this.

20220820_135000.jpg

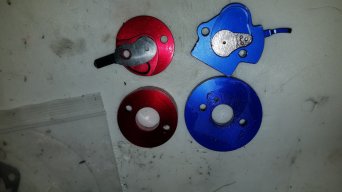
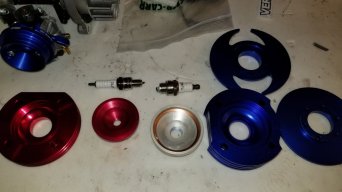
Here are some of the parts I found.
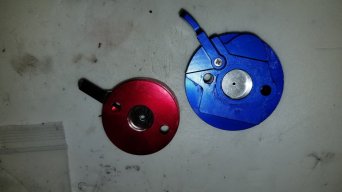
Starting with the intake, comparing to the stock part in red and the alternate in blue.
The stock velocity stack has an 18.3mm opening whereas the choke cuts it down to 15.04mm. I measured the carb intake port at 15.3mm.
Sure, the stock choke with its thin metal plate, thin gasket that does not do much for sealing out leaks is one of the first things people remove. For kicks, I tried to start up the Raminator with the choke off, primed and it did not want to start like It did when I removed the anodizing off of the cylinder cap. Note that the fuel tank was pressurized to some extent. Had to use the choke to get it started. Decided to look for something different and found it. Was not very expensive and came with a carb that looks like the original, along with gaskets and plenum. Did not need to swap the parts so I left the stock carb in place.

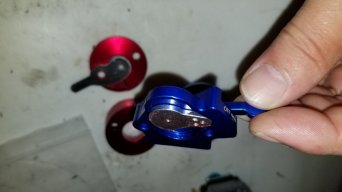
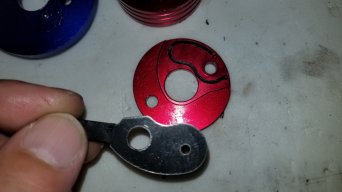
The blue part has the choke lever encased so there should be little if any air leaks for dirt to find its way in. There is a spring-loaded ball that is fit into the velocity stack to keep the choke in its position. Hopefully the choke lever will remain open when running the Ram. The assembly is much thicker than the stock assembly. It does come with stainless steel hardware to secure it to the carb. No reduction in bore as it maintains 16mm with the choke lever out of the way. The printing on the plate has off for choke and on for run.

The velocity stack is also stepped so it has a flange for the filter to keep it in place. That may be good or bad since the rubber part cannot be forced to rest against the choke lever if that is the only way to keep it from moving when running.

20220820_125242.jpg

20220820_125305.jpg
20220820_125314.jpg
20220820_125326.jpg

As for the top end kit. I believe I got rooked. It is not a stage 3 but stage 2 with larger heat sinking cylinder head. The piston that came in the kit was nearly identical to the stock part. I could have replaced it but there was no point in doing so at this time. I got a spare assuming the engine will actually work. Spark plug is also different.


20220820_130914.jpg

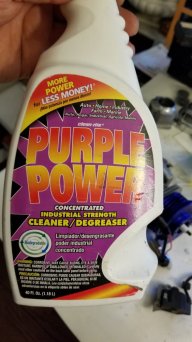
Removal of the anodizing is an easy task with the stock parts since the mating surfaces to the cylinder and spark plug are flat. The blue kit did offer a challenge as the mating surface is not flat, also has a ring around it so hand sanding was not possible. So why is the center cap in the picture above silver and not dark blue. It was blue like the rest of the parts and had the same resistance of the stock anodized parts, meaning it was an open circuit for spark. I found something by accident when cleaning up some Baja parts during a rebuild that appeared to remove the anodizing. Did a simple experiment with some of this degreaser in a ceramic dish, placed the center cap in the fluid and let it sit for an hour. Yep, that stuff did the trick. Had to replace the fluid a second time for another hour and it was mostly free of anodizing. Checked it with an ohm meter and confirmed I had good electrical contact. Before I was getting open circuit or 30M ohms. Did a final 5-hour soak diluted with water. There is still some areas that have the blue dye but did not seem to be in an area of concern to electrical conductivity. No sanding required for that part. Here is the stuff I used to strip the anodizing off. I bought it at auto-zone a few years ago for cleaning brake dust off of wheels.

20220820_135142.jpg

Final assembly of parts. What is left? Cut the fan cover down to fit the heat sink. I did add some oil to all of the bearings, cylinder wall, piston rings, before I assembled it. Turning the flywheel by hand I it did not seem to improve on compression. Doubt this will make any performance improvements. Even though the one threaded boss broke in half, I was still able to secure the head down well as there were enough threads present. Will have replace the spark plug boot since the stock one will not fit a BM6A plug. I may get an NGK BMR6A plug since the resistor type may be needed to quell the ignition noise down a bit. Lesson learned: do not bother with the stuff from Ebay or Amazon. Did consider a PBU engine but that was high dollar for the same thing. Taylor anyone? CY? TMR would be nice too.

Makes me wonder when the OBR fat-boy for the Raminator will be released. Last notice I saw was dated 2020. It has been 2 years now.
Almost seems like a lottery on what your gonna get with these engines! Lol
You got that right. :D
 
Today, wanted to try out the different choke/velocity stack on the stock engine. Also decided to pull off the RamAir race filter off of my Baja with the Zen-ESP G340RC engine to see if there would be any performance change with a less restrictive air filter. Also made another change to the spark plug. NGK CR7HIX 7544. I measured its resistance and it measured 5K. Perfect. Also took the opportunity to see what was going on with the brakes as I felt it was not stopping properly. Glad I did not wait to do this as I found the screws on the front brake had worked themselves out and just hanging by a few threads. Both screws had no sighs of thread-lock on them. The rear brake was in good shape. I could not move the screws.

Have to figure out what to do with the exhaust coupler. Damn thing leaks to the point it sprays combustion byproducts all over the transmission, front brake, servos, etc. I had tightened up the existing clamp and added a second one in hopes to curb this problem. Not a fix.

From a few roll-overs from yesterday, three of the side body pins are broken, chassis and body cage. Figured this would be the next thing to replace.

While I was swapping out the NGK CMR7H 3066 plug in favor of the iridium plug, I noticed that the head heat sink was no longer black. It had faded to brown. Here is the before picture:

20220807_120318.jpg

Here is the after picture when I installed the iridium plug today. The black has changed color to brown. Running on the hot side? I did not use any cleaners on the anodized head at all. I did sand down the inner dome for better continuity. The picture above was after that process. If it burns up, at least I have the other engine to use as a spare. May just take off the blue and install the red head after honing down the cylinder cap insert.

20220821_123324.jpg
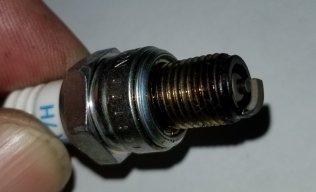
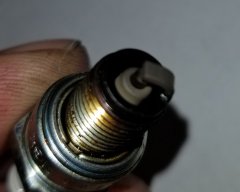
The plug I removed looked OK. There was oil on the threads, the insulator was not wet like before, after the cylinder head mod of removing the anodizing. A little bit of gray on the insulator and on the side of the ground prong, oil around the rim. This plug had at least one full tank of fuel run. 25:1 fuel mixture. Original air filter.


spark plug image 1.jpgclose up.jpg

As far as reading plugs, I am no expert. Some say brown color is ideal, but others mention gray is good too. I am not into cutting through a spark plug as some have suggested on the WWW. It runs good. May be a bit on the hot side, may richen it up just a tad. Will see how the change in air filter works out.

After the minor changes. I ran the truck for a bit, around 15 minutes. Performance improved considerably! Almost night and day. I was able to squeeze a bit of more speed than before. Not much but sounded way better as if it was able to breath. At the end of my short run, I tried to see if I could do the stair climb with it. Yesterday I tried this and could not get the truck to climb a set of steps unless I backed up and slammed into them. All it would do is bog down while pushing against the first step, tires would not even rotate. After the minor mod today, I was able to pull up to the step just resting the front tires against it. Just a little throttle and it climbed up the first. I cleared the second step easily. I was not trying to make a jump out of it as I did not want the Ram to slam into my side door into the house since the outer door has glass panels. I am finally happy with this truck. A few minor things to remedy but they are expected based on many who own one of these, body mounts break with little effort. Somewhere in my front yard are some plastic parts and clips.

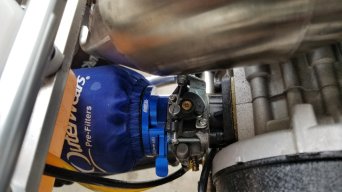
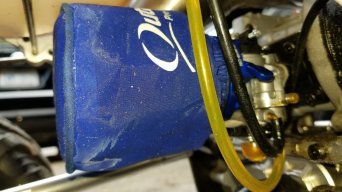
Edited: forgot to add the filter and choke pics:
The pull on outerwears fits the RamAir filter like a glove. Filter does not interfere with the sway bar or crush up against the fuel tank. It is straight and not angled. Much shorter than the stock filter but flows are quite well. My first experience with the RamAir filter was when I got the Taylor RC 35CC engine. I did run it on the Vekta KV5TT with the stock air filter assembly, the engine was not breathing well so I opted for the RamAir filter and what a huge difference that made with the 35cc engine. It also made a difference with the 49cc stock engine. For now, it stays. Just have to remind myself I need another one to replace what I removed from the Baja.

Love the new choke setup too. Bashed around a while and could not get it to move out of position. Engine fired right up after two pulls while I had the choke on like it did when I did the anodizing removal mod. Cool. Now I am having more fun with the Ram.
20220821_123343.jpg
20220821_123401.jpg
 
Last edited:
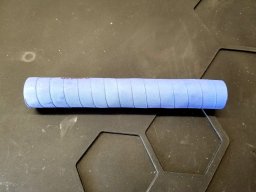
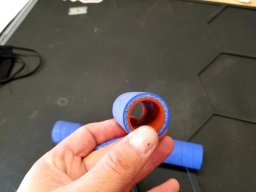
I got a nice piece of high temp silicone hose from Napa. Was cheap enough I bought like 12 inches. Cut it a longer then stock and has worked way better with no issue. That should sort out the exhaust spraying issue...I had the same issue and blew through the stock cheapy quick.

View attachment 83335
View attachment 83336
Thanks for the tip on the high temp hose. May give that a try. What ID is that? I have not measured the pipe yet. If you can find the Napa part number even better.

I can see the one I have at the moment has actually melted in some areas. I need to replace it soon.
 
Got back home tonight with time to spare! Lol.
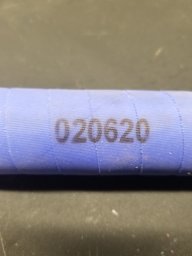
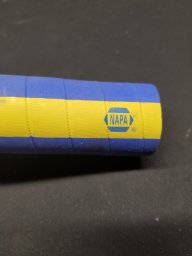
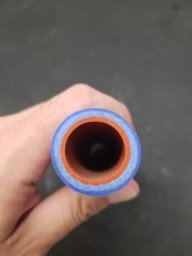
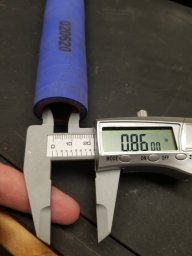
Ok I can not find it on Napa's website go figure. These are the markings it has and its size. Pretty close to 7/8ths ID. It is called reinforced silicone high temp hose. My Napa guys knew exactly what I was asking for and produced what I now have when I went in and asked. Hopefully these pics will help them identify it. If they cant figure it out...drop me a PM and we will see what we can do.

20220823_192906.jpg

20220823_192910.jpg

20220823_192919.jpg

20220823_193133.jpg
 
Got back home tonight with time to spare! Lol.
Ok I can not find it on Napa's website go figure. These are the markings it has and its size. Pretty close to 7/8ths ID. It is called reinforced silicone high temp hose. My Napa guys knew exactly what I was asking for and produced what I now have when I went in and asked. Hopefully these pics will help them identify it. If they cant figure it out...drop me a PM and we will see what we can do.

View attachment 83346

View attachment 83347

View attachment 83350

View attachment 83351
I just got the bart pipe from Primal RC, has the same tubing on it. I have not yet tried to look for the material. I will keep this in mind when that time come. Have a few things that will be changing along with the exhaust.
 
Back
Top
AdBlock Detected

We get it, advertisements are annoying!

Sure, ad-blocking software does a great job at blocking ads, but it also blocks useful features of our website. For the best site experience please disable your AdBlocker.

I've Disabled AdBlock    No Thanks