RickDizzle's Raminator Build

This site may earn a commission from merchant affiliate
links, including eBay, Amazon, and others.
Thanks guys! Sorry Z. Im going with my gut and for now running the insides black.

Today I worked on the fuel system. Its been seen that this truck has had fuel delivery system issues with others. Predominantly not venting the tank properly causing the truck to die due to the tank not being able to take air in, in place of the used fuel. After watching a ton of videos on this, I did the following:

This is how the truck looked stock.
20201020_195847.jpg

New DDM Aluminum fuel cap. I scuffed the inside at the small vent hole and prepped it for some JB Weld. I then plugged the hole making this cap now sealed.
20201020_195613.jpg
20201020_195638.jpg
20201020_195722.jpg

I then switched over the insides from the stock cap to the new.
20201020_195753.jpg

Looks way better then the stock cap.
20201020_195827.jpg

Now I got some aluminum angle in 1/2" x 3/4" to make a bracket. This bracket will bolt into the open center threaded hole in the rear fuel tank brace, stock on the truck. I used a DDM jj504 H clip for fuel lines and attached it to my bracket.
20201020_200041.jpg

Here it is bolted in.
20201020_200059.jpg

Next I pulled out the stock fuel tank grommet and removed the stock fuel lines from it and the fuel filter.
20201020_195957.jpg

Now I used the Snappy RC Fuel Tank Kit jj575. I ended up only using the tank grommet that has the three holes vs the stock two hole which is stock. The kit also comes with a black vent and tubing for it..but I wanted to do mine red to match. I then used the Full Force RC hi-flow kit.
20201020_195933.jpg
20201020_195906.jpg

I inserted the first brass fitting into the grommet. I then cut and install the tygon tubing with one clip and the stock fuel filter.
20201020_200120.jpg

The Full Force Hi-Flow kit comes with two brass fittings...I bought 2 extra fittings as they are also sold separately as well. The mod I am doing with the Snappy RC kit will need three brass fittings. The third fitting is for the vent system. If you opt to, you do not need to run a third fitting. You can run the Snappy RC vent directly into the third hole in the grommet. This would circumvent the need to make a bracket and a that work. But being OCD, I didnt like the look of that vent just sticking out of the grommet flopping around. So I cut this brass fitting down so it goes down through the grommet, but shouldn't reach my fuel. Green tape was just used to help me mark my cut. You can see how much shorter I made it.
20201020_200145.jpg
20201020_200211.jpg

I used some 2 stroke oil to lube up the grommet and inserted the grommet into the tank fully, with only the yellow fuel pickup line and filter/brass fitting installed. I left the other two holes open. Makes it much easier to get it to pop in as the grommet gives some play. Then I installed the second brass fitting. I did not add any additional black hose to it inside the tank, as the brass fitting is about as long as the original black line was. Last went in the cut brass fitting for the vent side. I then used clear tubing and a red valved vent from Detroit Performance. I looped that clear tubing into the H clip that was installed earlier in this post. Then I felt appropriate that I add a Amsoil sticker to my tank as I will be running dominator in this rig.
20201020_200314.jpg
20201020_200225.jpg
20201020_200238.jpg
20201020_200258.jpg

This should resolve any venting issues and I think looks pretty sharp. Well that is today's update! I have pretty full next couple of days. Will get some more wrenching in this weekend.
 
Looks nice, I see a potential issue, where you have the line hanging down fuel.may collect in it. Typically the breather is kept higher then the tank to keep from getting fuel in the line and locking it up. Like I said may not be an issue for you. Just something to look at after your running.
 
Looks nice, I see a potential issue, where you have the line hanging down fuel.may collect in it. Typically the breather is kept higher then the tank to keep from getting fuel in the line and locking it up. Like I said may not be an issue for you. Just something to look at after your running.
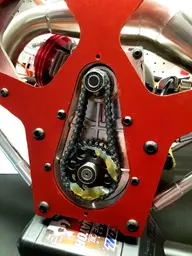
Great feedback! I was wondering bout that too. I am hoping that the vent inlet in the grommet not being in the fuel due to how short I made it, plus the breather having a check valve, thus only allowing air in and not allowing backflow due to the check valve will prevent that issue. If not I will work with it and see. I truly appreciate the feedback and will post the results once this beast is running.??
 
Got some good work in today. Today I switched out my carburetor for a TMR 2 needle carburetor. This is a stock carb modified with a low end needle. Removed the stock set up.
20201024_191912.jpg

20201024_191927.jpg

Here is the new carb and the Bartolone 2 piece velocity stack I am using.
20201024_191949.jpg

Carb on the right is the modified carb with the low speed needle adjustment.
20201024_192005.jpg
20201024_192022.jpg

Old velocity stack vs the Bartolone.
20201024_192040.jpg

What was removed, choke and stock velocity stack.
20201024_192054.jpg

Good ol' Fast Eddies getting some use today!
20201024_192204.jpg

Prepped for install.
20201024_192218.jpg

Lower portion of the stack installed. I torqued these 2 bolts down to 50 inch pounds.
20201024_192232.jpg

Prepped both parts for install with a very thin layer of Fast Eddies.
20201024_192255.jpg
20201024_192314.jpg

All completed.
20201024_192330.jpg
Next I moved on to where the drive shafts connect to the transfer case. The pins that attach the drive shafts to the output shafts are notorious for backing out. Mine seem to be installed by Hercules with some very strong loctite. So I left them in. I then took a nice super thick heat shrink with glue on the inside that is heat activated. I cut peices to go over the drive shaft at the output shaft, essentially trapping the pin and hopefully will help prevent it from being able to turn and back out. This stuff cures to a thick rubber that is very strong.

This is the pin I am referring too.
20201024_192343.jpg

Here is the cut heat shrink on but not heated.
20201024_192402.jpg

Here are both the front and rear drive shafts with the heat shrink heated and cured.
20201024_192419.jpg

20201024_192430.jpg

Moved on to the drive chain. This is a nice dual chain system. I opened up the cover, thank you to those that recommended a heat gun. I had the top screw super stuck with loctite. Hit it with the heat gun and worked like a charm. Here is the chain drive opened up as it looks stock.
20201024_192604-jpg.65166


I then cleaned out all of the stock grease.
20201024_192615.jpg
20201024_192627.jpg

Got down with some more Fast Eddies and nicely coated the chain and the drive gears. This Fast Eddies webs like a son of a gun. Such a good sticky grease...very impressed!
20201024_192743.jpg
Last for tonight, I oiled up my air filter. The set up looks very nice and I was very impressed that it has a spring inside the inner filter to prevent it from collapsing. I oiled the inner with BelRay foam filter oil. I noticed right away, while working in the filter oil...the spring was cutting into the face of the inner foam filter. Took care to be careful from here. Then reinstalled the outer cover not oiled, as I like to do on most two stage filters.
20201024_214329.jpg

And as I was afraid, the inner element is not very sturdy. While installing it on the velocity stack, the inner spring tore into the side. Can be seen in this pic if I pull on it.
20201024_214255.jpg


This is it without me pulling on it.
20201024_214412.jpg

So needless to say...I ordered another filter for running. I will probably heat cycle and break in using this, as it is the inner filter only. I will NOT run in any dirt til the new filter is here. With the issue, I opted to run my Primal outerwear cover.
20201024_214338.jpg

Here it is installed...looks really nice and fits really well.
20201024_214349.jpg

That was my Saturday of wrenching. If all goes well, should have axles underneath this beast and suspension in tomorrow!
 

Attachments

  • 20201024_192604.jpg
    20201024_192604.jpg
    154.3 KB · Views: 159
Last edited:
Ok today I was able to get down on the axle and suspension install.

First got the axle laid out and ready. To make it easier, you for sure want to have a stand for the truck. I ordered a toddler foldable step stool...works perfect!
20201026_213734.jpg

Next got the brakes prepped and ready. I found the rotors opening was cut a tad small on both rotors. Used a dremel to open them both up a small amount so they easily "float" on both drive shaft.
20201026_213719.jpg

Axle and drive shaft installed.
20201026_213830.jpg

I opted to use some anti-seize on the drive shaft grease. Won't attract nearly as much dirt as grease will.
20201026_213752.jpg

Next moved on to shocks. Here they are stock.
20201026_213925.jpg

I got some JS Performance spring separators and lower spring perches in aluminum. Looks way better and will hold up to the down force of the truck as it lands. Also got the aluminum shock bushings as the plastic tend to wear quick and oblong.
20201026_213906.jpg
20201026_214335.jpg
20201026_213946.jpg

Installed on the JS Performance shock mounts...looks amazing!
20201026_214024.jpg

A pic of the brake caliper installed. Easy install just have to run the brake cables tomorrow.
20201026_214004-jpg.65256


After checking spacing, compression and droop, I opted to run the second set of shocks in this location. Some run them one hole higher, but I fell like this is a great starting point.
20201026_214040.jpg

Swaybars went on next. They are really good quality and I like how they milled the axle to seat the swaybar. You can tell they were thought out and not just an afterthought.
20201026_214131.jpg
20201026_214117.jpg

On to the front. Much of the exact same minus the steering.
20201026_214148.jpg

Normal shock is straight forward, additional shock is a lil work. There is no way to get the bottom screw in. As you can see due to this arm being in the way.
20201026_214223.jpg

Some have said, just pull that arm and it will go right in. That is NOT the case. As you can see here.
20201026_214240.jpg
20201026_214258.jpg

So the work around is to pull the steering servos and go from the back side.
20201026_214314.jpg

All completed with both shocks.
20201026_214351.jpg

Another trick to help prevent burning up servos, align the steering links so they are much more parallel. You can see how "V" shaped they are based on stock install location.
20201026_214204.jpg

Trick is to flip the outer mounting location so the mount on the bottom not the top. Much flatter. I will tomorrow pull the cams of the servos, power the truck on and center everything. This way the servos work with each other and don't fight each other. This should extend servo life.
20201026_214405.jpg

Overall, I am very happy with how its looking and coming together. Seriously still shocked at how huge this thing is. It dwarfs my 5 foot long work bench lol!
20201026_214513.jpg
20201026_214421.jpg
20201026_214535.jpg

More to come.....
 

Attachments

  • 20201026_214004.jpg
    20201026_214004.jpg
    187.1 KB · Views: 153
Getting close to firing her up soon! Today I got down on the brakes, steering and electronics. Not nearly as many pics due to not a lot to show.

First I wrapped up the steering. I taped off the front bumper as not to mess up the nice red billet. I then pulled both servo cams and provided power to the truck. I was super surprised and happy with the fact the transmitter and the receiver was already set up and bound.
I then set up the servos so they are completely even and working with each other. I noticed had I not made adjustments, the steering would have overlocked one direction and not had full throw the other way.
20201027_213308.jpg
20201027_213329.jpg

You can also see in the top pic that I ran the front brake cable. I ran the back as well. Here you can see the cable run up and over and through the block for the servo.
20201027_213402.jpg
20201027_213342.jpg

I would like to run two lock collars each on the brake cables..but kit only came with 2 total and I can't find any in my small town. So one will do for now. Moved on to the brakes themselves. As you can see you install a small return spring on the caliper when fishing the cable through.
20201027_213415.jpg

These lil screws here, do not tighten down against anything. You should pull them, clean the threads and red loctite them. I did my rears...my fronts were king king strong...so I did not back them out and redo them. Will add to my post run checklists when I park the rig for the day.
20201027_213429.jpg

Next I pulled the stock spark plug. I then used a new straw and squeezed some 3 in 1 oil into the engine. Let it sit for a bit and then did several light pulls of the pull start to get the oil to coat the ring and cylinder and sit for the next day or so so my first few pulls when starting won't be "dry".20201027_213445.jpg
20201027_213505.jpg

Here is the new NGK plug next to the stock plug. This is its "match" according to all the interwebs and the computer at the parts store. From electrode to base they are the same length, but the NGK porcelain is a bit shorter.
20201027_213518.jpg

After I installed the NGK plug, the pull start handle and plastic sleeve were replaced. I went with an Inertia Racing Products pull start tube and nice aluminum red pull handle to match the truck. Also the truck doesn't come with an antenna tube. So I used a dubro red tube to protect the 2.4g antenna.
20201027_213549.jpg

Next I went on to add dielectric grease to all electronic connections. Had a lil brain fart when plugging in my receiver channels. Huge thanks to @Relic-1 . He helped me out big time by double checking channels on his Raminator's reciever.
I ordered expanded braided cable sleeve to clean up the servo wires up front and for the brakes. Will do a final clean up and zip tie this up soon...lil mess at the moment.
20201027_213604.jpg

Tomorrow I plan to work on getting all the decals placed on the body and get her looking right!
 

Attachments

  • 20201027_213549.jpg
    20201027_213549.jpg
    228.6 KB · Views: 2
Looking good the anticipation must be killing you ????
For sure! But I wanna do things right the first time. To much invested in this thing to just throw it together. Did a lot of research during my waiting time for it. That really helped me get on the right track for the build. And I really appreciate this forum allowing me to document the build.
 
Anticipation !!!!!????? That died for me months ago !!!! T. M. R. Saw to that !!!! RC max will be shipping motors early December , then I'll come back and show my build and my anticipation return , this is gunna be epic folks , I literally can't even look at my raminator right now ,it's buried behind boxes and parts in my shop , but folks it's getting close to time to dig it out , all kinds of things to do dual shocks wheel wide kit , and all the touch up stuff , and I have to encourage anybody that has this truck , toreiforce the body with gorrilla Glu duct tape , this is a heavy rig and if it rolls the body takes a hard beating , just ask medic , he will strongly agree , but all that said , looks like a lot of fun Mr. Dizzle , I can't wait rrrrrr well I geuss maybe I've proved I can wait , been waiting since last December !!!! Wow ! I can't believe it myself , pathetic !!!!
 
Anticipation !!!!!????? That died for me months ago !!!! T. M. R. Saw to that !!!! RC max will be shipping motors early December , then I'll come back and show my build and my anticipation return , this is gunna be epic folks , I literally can't even look at my raminator right now ,it's buried behind boxes and parts in my shop , but folks it's getting close to time to dig it out , all kinds of things to do dual shocks wheel wide kit , and all the touch up stuff , and I have to encourage anybody that has this truck , toreiforce the body with gorrilla Glu duct tape , this is a heavy rig and if it rolls the body takes a hard beating , just ask medic , he will strongly agree , but all that said , looks like a lot of fun Mr. Dizzle , I can't wait rrrrrr well I geuss maybe I've proved I can wait , been waiting since last December !!!! Wow ! I can't believe it myself , pathetic !!!!
That's too bad. But I think most of the rest of us are very much enjoying Rick's build. Maybe we'll enjoy yours as well, maybe not. Lol. :p
 
As promised today I did decal duty. First thing you will do is remove all the body screws and plastic grommets that attach the cage.
20201028_222440.jpg

This is what they look like.
20201028_222459.jpg

Everything I had heard in build videos said that there is a thin film coat on the body. I removed my body and confirmed mine shipped without the protective film...Talked with Primal and they said some kits are shipping with the film already removed. So since the body was off, figured I would shot a pic of the cage.
20201028_222515.jpg

From there I jumped into doing decals. I will say for someone with mild OCD, it is almost impossible to get them perfect. I spent an entire day doing mine. Took my time and I still have flaws. You will want to tape your body line between you bed and the cab using scotch tape, as with the screws out, they are not lined up. I then did my giant decals first. I tried to float them with a mist of water with 3 drops of dish soap. The glue adhesive is not super super strong so it made me leary to float them. You then want to line up the big decal at the bottom of the cab and start laying it out. I also used a blow dryer to help. They are not a traditional vinyl, so don't move like vinyl. The heat helps but its not the same as a large vinyl decal. Once you lay it all out, you will want to run a NEW sharp razor blade through the wheel wells and the cab window. Then you will start to roll the decal around the bed side and tailgate and up to the headlights. Time and patience here my friends. Lots of little cuts to make it work right. You will also notice you may have some small triangle gaps behind the cab. You will have tons of extra decal to cover this with. Work slow and bottom to top then rear to front. Worked best for me.
20201028_222540.jpg
After I did the big sides, I did the small decals, tail lights, grills, headlights and so on. These are all very easy.
20201028_222551.jpg

The hood decal...now that is a whole other story. The best thing to do here is watch Primal's video. He advises to cut it into 4 sections as it makes it a lot easier to fit the curvature of the hood hump. That worked fantastic! However the glue is NOT very strong. I already have pieces rolling and not sticking to the curves well. Stinks as I spent a lot of time on it and it looked great! Not super confident that the hood decal is gonna hold long term. As a note....I did not float these due to wanting them to be as tacky as possible just for that reason.
20201028_222634.jpg

A pic of the other side and from the top. As you can see, the bed sides are a tad finicky as well. Time will tell how well the decals hold up. I really hope they hold up well as I like the look.
20201028_222624.jpg
20201028_222612.jpg

Overall I am happy with my application. Wish the decals were a lil more like a vinyl so heat would help in curves and really wish the adhesive was much more "sticky". And side note...watch the lil black washers for the body. I had one...only one...a top washer...grow legs and run away. I can't find it anywhere. Tore apart my work area and nada. Even my eagle eye daughter who finds ALL my lost screws and such couldn't find it. Unfortunately Primal only sells the ENTIRE set for $22 bucks. Needless to say I will look some more before I order it.
Tomorrow I will be reinstalling the brand new air filter as it arrived today. Then will go wheels and tires and first start! Whoot whoot!
 
Back
Top
AdBlock Detected

We get it, advertisements are annoying!

Sure, ad-blocking software does a great job at blocking ads, but it also blocks useful features of our website. For the best site experience please disable your AdBlocker.

I've Disabled AdBlock    No Thanks