- Messages
- 13,208
- Reaction score
- 22,962
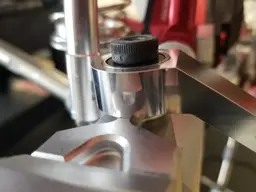
Those links make the sway bars look wimpy lol. Sure is coming along nicely ??


Follow along with the video below to see how to install our site as a web app on your home screen.
Note: This feature may not be available in some browsers.


") can see why it costs what it dose?
can see why it costs what it dose?I pick heavy things up and put them down....?I'm still wondering how you get it in the workbench ??
Not a silly question considering its weight and size. If I already have it on its "stand" (the foldable stool) I am able to pick it straight up by the stool and put it on the work bench. Mind you it is a lil sketchy doing it like that. If its not on its stand yet, I place the stand on the bench and then myself and a second person pick it up by its axles and put it on the stand. I much prefer this method as its easier and I don't have the risk of dropping it. Its so big, plus the weight, it makes it awkward to do by yourself.I'm still wondering how you get it in the workbench ??
For sure! Everything on this truck is very well made. I have been into RC and real custom cars for a long time...this thing speaks volumes to the time they took to design and manufacture it. The CNC work and castings are immaculate. All the aftermarket stuff from JS Performance has been beautiful amazing quality as well. No complaints at all!the parts look very well made.
I used the Snappy Rc kit along with the Full Force kit. This is what you need for the Full Force kit.When you installed the full force gas line kit was the holes in the tank plug to big for the kit brass fittings ?
Sounds like a good thing to try. I didnt fool with my stock gasket/plug...I went straight to the Snappy. As long as it all seals up well..should be good!I see what's going on now , I'm gunna slip a piece of hose over the brass fitting , like it says on the add you sent me , I thought of that already , but didn't want to Jimmy anything , I'll get a little straight brass connecter to attach vent hose , and do the same piece of hose thing there also
Register and gain access to Discussions, Reviews, Tech Tips, How to Articles, and much more - on the largest Large Scale RC community for RC enthusiasts that covers all aspects of the Large Scale RC!
Register Today It's free! This box will disappear once registered!